I’ve been experimenting with candy-inspired cookies for years, and nothing has captured my attention quite like Kit Kat cookies. These delightful treats combine the beloved crunch of wafer bars with the comfort of homemade cookies, creating something truly spectacular. When I first discovered this recipe concept, I knew I had to perfect it for fellow baking enthusiasts who crave that perfect balance of chocolate and crunch.
The beauty of Kit Kat cookies lies in their versatility and the nostalgic joy they bring. Whether you’re baking for a special occasion, satisfying a midnight craving, or looking to impress guests, these cookies deliver on every front. I’ve refined this recipe through countless batches, adjusting sweetness levels, texture combinations, and baking techniques to achieve what I consider the perfect Kit Kat cookie.
Understanding Kit Kat Cookie Fundamentals
Base Cookie Dough : The foundation typically consists of butter, sugars, eggs, flour, and cocoa powder, creating a rich chocolate cookie base that complements the Kit Kat pieces.
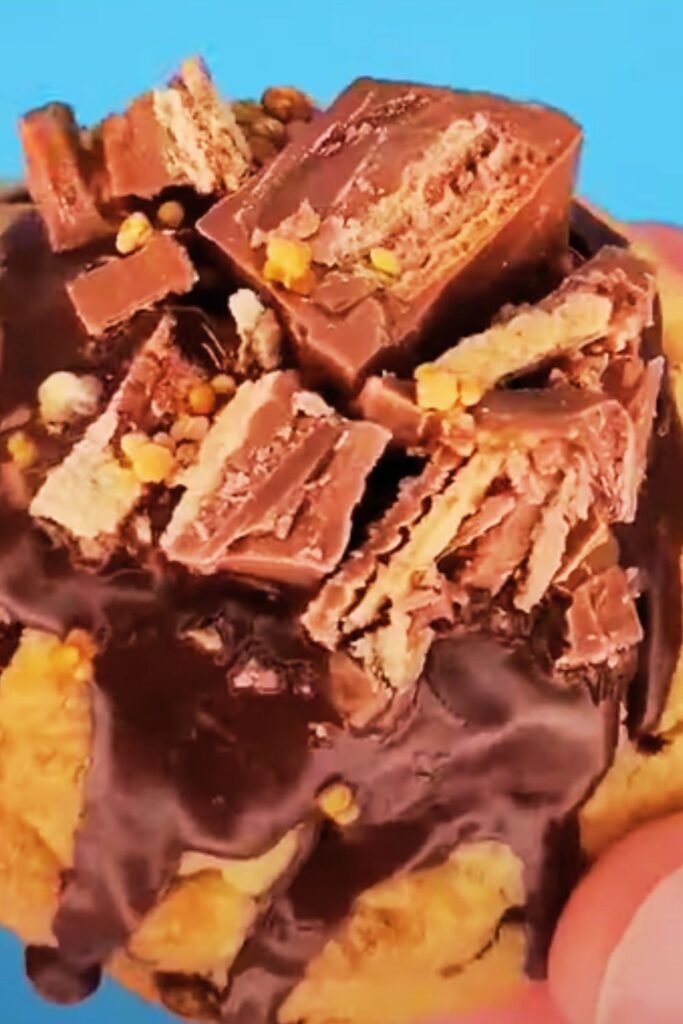
Kit Kat Integration : The candy bars are chopped into various sizes and incorporated both into the dough and as toppings, providing textural contrast and concentrated chocolate-wafer flavor.
Texture Profile : Successfully executed Kit Kat cookies achieve a tender, slightly chewy interior with crispy edges and delightful crunchy surprises from the candy pieces.
Flavor Balance : The recipe must harmonize the cookie’s chocolate base with the Kit Kat’s milk chocolate and wafer notes without overwhelming either component.
Essential Ingredients and Quality Considerations
My experience has taught me that ingredient quality directly impacts the final result. I always emphasize using premium components when possible, as they elevate these cookies from good to extraordinary.
Primary Ingredients Breakdown
| Ingredient | Quantity | Purpose | Quality Tips |
|---|---|---|---|
| All-purpose flour | 2¼ cups | Structure foundation | Use unbleached for better flavor |
| Cocoa powder | ¼ cup | Chocolate base flavor | Dutch-processed preferred |
| Butter | 1 cup (2 sticks) | Fat, flavor, texture | European-style for richness |
| Brown sugar | ¾ cup | Moisture, molasses notes | Dark brown for deeper flavor |
| Granulated sugar | ½ cup | Sweetness, structure | Fine granulation works best |
| Large eggs | 2 | Binding, moisture | Room temperature essential |
| Vanilla extract | 2 teaspoons | Flavor enhancement | Pure vanilla only |
| Baking soda | 1 teaspoon | Leavening agent | Check freshness date |
| Salt | ½ teaspoon | Flavor amplification | Sea salt preferred |
| Kit Kat bars | 8-10 bars | Star ingredient | Full-size bars, not minis |
Kit Kat Selection and Preparation
I’ve experimented with various Kit Kat types and sizes, and my findings consistently point to regular full-size bars as the optimal choice. The mini versions don’t provide enough substantial pieces, while king-size bars can overwhelm the cookie balance.
Chopping Technique: I recommend using a sharp knife to cut Kit Kats into irregular chunks ranging from pea-sized pieces to larger quarter-sized chunks. This variety ensures every bite offers different textural experiences.
Temperature Consideration: Slightly chilled Kit Kat bars chop more cleanly and maintain their shape better during mixing and baking.
Step-by-Step Baking Process
My refined technique has evolved through numerous iterations, and I’ve discovered that attention to detail during each phase dramatically affects the outcome.
Preparation Phase
- Oven preheating: Set temperature to 350°F (175°C) and position racks in upper and lower thirds
- Pan preparation: Line baking sheets with parchment paper or silicone mats
- Ingredient temperature: Ensure butter and eggs reach room temperature naturally
- Kit Kat preparation: Chop bars as described above, reserving some pieces for topping
Mixing Methodology
My mixing approach prioritizes proper incorporation while preventing overmixing, which can lead to tough cookies.
Creaming Stage: I cream butter with both sugars for exactly 3-4 minutes until the mixture becomes light and noticeably fluffy. This step incorporates air and creates the foundation for proper texture.
Egg Integration: Adding eggs one at a time, followed by vanilla, ensures proper emulsification. I mix just until combined after each addition.
Dry Ingredient Addition: I whisk flour, cocoa powder, baking soda, and salt separately before gradually incorporating into the wet mixture. This prevents pockets of unmixed flour.
Kit Kat Folding: Using a wooden spoon or spatula, I gently fold in about ¾ of the chopped Kit Kat pieces, reserving the remainder for pressing into cookie tops.
Baking Techniques and Temperature Control
Temperature management separates good Kit Kat cookies from exceptional ones. I’ve learned that slight variations in oven temperature and timing can dramatically alter the final texture.
Optimal Baking Parameters
| Factor | Specification | Reasoning |
|---|---|---|
| Oven temperature | 350°F (175°C) | Balanced browning without burning chocolate |
| Baking time | 9-11 minutes | Prevents overbaking while ensuring proper set |
| Cookie size | 2 tablespoons dough | Consistent cooking, optimal texture ratio |
| Pan spacing | 2 inches apart | Allows proper spreading without merging |
| Cooling time | 5 minutes on pan | Prevents breaking while maintaining chewiness |
Visual Doneness Indicators
I’ve learned to identify perfect doneness through visual cues rather than relying solely on timers. Properly baked Kit Kat cookies exhibit slightly set edges with centers that appear just barely underbaked. The Kit Kat pieces should be softened but not completely melted.
Advanced Variations and Customizations
After mastering the basic recipe, I’ve developed several variations that cater to different preferences and dietary needs.

Flavor Profile Modifications
Double Chocolate Version: I add an extra 2 tablespoons of cocoa powder and include dark chocolate chips alongside Kit Kat pieces for intense chocolate lovers.
Salted Caramel Enhancement: A pinch of sea salt sprinkled on top before baking, combined with caramel-filled Kit Kat bars, creates sophisticated flavor complexity.
Mint Variation: Using mint-flavored Kit Kat bars (when available) and adding ½ teaspoon peppermint extract creates refreshing cookies perfect for holidays.
Texture Modifications
Extra Crunchy: I reserve more Kit Kat pieces for pressing into cookie tops and add crushed vanilla wafers to the dough for additional crunch.
Chewy Focus: Reducing baking time by 1-2 minutes and using all brown sugar instead of the granulated/brown sugar combination creates notably chewier cookies.
Storage and Freshness Maintenance
Proper storage has become crucial in my baking routine, especially since these cookies are often made in large batches for sharing.
Storage Solutions Table
| Storage Method | Duration | Container Type | Freshness Tips |
|---|---|---|---|
| Counter storage | 5-7 days | Airtight container | Layer with parchment |
| Refrigerator | 2 weeks | Sealed container | Bring to room temp before serving |
| Freezer | 3 months | Freezer bags | Double wrap for protection |
| Dough freezing | 6 months | Portion and freeze | Bake directly from frozen, add 1-2 minutes |
Freshness Preservation Tips
I’ve discovered that placing a slice of bread in the storage container helps maintain moisture levels without making cookies soggy. The bread absorbs excess moisture while releasing just enough to keep cookies tender.
For longer storage, I individually wrap cookies in plastic wrap before placing them in freezer bags. This prevents freezer burn and allows for easy portion control when serving.
Troubleshooting Common Issues
Through my extensive baking experience, I’ve encountered and solved various problems that commonly arise with Kit Kat cookies.
Spreading Problems: Excessive spreading usually indicates butter that’s too warm or insufficient flour. I combat this by chilling dough for 30 minutes before baking.
Kit Kat Melting: When candy pieces melt completely, the oven temperature is typically too high, or baking time is excessive. Reducing temperature by 25°F often resolves this issue.
Dry Texture: Overbaking or insufficient fat content causes dryness. I’ve learned to slightly underbake for optimal moisture retention.
Uneven Browning: This usually stems from uneven oven temperatures or overcrowded baking sheets. Rotating pans halfway through baking ensures even results.
Serving Suggestions and Presentation
Presentation elevates these cookies from simple treats to impressive desserts. I’ve developed several serving strategies that highlight their unique character.
Warm Service: Serving cookies slightly warm enhances the Kit Kat chocolate flavor and creates appealing textural contrast.
Ice Cream Pairing: Vanilla ice cream provides an excellent temperature and flavor contrast, while chocolate ice cream creates indulgent richness.
Milk Combinations: Cold milk remains the classic pairing, but I’ve found that chocolate milk amplifies the cookie’s chocolate notes beautifully.
Coffee Accompaniment: The cookies pair exceptionally well with coffee, as the bitter notes complement the sweet chocolate elements.
Nutritional Considerations and Modifications
Understanding the nutritional profile helps in making informed decisions about portion sizes and modifications.
Nutritional Breakdown (Per Cookie)
| Nutrient | Amount | Daily Value % |
|---|---|---|
| Calories | 185 | 9% |
| Total Fat | 8g | 12% |
| Saturated Fat | 5g | 25% |
| Cholesterol | 25mg | 8% |
| Sodium | 95mg | 4% |
| Carbohydrates | 28g | 10% |
| Sugars | 18g | – |
| Protein | 3g | 6% |
Healthier Modification Options
Reduced Sugar: I’ve successfully reduced sugar by up to 25% without significantly impacting texture, though flavor becomes less sweet.
Whole Grain Integration: Substituting up to half the all-purpose flour with whole wheat pastry flour adds fiber while maintaining acceptable texture.
Portion Control: Making smaller cookies using 1 tablespoon portions reduces calories while maintaining satisfaction.
Questions and Answers
Q: Can I use different candy bars instead of Kit Kat? I’ve experimented with various candy bars, and while other options work, they create different flavor profiles. Twix bars provide caramel notes, while Crunch bars add more texture. However, Kit Kat’s unique wafer-chocolate combination remains unmatched for this specific recipe.
Q: Why do my cookies spread too much during baking? Excessive spreading typically results from butter that’s too warm, insufficient flour, or oven temperature that’s too low. I recommend chilling your dough for 30 minutes before baking and ensuring your oven reaches the proper temperature before inserting cookies.
Q: How do I prevent Kit Kat pieces from sinking to the bottom? Tossing chopped Kit Kat pieces in a light coating of flour before folding them into the dough helps them stay suspended throughout the cookie. Additionally, pressing some pieces into the tops ensures visible candy in every cookie.
Q: Can I make these cookies gluten-free? I’ve successfully adapted this recipe using a 1:1 gluten-free flour blend, though the texture becomes slightly more delicate. Adding an extra ¼ teaspoon of xanthan gum (if not included in your flour blend) helps maintain structure.
Q: What’s the best way to achieve consistent cookie sizes? I use a cookie scoop or measuring spoons to portion dough consistently. A #40 scoop (about 1.5 tablespoons) creates uniform cookies that bake evenly. Weighing portions on a kitchen scale provides the most precision.
Q: How can I tell when the cookies are perfectly done? The edges should appear set and slightly darker, while centers look just barely underbaked. The cookies will continue cooking on the hot pan after removal from the oven, so slightly underbaking prevents dryness.
Q: Can I freeze the baked cookies? Absolutely! I freeze baked cookies regularly. Wrap them individually in plastic wrap, then store in freezer bags for up to three months. They thaw quickly at room temperature and taste freshly baked.
Q: What causes my cookies to be too hard? Overbaking is the primary culprit for hard cookies. Reducing baking time by 1-2 minutes and removing cookies when they still appear slightly soft in the center usually resolves this issue.
These Kit Kat cookies represent the perfect fusion of nostalgic candy flavors with classic cookie comfort. Through careful attention to ingredient quality, proper technique, and understanding of baking science, anyone can create these delightful treats. The combination of chocolate cookie base with crunchy Kit Kat pieces creates an irresistible texture that appeals to both children and adults.
My journey with this recipe has taught me that baking success comes from understanding each component’s role and how they interact during the baking process. Whether you’re making these for a special occasion or simply satisfying a chocolate craving, the techniques and tips I’ve shared will help you achieve consistently excellent results.
The versatility of this recipe allows for endless creativity while maintaining the core appeal that makes Kit Kat cookies so special. From storage strategies to troubleshooting common issues, mastering these details ensures that every batch delivers the perfect balance of chocolate, crunch, and comfort that defines exceptional Kit Kat cookies.