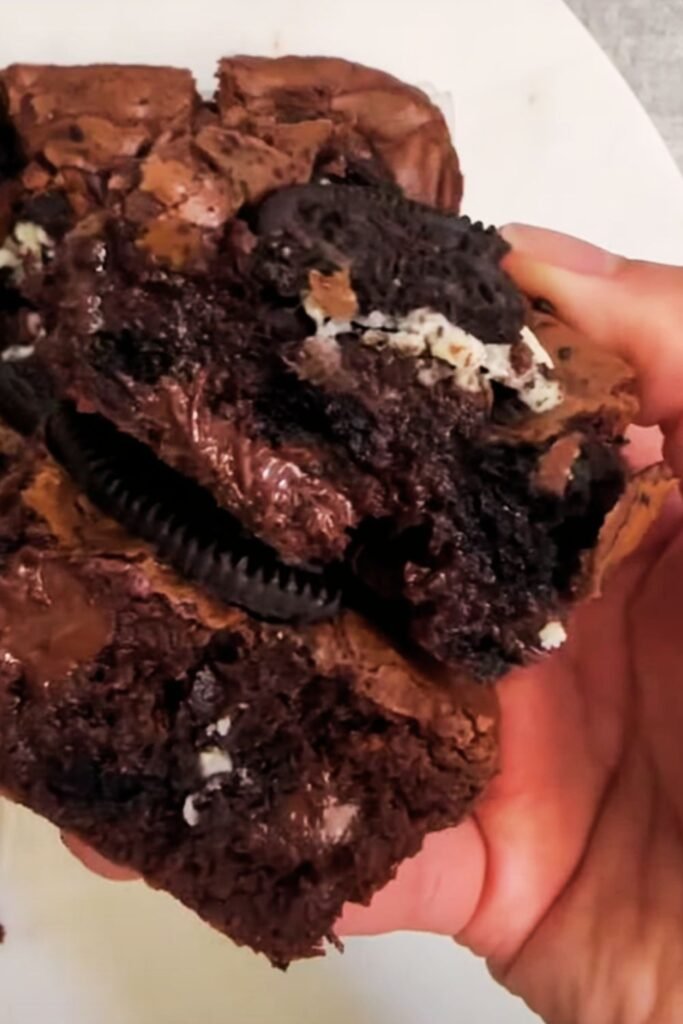
There’s something magical about combining two beloved desserts into one incredible treat. When I first discovered the concept of stuffing Oreo cookies into brownies and topping them with Oreo vanilla frosting, I knew I had found my new favorite indulgence. These aren’t just ordinary brownies – they’re a triple-layer chocolate and cream experience that transforms a simple dessert into something extraordinary.
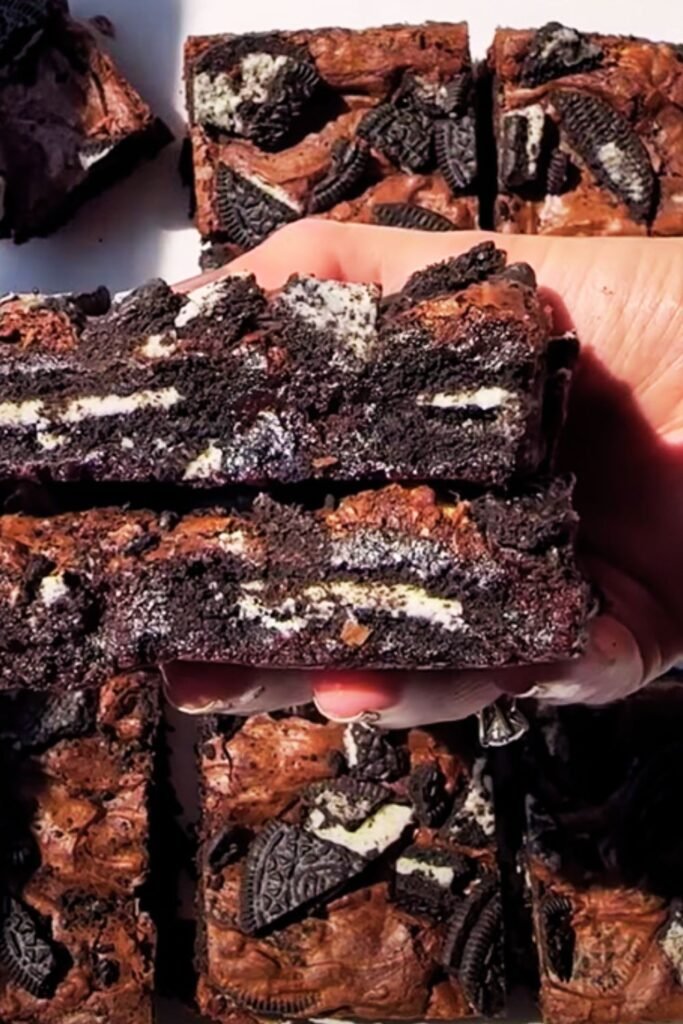
The beauty of these Oreo stuffed brownies lies in their perfect balance of textures and flavors. You get the fudgy richness of homemade brownies, the satisfying crunch of whole Oreo cookies baked right inside, and a creamy vanilla frosting studded with even more crushed Oreos. It’s like having a brownie, cookie, and frosted cake all in one delicious bite.
I’ve been perfecting this recipe for years, and what started as a simple experiment has become my go-to dessert for special occasions, potluck dinners, and those moments when only the most decadent chocolate treat will do. The best part? Despite looking incredibly sophisticated, these brownies are surprisingly straightforward to make.
Understanding Your Ingredients
Brownie Base: The foundation requires high-quality cocoa powder and melted chocolate to create that deep, rich flavor profile I’m after.
Oreo Cookies: I use regular Oreo cookies for stuffing, though you can experiment with different varieties like Double Stuf or Golden Oreos for unique twists.
Vanilla Frosting: A cream cheese and butter base provides the perfect canvas for incorporating crushed Oreos, creating a cookies-and-cream flavor explosion.
Eggs: Room temperature eggs incorporate more easily and create a better texture in the final brownies.
Flour: All-purpose flour provides structure without making the brownies too cake-like.
Essential Equipment and Preparation
Before diving into the baking process, I always make sure my workspace is properly set up. You’ll need a 9×13 inch baking pan, which I prefer to line with parchment paper for easy removal. A stand mixer or hand mixer is essential for the frosting, though you can make the brownie batter by hand if needed.

Temperature control is crucial for success. I preheat my oven to 350°F (175°C) and ensure all ingredients are at room temperature before beginning. This might seem like a small detail, but it makes a significant difference in how everything combines and bakes.
The Ultimate Oreo Stuffed Brownies Recipe
Ingredients
| Brownie Layer | Quantity | Notes |
|---|---|---|
| Unsalted butter | 1 cup (2 sticks) | Room temperature |
| Granulated sugar | 1½ cups | White sugar works best |
| Large eggs | 4 | Room temperature |
| Vanilla extract | 2 teaspoons | Pure vanilla preferred |
| Unsweetened cocoa powder | ¾ cup | Dutch-processed recommended |
| All-purpose flour | 1 cup | Sifted for best results |
| Salt | ½ teaspoon | Enhances chocolate flavor |
| Semi-sweet chocolate chips | ½ cup | Optional but recommended |
| Regular Oreo cookies | 20-24 cookies | For stuffing |
| Oreo Vanilla Frosting | Quantity | Notes |
|---|---|---|
| Cream cheese | 8 oz | Room temperature |
| Unsalted butter | ½ cup | Room temperature |
| Powdered sugar | 4 cups | Sifted |
| Vanilla extract | 2 teaspoons | Pure vanilla |
| Heavy cream | 2-3 tablespoons | As needed for consistency |
| Crushed Oreo cookies | 1 cup | Coarsely crushed |
Step-by-Step Instructions
Preparing the Brownie Base
I start by melting the butter in a large microwave-safe bowl, heating it in 30-second intervals until completely melted. Once cooled slightly, I whisk in the granulated sugar until well combined. The mixture should look smooth and glossy at this point.
Next, I add the eggs one at a time, beating well after each addition. This gradual incorporation prevents the eggs from scrambling and ensures a smooth batter. The vanilla extract goes in next, followed by the dry ingredients.
In a separate bowl, I whisk together the cocoa powder, flour, and salt. This step helps eliminate any lumps and ensures even distribution. I then gradually fold the dry ingredients into the wet mixture, being careful not to overmix. Overmixing can lead to tough, chewy brownies instead of the fudgy texture we’re aiming for.
Assembly and Baking Process
Here’s where the magic happens. I spread half of the brownie batter into my prepared 9×13 inch pan, creating an even layer. Then comes the fun part – arranging the Oreo cookies in a single layer over the batter. I typically use about 20-24 cookies, depending on how densely packed I want them.
The remaining brownie batter gets carefully spread over the Oreos. This can be a bit tricky since the cookies create an uneven surface, but I’ve found that dropping spoonfuls of batter randomly across the surface and then gently spreading works best. Don’t worry if some cookie edges peek through – it adds to the rustic charm.
Into the oven they go for 35-40 minutes. I check for doneness by inserting a toothpick into a brownie-only section (avoiding the cookies). It should come out with a few moist crumbs attached. Remember, these will continue cooking slightly as they cool, so slightly underbaked is better than overdone.
Creating the Perfect Oreo Vanilla Frosting
While the brownies cool completely, I prepare the frosting. Room temperature cream cheese and butter are absolutely essential here – cold ingredients will result in a lumpy frosting that’s difficult to spread smoothly.
I beat the cream cheese and butter together until light and fluffy, about 3-4 minutes with a stand mixer. Gradually, I add the powdered sugar, one cup at a time, beating well after each addition. The vanilla extract goes in next, followed by enough heavy cream to achieve the perfect spreading consistency.
The final step is folding in the crushed Oreos. I prefer to crush them coarsely – some fine crumbs mixed with chunkier pieces create the best texture contrast in the finished frosting.
Advanced Techniques and Variations
Texture Optimization Tips
Over the years, I’ve discovered several techniques that elevate these brownies from good to absolutely incredible. First, I always use a combination of melted butter and oil. While the recipe above uses all butter for simplicity, substituting ¼ cup of the butter with vegetable oil creates an even fudgier texture.
Temperature Control: I’ve learned that slightly underbaking is key. The residual heat continues the cooking process, and you’ll end up with perfectly fudgy brownies rather than cake-like ones.
Cooling Strategy: I let the brownies cool in the pan for exactly 2 hours before frosting. This prevents the frosting from melting while ensuring the brownies are set enough to support the weight of the frosting layer.
Creative Variations
| Variation | Modification | Expected Result |
|---|---|---|
| Double Chocolate | Add chocolate chips to batter | Extra chocolate intensity |
| Mint Oreo | Use mint Oreos instead of regular | Refreshing chocolate-mint flavor |
| Peanut Butter Twist | Add PB to frosting | Cookies and cream meets PB |
| Salted Caramel | Drizzle caramel over frosting | Sweet and salty combination |
| Espresso Enhanced | Add 1 tsp instant coffee to batter | Deeper chocolate flavor |
Nutritional Information and Serving Guidelines
Understanding the nutritional content helps with portion planning and dietary considerations. These brownies are definitely an indulgent treat, but knowing the numbers helps you enjoy them mindfully.
| Nutritional Content | Per Serving | % Daily Value |
|---|---|---|
| Calories | 485 | 24% |
| Total Fat | 22g | 34% |
| Saturated Fat | 13g | 65% |
| Cholesterol | 85mg | 28% |
| Sodium | 220mg | 9% |
| Total Carbohydrates | 72g | 24% |
| Dietary Fiber | 3g | 12% |
| Sugars | 58g | – |
| Protein | 6g | 12% |
Based on 16 servings per 9×13 pan
Storage and Serving Recommendations
These brownies actually improve with time. I store them covered in the refrigerator for up to one week, and they maintain their perfect texture throughout. The frosting firms up slightly when chilled, making them easier to cut into clean squares.
For serving, I recommend removing them from the refrigerator about 30 minutes before serving to allow the frosting to soften slightly. This creates the perfect balance – firm enough to hold its shape but soft enough to bite through easily.
Serving Suggestions:
- Pair with cold milk for the classic combination
- Serve alongside fresh strawberries for a fruity contrast
- Accompany with vanilla ice cream for an extra indulgent dessert
- Cut into smaller squares for party platters
- Package individually for lunch box treats
Troubleshooting Common Issues
Problem-Solution Matrix
| Issue | Cause | Solution |
|---|---|---|
| Dry, crumbly brownies | Overbaking or too much flour | Reduce baking time, measure flour accurately |
| Frosting too runny | Ingredients too warm | Chill mixture, then re-whip |
| Frosting too stiff | Too much powdered sugar | Add cream gradually until smooth |
| Uneven baking | Oven hot spots | Rotate pan halfway through baking |
| Brownies stick to pan | Inadequate greasing | Use parchment paper plus cooking spray |
Professional Tips for Success
I’ve learned that the key to consistent results lies in attention to detail. Always measure ingredients by weight when possible – flour can vary significantly in cup measurements depending on how it’s packed. I use a kitchen scale for the most accurate results.
Oven temperatures can vary by 25-50 degrees from the displayed temperature. I always use an oven thermometer to ensure accuracy, especially for baking projects like this where precise temperature control affects the final texture.
Seasonal Adaptations and Holiday Versions
These brownies adapt beautifully to different seasons and holidays. For Halloween, I use orange-colored Oreos and add orange food coloring to the frosting. Christmas versions get crushed candy canes mixed into the frosting along with the Oreos.
During summer months, I sometimes chill the finished brownies for 4-6 hours before serving, creating an almost ice-cream-like texture that’s incredibly refreshing. The contrast between the cold, firm brownie and the creamy frosting is absolutely divine.
Questions and Answers
Q. Can I make these brownies ahead of time for a party? Absolutely! These brownies actually taste better after sitting for a day or two. I make them up to three days in advance, store them covered in the refrigerator, and bring them to room temperature about 30 minutes before serving. The flavors meld beautifully, and the texture becomes even more fudgy.
Q. What’s the best way to cut clean squares? I use a sharp knife dipped in warm water and wiped clean between each cut. The warm blade glides through the frosting without dragging, creating professional-looking squares. For extra precision, I mark the cutting lines with a toothpick before making the actual cuts.
Q. Can I freeze these brownies? Yes, but I recommend freezing them before adding the frosting. Wrap the cooled brownies tightly in plastic wrap, then aluminum foil, and freeze for up to three months. Thaw completely before frosting. The frosting doesn’t freeze as well due to the cream cheese content.
Q. How do I prevent the Oreos from sinking to the bottom? The key is using a thick enough brownie batter as your base layer. I spread about 60% of the batter on the bottom, place the cookies, then cover with the remaining 40%. The cookies should be just barely covered – they’ll stay suspended in the batter during baking.
Q. Can I use different types of Oreos? Definitely! I’ve experimented with Golden Oreos, Double Stuf, and even seasonal flavors like mint or pumpkin spice. Each creates a unique twist on the classic recipe. Just keep in mind that different Oreo varieties may have slightly different moisture contents, which could affect baking time by a minute or two.
Q. Why does my frosting sometimes turn out grainy? Grainy frosting usually results from powdered sugar that hasn’t been properly incorporated or cream cheese that’s too cold. I always sift my powdered sugar and make sure my cream cheese and butter are truly at room temperature – they should give slightly when pressed but not be soft or melting.
Q. How can I make these brownies less sweet? I sometimes reduce the granulated sugar in the brownie base by ¼ cup and use dark chocolate chips instead of semi-sweet. For the frosting, using less powdered sugar and adding a pinch of salt helps balance the sweetness. The cream cheese already provides some tang that cuts through the sugar.
Q. What if I don’t have cream cheese for the frosting? While cream cheese creates the best texture and flavor, you can substitute with an equal amount of mascarpone cheese or even thick Greek yogurt in a pinch. The texture will be slightly different, but still delicious. For a completely different approach, try a simple chocolate ganache instead of the Oreo frosting.
These Oreo stuffed brownies with Oreo vanilla frosting represent everything I love about baking – the combination of familiar flavors in an unexpected way, the satisfaction of creating something that looks professionally made, and the joy of sharing an indulgent treat that brings smiles to everyone who tries it. Whether you’re baking for a special occasion or just because you deserve something wonderful, this recipe delivers every single time.