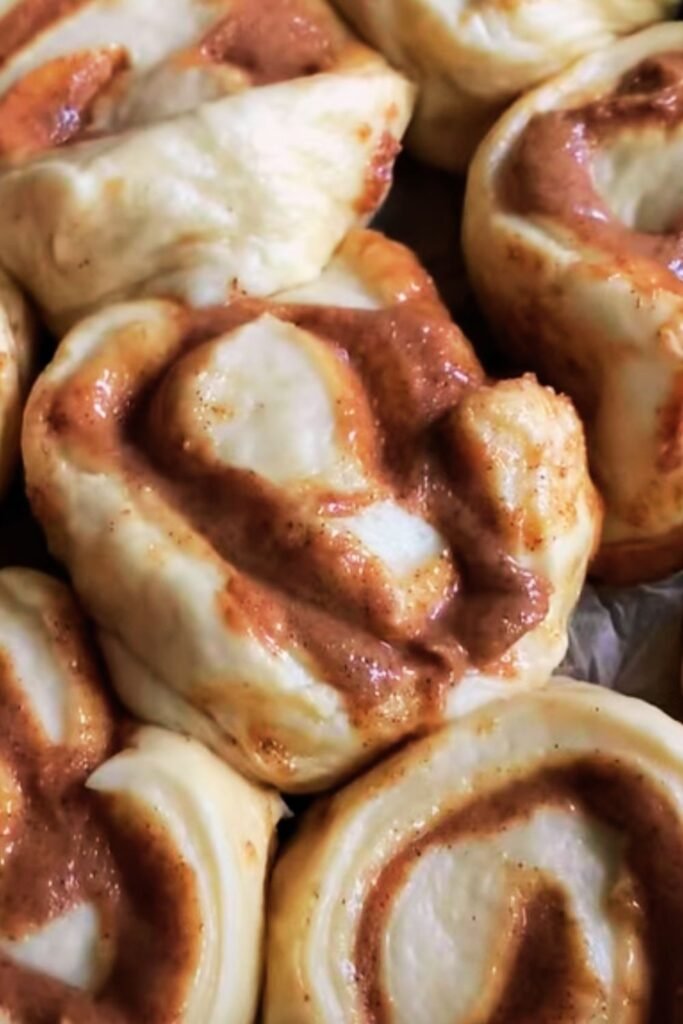
When I first discovered Biscoff spread, my world changed forever. That creamy, caramelized cookie butter with its distinctive spiced flavor opened up endless possibilities in my kitchen. Among all the delicious creations I’ve made, these Biscoff Cinnamon Rolls stand out as pure perfection. They combine the beloved comfort of classic cinnamon rolls with the irresistible taste of Biscoff cookies, creating a breakfast treat that’s nothing short of extraordinary.
I’ve spent countless mornings perfecting this recipe, and I can confidently say these rolls will transform your breakfast table into something magical. The soft, pillowy dough swirled with cinnamon-spiced Biscoff filling and topped with a luscious glaze creates an experience that goes beyond ordinary baking.
What Makes Biscoff Cinnamon Rolls Special
Biscoff Spread : A smooth, spreadable cookie butter made from speculoos cookies, featuring warm spices like cinnamon, nutmeg, and ginger that create a caramelized, almost toffee-like flavor profile.
Enriched Dough : A yeasted dough containing eggs, butter, and milk that creates the characteristic tender, fluffy texture of premium cinnamon rolls.
Compound Filling : A mixture that combines traditional cinnamon-sugar with Biscoff spread, creating layers of flavor that complement rather than compete with each other.
Cream Cheese Glaze : A rich topping that balances the sweetness of the rolls while adding a tangy contrast to the warm spices.
The magic happens when these elements come together. As the rolls bake, the Biscoff spread melts slightly, creating pockets of concentrated flavor throughout each swirl. The result is a cinnamon roll that tastes familiar yet completely unique.
Essential Ingredients and Their Roles
Creating perfect Biscoff Cinnamon Rolls requires understanding how each ingredient contributes to the final product. I’ve learned through experience that quality ingredients make a noticeable difference.
| Ingredient | Quantity | Purpose | Quality Tips |
|---|---|---|---|
| Bread Flour | 4 cups | Provides structure and chewiness | Higher protein content creates better texture |
| Active Dry Yeast | 2¼ teaspoons | Leavening agent for rise | Check expiration date; proof before using |
| Whole Milk | 1 cup | Tenderizes dough, adds richness | Room temperature works best for yeast activation |
| Unsalted Butter | 6 tablespoons | Flavor and texture enhancement | European-style butter adds richness |
| Large Eggs | 2 | Structure and moisture | Room temperature incorporates better |
| Granulated Sugar | ⅓ cup | Feeds yeast, adds sweetness | Regular granulated works perfectly |
| Salt | 1 teaspoon | Flavor enhancement and gluten development | Fine sea salt preferred |
| Biscoff Spread | ¾ cup | Primary flavoring agent | Creamy variety spreads easier than crunchy |
| Brown Sugar | 1 cup packed | Caramel notes in filling | Dark brown sugar intensifies flavor |
| Ground Cinnamon | 2 tablespoons | Classic warming spice | Ceylon cinnamon offers more complex flavor |
| Cream Cheese | 4 oz | Glaze base | Full-fat creates smoothest texture |
| Powdered Sugar | 1½ cups | Glaze sweetener and thickness | Sift to prevent lumps |
| Vanilla Extract | 2 teaspoons | Flavor enhancer | Pure vanilla makes a difference |
The quality of your Biscoff spread significantly impacts the final result. I always use the original smooth variety because it distributes more evenly than the crunchy version. If you can only find crunchy Biscoff, you can warm it slightly to make spreading easier.
Step-by-Step Preparation Method
Preparing the Dough
I start by warming the milk to about 110°F – it should feel barely warm to the touch. Too hot will kill the yeast, while too cool won’t activate it properly. I dissolve the yeast in the warm milk with a pinch of sugar and let it sit for 5-10 minutes until it becomes foamy. This proofing step ensures your yeast is active and will give you the rise you need.
In my stand mixer bowl, I combine the flour, remaining sugar, and salt. I create a well in the center and add the proofed yeast mixture, melted butter, and beaten eggs. Using the dough hook, I mix on low speed until the ingredients come together, then increase to medium speed for 8-10 minutes until the dough becomes smooth and elastic.
The dough should be slightly sticky but not wet. If it’s too sticky, I add flour one tablespoon at a time. If it’s too dry, I add milk one teaspoon at a time. The texture should be soft and supple when properly mixed.
First Rise
I place the dough in a greased bowl, turning it to coat all sides. Covering with a damp towel, I let it rise in a warm, draft-free location for 1-2 hours until doubled in size. My favorite spot is inside my oven with just the light on – it creates the perfect warm environment.
Creating the Filling
While the dough rises, I prepare the filling by combining the packed brown sugar and cinnamon in a bowl. I also soften the Biscoff spread slightly by microwaving it for 15-20 seconds, which makes it much easier to spread evenly across the dough.
Rolling and Filling
Once the dough has doubled, I punch it down gently and turn it onto a lightly floured surface. Using a rolling pin, I roll it into a 16×12-inch rectangle, keeping the edges as straight as possible.
I spread the softened Biscoff spread evenly across the entire surface, leaving a ½-inch border along one long edge. Then I sprinkle the cinnamon-sugar mixture over the Biscoff spread, pressing it lightly to help it adhere.
Starting from the long edge opposite the border, I roll the dough tightly into a log. I pinch the seam to seal it, then use a sharp knife or dental floss to cut the log into 12 equal pieces.
Second Rise and Baking
I arrange the cut rolls in a greased 9×13-inch baking dish, spacing them evenly. They should just touch each other. I cover them with a towel and let them rise for another 45-60 minutes until they’ve expanded and are touching.
I preheat my oven to 350°F during the last 15 minutes of rising. Once risen, I bake the rolls for 25-30 minutes until they’re golden brown on top and spring back lightly when touched.
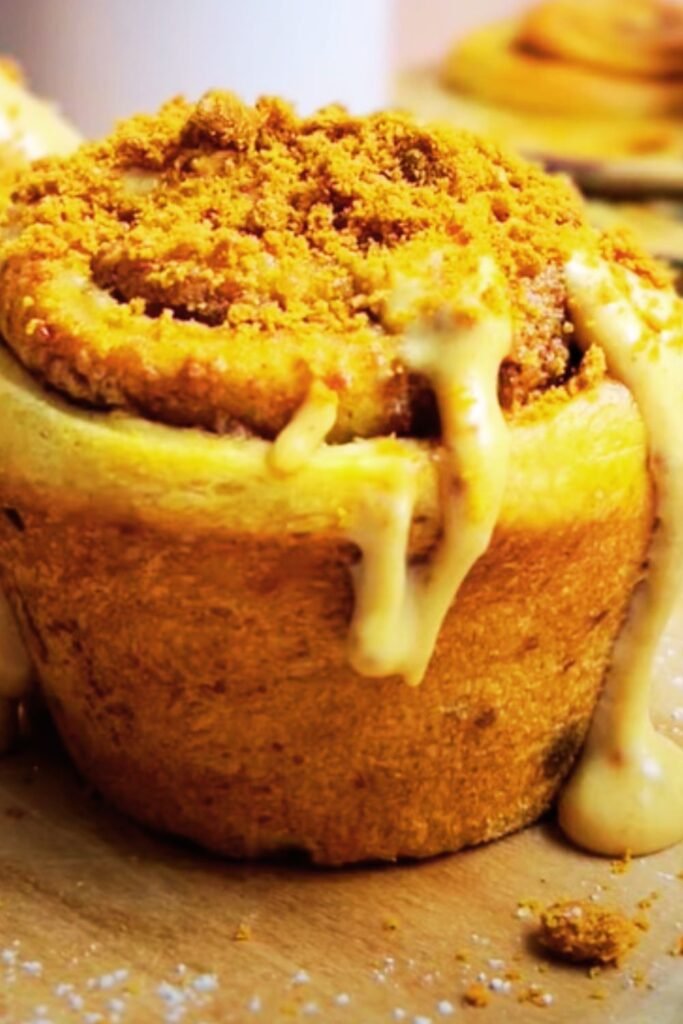
Perfecting the Biscoff Cream Cheese Glaze
The glaze elevates these rolls from good to extraordinary. I bring cream cheese to room temperature before starting – cold cream cheese creates lumps that are difficult to smooth out.
| Glaze Component | Amount | Technique |
|---|---|---|
| Cream Cheese | 4 oz, room temperature | Beat until completely smooth |
| Butter | 3 tablespoons, softened | Cream with cream cheese |
| Powdered Sugar | 1½ cups, sifted | Add gradually to prevent lumps |
| Biscoff Spread | 3 tablespoons, warmed | Incorporate for flavor and color |
| Vanilla Extract | 1 teaspoon | Add last for best flavor |
| Milk | 2-4 tablespoons | Adjust consistency as needed |
I beat the cream cheese and butter together until light and fluffy, about 3 minutes. Gradually adding the sifted powdered sugar, I beat until smooth. The warmed Biscoff spread incorporates easily and gives the glaze a beautiful caramel color. Finally, I add vanilla and enough milk to reach a pourable but not too thin consistency.
Advanced Techniques for Perfect Results
Temperature Control
Temperature management is crucial throughout this process. I use an instant-read thermometer to check milk temperature for yeast activation. During rising, I maintain a consistent 75-80°F environment. For baking, I rely on my oven thermometer since many home ovens run hot or cold.
Make-Ahead Strategies
These rolls work beautifully as a make-ahead breakfast. After the first rise, I can refrigerate the dough overnight, then continue with rolling and filling the next morning. Alternatively, I can prepare the rolls completely, cover them tightly, and refrigerate overnight before the second rise. In the morning, I let them come to room temperature and rise before baking.
For longer storage, I freeze the unbaked rolls after cutting. I place them on a baking sheet to freeze individually, then transfer to freezer bags. When ready to bake, I thaw them overnight in the refrigerator, let them rise, and bake as normal.
Troubleshooting Common Issues
Dense Rolls: Usually caused by over-flouring, inactive yeast, or insufficient rising time. I always check my yeast expiration date and proof it before using.
Uneven Baking: Often results from uneven roll sizes or oven hot spots. I rotate my pan halfway through baking and try to cut rolls as evenly as possible.
Filling Leakage: This happens when the dough is rolled too loosely or the seam isn’t properly sealed. I make sure to roll tightly and pinch the seam firmly.
Tough Texture: Over-mixing or too much flour creates tough rolls. I mix just until the dough is smooth and elastic, no longer.
Nutritional Information and Dietary Considerations

| Nutritional Aspect | Per Roll (1 of 12) | Daily Value % |
|---|---|---|
| Calories | 385 | 19% |
| Total Fat | 12g | 15% |
| Saturated Fat | 7g | 35% |
| Cholesterol | 55mg | 18% |
| Sodium | 295mg | 13% |
| Total Carbohydrates | 65g | 24% |
| Dietary Fiber | 2g | 7% |
| Sugars | 32g | – |
| Protein | 7g | 14% |
| Calcium | 85mg | 6% |
| Iron | 2.1mg | 12% |
While these rolls are definitely an indulgent treat, they do provide some nutritional value. The enriched flour contributes B vitamins and iron, while the dairy components add calcium and protein. The eggs provide complete protein and various vitamins.
For those with dietary restrictions, I’ve successfully made modifications. Dairy-free versions work well using plant-based milk and vegan butter substitutes, though the texture is slightly different. Gluten-free versions require a different approach entirely, using a gluten-free flour blend and xanthan gum.
Serving Suggestions and Pairings
These Biscoff Cinnamon Rolls shine brightest when served warm from the oven. I like to drizzle the glaze over the warm rolls so it melts slightly into the crevices, creating the perfect balance of temperatures and textures.
For special occasions, I serve them alongside fresh fruit – sliced strawberries or bananas complement the spiced flavors beautifully. A sprinkle of toasted nuts, particularly pecans or walnuts, adds wonderful texture contrast.
Coffee pairings work exceptionally well. The caramelized notes in Biscoff complement medium to dark roast coffees, while the cinnamon pairs beautifully with flavored coffees like hazelnut or vanilla.
For brunch gatherings, I often prepare a variety of toppings: extra Biscoff spread for spreading, fresh whipped cream, and even a sprinkle of sea salt for those who enjoy sweet-salty combinations.
Storage and Reheating Guidelines
Proper storage maintains the rolls’ quality for several days. I store cooled, glazed rolls in an airtight container at room temperature for up to 3 days. For longer storage, I refrigerate them for up to a week or freeze for up to 3 months.
| Storage Method | Duration | Reheating Instructions |
|---|---|---|
| Room Temperature | 3 days | Microwave 15-20 seconds per roll |
| Refrigerated | 1 week | Oven at 300°F for 5-8 minutes |
| Frozen | 3 months | Thaw overnight, then reheat in oven |
Reheating requires gentle warmth to avoid drying out the rolls. I prefer using the oven for the best texture, though microwaving works for quick individual servings.
Seasonal Variations and Creative Adaptations
Throughout the year, I enjoy modifying this base recipe to reflect seasonal flavors. During fall, I add a touch of pumpkin spice to the filling. Winter calls for a hint of orange zest in the glaze. Spring brings fresh lemon zest possibilities, while summer might include a berry compote drizzle.
The Biscoff element adapts well to other cookie butter flavors too. I’ve successfully used peanut butter versions, almond butter varieties, and even Nutella for chocolate lovers.
For special dietary needs, I’ve developed modifications that maintain the essence of these rolls. Sugar substitutes work reasonably well, though they affect the texture slightly. Whole wheat flour can replace up to half the bread flour for added fiber.
Q&A Section
Q: Can I use instant yeast instead of active dry yeast? Yes, absolutely! I use instant yeast frequently because it doesn’t require proofing. Use the same amount, but mix it directly with the dry ingredients. The rise times might be slightly shorter.
Q: What if my Biscoff spread is too thick to spread easily? I warm it in the microwave for 15-20 seconds to soften it. You can also mix in a teaspoon of melted butter to make it more spreadable without affecting the flavor significantly.
Q: How do I know when the dough has risen enough? The dough should double in size and pass the “poke test.” Gently poke the dough with your finger – if the indentation remains and doesn’t spring back quickly, it’s ready.
Q: Can I make these rolls smaller or larger? Definitely! For smaller rolls, cut the log into 15-18 pieces and reduce baking time by 5-8 minutes. For larger rolls, cut into 8-10 pieces and add 5-10 minutes to baking time.
Q: Why do my rolls sometimes turn out lopsided? This usually happens when the dough isn’t rolled evenly or when cutting isn’t done straight down. I use dental floss to cut through the dough cleanly, pulling it straight down without sawing motions.
Q: Can I reduce the sugar content without affecting the texture? You can reduce the sugar in the filling by up to half without major texture changes. However, reducing sugar in the dough affects yeast performance and texture, so I don’t recommend it.
Q: What’s the best way to reheat day-old rolls? I wrap them in slightly damp paper towels and microwave for 15-20 seconds, or reheat in a 300°F oven for 5-8 minutes. This restores moisture and warmth without making them tough.
Q: How can I tell when the rolls are perfectly baked? They should be golden brown on top and spring back lightly when touched. An instant-read thermometer inserted in the center should read 190-200°F.
Q: Can I freeze the dough before the first rise? Yes, though I prefer freezing after shaping. If freezing before the first rise, let the dough thaw completely in the refrigerator overnight, then proceed with the first rise.
Q: What causes the filling to leak out during baking? Usually this happens when the dough is rolled too loosely, the seam isn’t sealed properly, or there’s too much filling. Make sure to roll tightly and seal the seam well.
Creating these Biscoff Cinnamon Rolls has become one of my most treasured baking experiences. The combination of techniques, flavors, and the joy they bring to everyone who tries them makes every step worthwhile. Whether you’re making them for a special occasion or just because you deserve something wonderful, these rolls deliver comfort and indulgence in every bite.
The process might seem involved, but each step builds toward something truly special. Take your time, enjoy the process, and don’t be afraid to make small adjustments based on your preferences. Baking should be joyful, and these rolls embody that joy perfectly.