When I first encountered a potato galette at a small bistro in Lyon, I was immediately captivated by its rustic elegance. This isn’t just another potato dish—it’s a culinary canvas that transforms humble ingredients into something extraordinary. The golden, crispy layers of thinly sliced potatoes arranged in overlapping circles create a visual masterpiece that’s as stunning as it is delicious.
The beauty of a potato galette lies in its simplicity and versatility. Unlike complicated casseroles or fussy gratins, this French-inspired dish requires minimal ingredients but delivers maximum impact. I’ve been perfecting my technique for years, and I’m excited to share everything I’ve learned about creating this show-stopping side dish that’s guaranteed to elevate any meal.
What Exactly Is a Potato Galette?
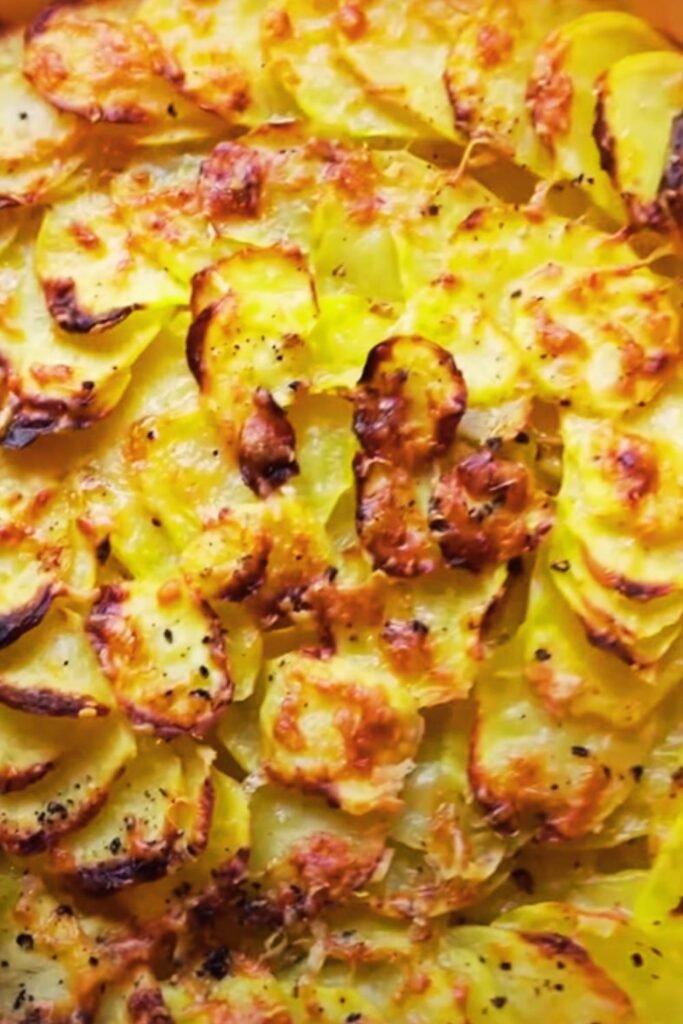
A potato galette is fundamentally a free-form tart featuring thinly sliced potatoes arranged in an overlapping pattern, typically baked until golden and crispy. The term “galette” comes from the French word meaning “flat cake,” and it perfectly describes this rustic dish.
Key Characteristics:
- Texture: Crispy exterior with tender, creamy interior layers
- Appearance: Overlapping circular pattern resembling fish scales or rose petals
- Cooking Method: Baked at high heat to achieve optimal crispness
- Serving Style: Cut into wedges like a pizza or tart
The galette differs from other potato dishes in several important ways. Unlike scalloped potatoes, which are layered in a deep dish with cream, or potato gratin, which typically includes cheese, a classic galette relies on the natural starches in potatoes to create cohesion. This makes it lighter and allows the pure potato flavor to shine through.
Essential Equipment and Ingredients
Equipment You’ll Need
| Equipment | Purpose | Alternative Options |
|---|---|---|
| Mandoline slicer | Creates uniform 1/8-inch slices | Sharp knife with steady hand |
| 10-inch cast iron skillet | Even heat distribution and presentation | Oven-safe skillet or tart pan |
| Large mixing bowl | Combining ingredients | Any large bowl |
| Clean kitchen towels | Removing excess moisture | Paper towels |
| Pastry brush | Applying butter/oil evenly | Spoon for drizzling |
Ingredient Breakdown
Core Ingredients:
- Potatoes (2-3 pounds): Yukon Gold or Russet varieties work best
- Butter (4-6 tablespoons): Unsalted, melted for brushing
- Salt (1-2 teaspoons): Kosher or sea salt for seasoning
- Black pepper (1/2 teaspoon): Freshly ground for best flavor
- Fresh thyme (2-3 sprigs): Optional but highly recommended
Optional Flavor Enhancers:
- Garlic powder or minced fresh garlic
- Rosemary or other hardy herbs
- Parmesan cheese for a richer version
- Onion powder for subtle depth
The Science Behind Perfect Galette
Understanding the science behind potato galettes has revolutionized my cooking approach. Potatoes contain varying amounts of starch, which directly affects the final texture. When heated, these starches gelatinize and create natural binding agents that hold the galette together.
The key is achieving the right balance of moisture and heat. Too much moisture results in a soggy galette, while insufficient moisture leads to dry, separated layers. I’ve discovered that briefly soaking and then thoroughly drying the potato slices creates the perfect foundation.
Step-by-Step Preparation Method
Phase 1: Potato Preparation
I begin by selecting the right potatoes. Yukon Gold potatoes are my preferred choice because they have a perfect balance of starch and moisture. They hold their shape well while developing a creamy texture when cooked.
Detailed Preparation Steps:
- Washing and Peeling: Scrub potatoes thoroughly under cold running water. Peel completely using a vegetable peeler, ensuring no eyes or blemishes remain.
- Slicing Technique: Using a mandoline set to 1/8-inch thickness, slice potatoes into uniform rounds. Consistency is crucial—uneven slices will cook at different rates.
- Soaking Process: Place sliced potatoes in a large bowl of cold water for 15-20 minutes. This removes excess starch and prevents browning.
- Drying Method: Drain potatoes thoroughly and pat completely dry with clean kitchen towels. Any remaining moisture will create steam and prevent proper crisping.
Phase 2: Seasoning and Assembly
The seasoning process is where I add my personal touch. I prefer a simple approach that highlights the potato’s natural flavor while adding complementary elements.
Seasoning Mixture:
- Combine melted butter with minced garlic (if using)
- Add salt, pepper, and dried herbs
- Mix until well incorporated
Assembly Technique:
- Skillet Preparation: Preheat oven to 450°F (230°C). Heat cast iron skillet over medium heat and add a tablespoon of butter.
- First Layer: Start from the center of the skillet, arranging potato slices in a tight spiral pattern. Each slice should overlap the previous one by about half.
- Subsequent Layers: Continue building layers, brushing each with the seasoned butter mixture. Apply gentle pressure to ensure good contact between layers.
- Final Touches: Brush the top layer generously with remaining butter mixture and sprinkle with fresh thyme leaves.
Cooking Techniques and Temperature Control
Temperature control is absolutely critical for achieving the perfect galette. I’ve experimented with various temperatures and timing combinations, and I’ve found that starting with high heat on the stovetop followed by oven finishing produces the best results.
Optimal Cooking Process:
| Stage | Temperature | Duration | Visual Cues |
|---|---|---|---|
| Stovetop searing | Medium-high heat | 5-7 minutes | Edges begin to sizzle |
| Oven baking | 450°F (230°C) | 35-40 minutes | Golden brown top |
| Resting period | Room temperature | 10 minutes | Firms up for slicing |
The stovetop phase creates the crucial bottom crust, while the oven ensures even cooking throughout. I listen for the gentle sizzling sound that indicates proper heat level—too aggressive and the bottom burns before the top cooks.
Troubleshooting Common Issues
Through years of making galettes, I’ve encountered various challenges and developed solutions for each problem.
Common Problems and Solutions:
Soggy Bottom:
- Ensure potatoes are completely dry before assembly
- Use adequate butter for initial searing
- Don’t overcrowd the skillet with too many layers
Uneven Browning:
- Rotate the skillet halfway through baking
- Use an oven thermometer to verify temperature accuracy
- Consider adjusting oven rack position
Falling Apart When Slicing:
- Allow adequate resting time before cutting
- Use a sharp knife and clean between cuts
- Ensure layers were pressed together during assembly
Burnt Edges:
- Reduce oven temperature by 25°F and extend cooking time
- Cover edges with foil if browning too quickly
- Check that slices aren’t extending beyond skillet edges
Flavor Variations and Creative Adaptations
One of the aspects I love most about potato galettes is their adaptability. The basic technique serves as a foundation for countless variations.
Herb-Infused Variations:
- Mediterranean: Add dried oregano, basil, and sun-dried tomatoes
- French Provincial: Include fresh thyme, rosemary, and bay leaves
- German-Inspired: Incorporate caraway seeds and fresh dill
Cheese Integration:
- Parmesan: Sprinkle between layers for nutty richness
- Gruyere: Add thin slices for French onion soup flavors
- Goat Cheese: Dot with crumbles for tangy contrast
Vegetable Additions:
- Onion Galette: Alternate potato layers with caramelized onions
- Root Vegetable Medley: Combine potatoes with sweet potatoes and parsnips
- Seasonal Vegetables: Add thinly sliced beets or turnips
Nutritional Profile and Health Benefits
Understanding the nutritional aspects of potato galettes helps me make informed decisions about portion sizes and meal planning.
Nutritional Information per Serving (based on 8 servings):
| Nutrient | Amount | % Daily Value |
|---|---|---|
| Calories | 185 | 9% |
| Carbohydrates | 28g | 9% |
| Protein | 3g | 6% |
| Fat | 7g | 11% |
| Fiber | 2g | 8% |
| Potassium | 450mg | 13% |
| Vitamin C | 12mg | 13% |
Health Benefits:
- Complex Carbohydrates: Provide sustained energy
- Potassium: Supports heart health and muscle function
- Vitamin C: Antioxidant properties boost immune system
- Fiber: Aids digestion and promotes satiety
Serving Suggestions and Pairing Ideas
I’ve served potato galettes with numerous dishes, and I’ve discovered which combinations work best for different occasions.
Main Course Pairings:
- Roasted Chicken: The crispy galette complements tender, juicy poultry
- Grilled Salmon: Provides a substantial base for delicate fish
- Beef Tenderloin: Elegant enough for special occasion dinners
- Pork Chops: Rustic combination perfect for casual family meals
Vegetarian Options:
- Roasted Vegetables: Create a colorful, plant-based meal
- Mushroom Risotto: Earthy flavors complement each other beautifully
- Spinach Salad: Fresh greens balance the rich potato dish
Sauce Accompaniments:
- Herb Butter: Melted butter with fresh herbs
- Garlic Aioli: Creamy, pungent complement
- Sour Cream: Classic pairing with chives
- Chimichurri: Fresh, vibrant herb sauce
Storage and Reheating Methods
Proper storage and reheating techniques ensure that leftover galette maintains its appealing texture and flavor.
Storage Guidelines:
| Storage Method | Duration | Temperature | Notes |
|---|---|---|---|
| Refrigerator | 3-4 days | 35-40°F | Cover tightly with plastic wrap |
| Freezer | 2-3 months | 0°F | Wrap in foil, then plastic |
| Room temperature | 2 hours maximum | Below 70°F | Food safety consideration |
Reheating Techniques:
- Oven Method: 350°F for 15-20 minutes, covered with foil
- Skillet Method: Medium heat with lid, 10-12 minutes
- Microwave: Use 50% power in 30-second intervals
I strongly recommend avoiding the microwave when possible, as it tends to make the galette soggy. The oven method best preserves the original texture.
Advanced Techniques for Experienced Cooks
After mastering the basic galette, I’ve developed several advanced techniques that elevate the dish to restaurant quality.
Professional Tips:
- Layering Strategy: Alternate the direction of overlapping slices in each layer
- Pressure Technique: Use a smaller skillet to gently press layers together
- Butter Clarification: Clarified butter prevents burning during high-heat cooking
- Timing Precision: Use a kitchen timer for each phase to ensure consistency
Presentation Enhancement:
- Garnish Selection: Fresh herb sprigs or edible flowers
- Sauce Drizzling: Artistic drops of colored sauces around the plate
- Portion Control: Use a sharp knife to create clean, uniform wedges
Q&A Section
Q: What type of potatoes work best for galettes? Yukon Gold potatoes are my top choice because they have the perfect balance of starch and moisture. They hold their shape well while developing a creamy interior. Russet potatoes also work but may require more careful handling due to their higher starch content.
Q: Can I make a galette without a mandoline slicer? Absolutely! While a mandoline creates perfectly uniform slices, you can achieve excellent results with a sharp knife. The key is maintaining consistent thickness—aim for about 1/8 inch. Take your time and use a steady hand.
Q: How do I prevent my galette from falling apart? The secret is in the preparation and assembly. Make sure your potato slices are completely dry after soaking, press each layer firmly as you build the galette, and allow adequate resting time after baking. The natural starches need time to set.
Q: Can I prepare a galette ahead of time? Yes, but with some modifications. You can assemble the galette up to 4 hours ahead and keep it covered in the refrigerator. However, for best results, I recommend baking it fresh. The texture is significantly better when served shortly after cooking.
Q: What’s the best way to slice a galette for serving? Use a sharp knife and clean it between cuts. Allow the galette to rest for at least 10 minutes after baking—this helps it firm up. Cut into wedges like a pizza, making sure to go all the way through to the bottom.
Q: Can I freeze leftover galette? Yes, galettes freeze reasonably well for up to 3 months. Wrap individual portions in plastic wrap, then aluminum foil. When reheating, thaw overnight in the refrigerator and use the oven method at 350°F until heated through.
Q: How do I know when my galette is properly cooked? Look for a golden-brown top with crispy edges. The layers should hold together when you lift a section with a spatula. If you insert a knife into the center, it should go through easily without resistance.
Q: What herbs work best with potato galettes? Thyme is my go-to herb because it pairs beautifully with potatoes and withstands the high cooking temperature. Rosemary, sage, and oregano also work well. I prefer using fresh herbs when possible, adding them during the last 10 minutes of baking.
Q: Can I make individual-sized galettes? Definitely! Use 4-inch ramekins or small cast iron skillets. Reduce the cooking time to about 20-25 minutes and adjust the potato quantity accordingly. Individual galettes make elegant presentations for dinner parties.
Q: What should I do if my galette is browning too quickly? Cover the top with aluminum foil and reduce the oven temperature by 25°F. Continue baking until the interior is tender when tested with a knife. Every oven is different, so adjustments may be necessary.
The potato galette has become one of my signature dishes, and I’m confident that with these detailed instructions and tips, you’ll be able to create your own masterpiece. Remember, cooking is about experimentation and personal preference—don’t be afraid to make this recipe your own. The rustic nature of galettes means that small imperfections only add to their charm and character.