When I first attempted sweet and sour chicken years ago, I made every mistake possible. The sauce was too thick, the chicken soggy, and the vegetables overcooked. Today, after countless experiments and refinements, I’m excited to share my perfected approach to this beloved dish that consistently delivers restaurant-quality results at home.
Sweet and sour chicken represents one of the most popular Chinese-American dishes, combining crispy battered chicken with a glossy, tangy sauce that perfectly balances sweetness and acidity. The dish originated from traditional Chinese cooking but evolved significantly to suit Western palates, becoming a staple in Chinese restaurants worldwide.
Understanding Sweet and Sour Chicken
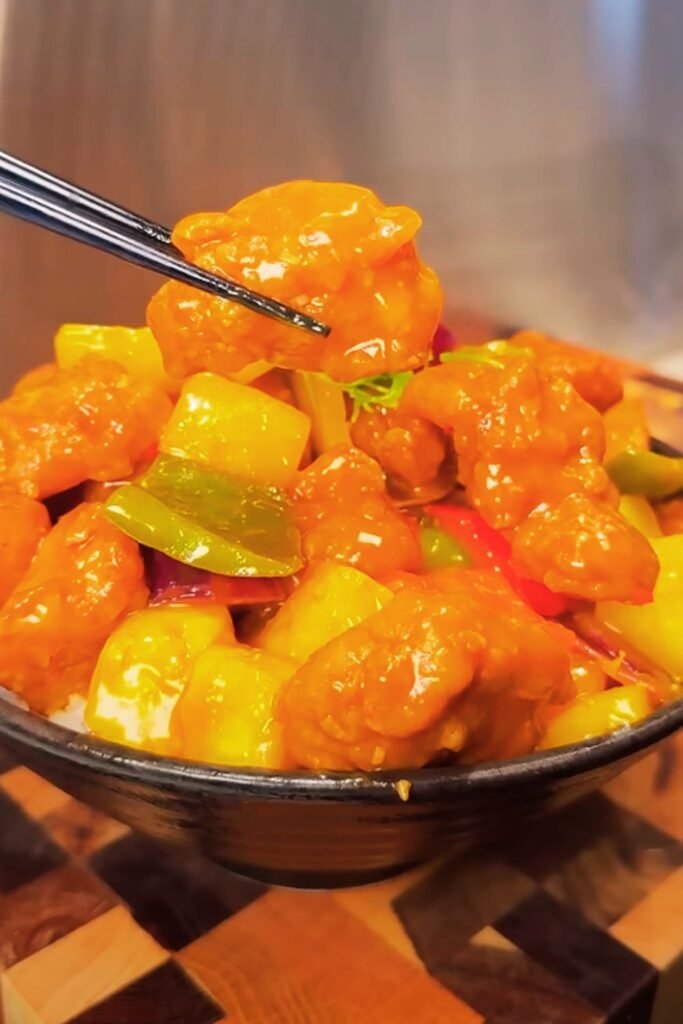
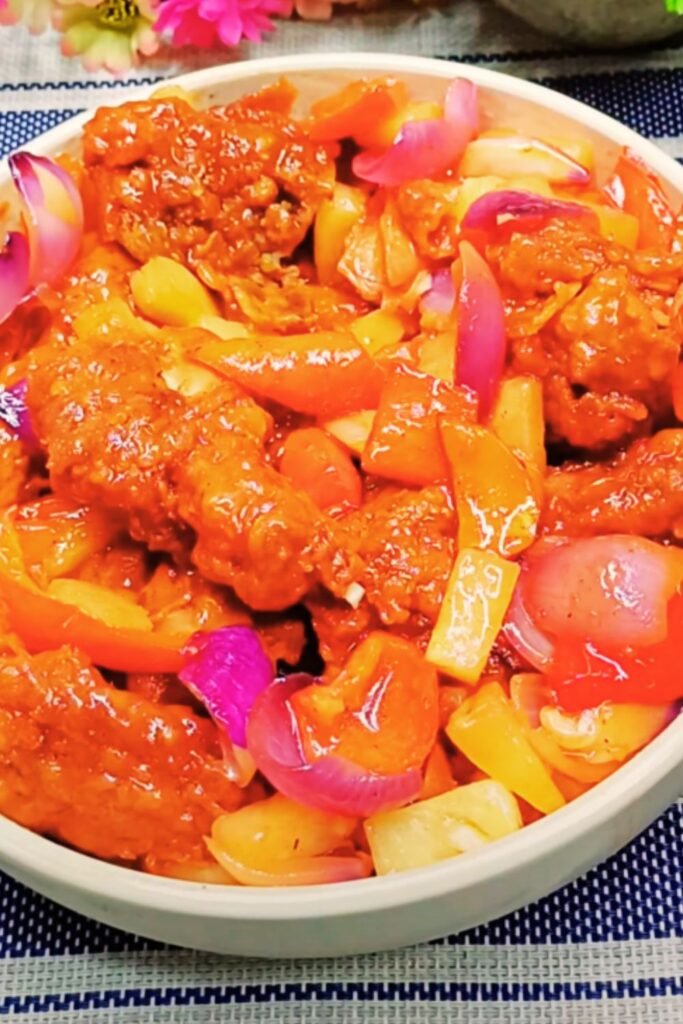
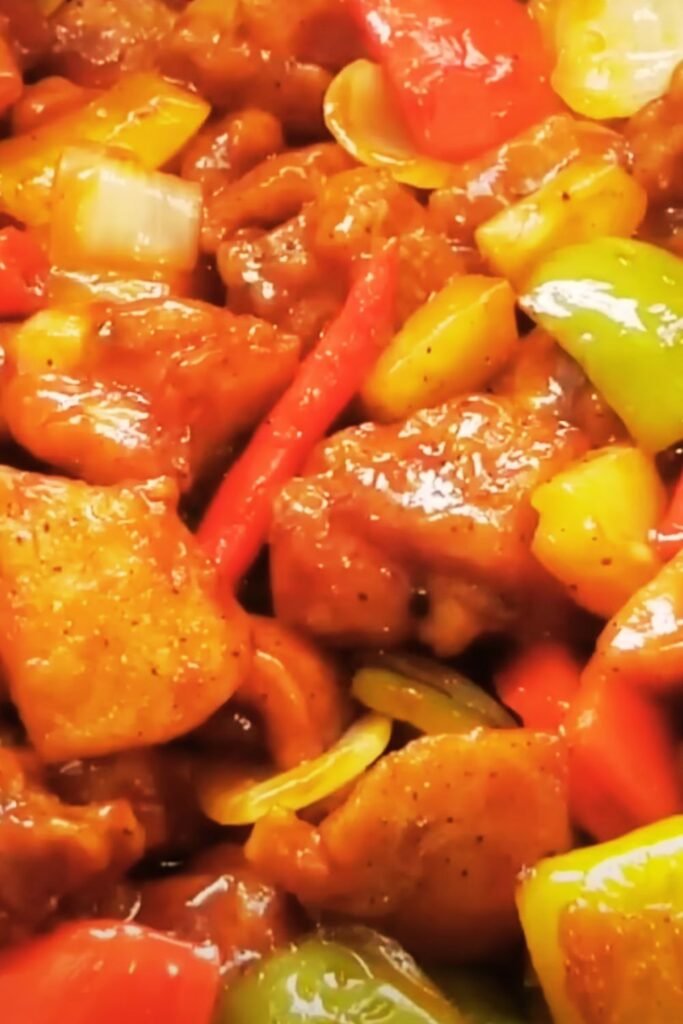
Sweet and Sour Chicken : A Chinese-American dish featuring battered and fried chicken pieces coated in a glossy sauce that balances sweet and tangy flavors, typically served with colorful vegetables like bell peppers, pineapple, and onions.
Velveting : A Chinese cooking technique where meat is marinated in egg white, cornstarch, and seasonings, then briefly blanched or fried at low temperature to create tender, silky texture.
Wok Hei : The distinctive smoky flavor imparted by cooking at extremely high heat in a well-seasoned wok, literally translating to “breath of the wok.”
Cornstarch Slurry : A mixture of cornstarch and cold liquid used to thicken sauces, creating the characteristic glossy finish of Chinese sauces.
My Perfect Sweet and Sour Chicken Recipe
Through years of experimentation, I’ve developed this foolproof recipe that delivers consistently excellent results. The key lies in proper preparation, temperature control, and timing.
Ingredients Breakdown
| Component | Ingredient | Quantity | Purpose |
|---|---|---|---|
| Chicken | Boneless chicken thighs | 2 lbs | Main protein, stays juicier than breast |
| Egg whites | 2 large | Tenderizing and binding | |
| Cornstarch | 3 tbsp | Coating for crispiness | |
| Soy sauce | 1 tbsp | Flavor enhancement | |
| Rice wine | 1 tbsp | Tenderizing and aroma | |
| Batter | All-purpose flour | 1 cup | Structure and crispiness |
| Cornstarch | ½ cup | Extra crispiness | |
| Baking powder | 1 tsp | Lightness and puff | |
| Cold water | ¾ cup | Batter consistency | |
| Salt | ½ tsp | Flavor enhancement | |
| Sauce | Rice vinegar | ⅓ cup | Primary sourness |
| Ketchup | ¼ cup | Sweetness and color | |
| Brown sugar | 3 tbsp | Deep sweetness | |
| Soy sauce | 2 tbsp | Umami depth | |
| Pineapple juice | ¼ cup | Natural sweetness and tang | |
| Cornstarch | 2 tbsp | Thickening agent | |
| Vegetables | Bell peppers (mixed colors) | 2 medium | Color and crunch |
| Pineapple chunks | 1 cup | Traditional sweetness | |
| White onion | 1 medium | Aromatic base | |
| Garlic | 3 cloves | Flavor foundation | |
| Fresh ginger | 1 inch piece | Aromatic warmth |
Preparation Steps
My method focuses on three distinct phases: preparation, cooking, and assembly. This systematic approach ensures each component reaches its optimal state.
Phase 1: Chicken Preparation
- Cut chicken thighs into uniform 1-inch pieces
- Marinate with egg whites, cornstarch, soy sauce, and rice wine for 30 minutes
- This velveting process creates incredibly tender meat
Phase 2: Batter Creation
- Combine dry ingredients in one bowl
- Gradually whisk in cold water until smooth
- Rest batter for 15 minutes to develop gluten structure
Phase 3: Sauce Development
- Whisk all sauce ingredients except cornstarch in a bowl
- Create cornstarch slurry separately with cold water
- Keep sauce components ready for quick assembly
Cooking Process
The cooking sequence requires precise timing and temperature control. I’ve learned that success depends on maintaining proper oil temperature and working in manageable batches.
Step 1: Oil Temperature Management Heat oil to 350°F (175°C) in a heavy-bottomed pot or wok. I use a candy thermometer for accuracy, as temperature fluctuations dramatically affect texture. Too low, and the chicken absorbs oil; too high, and the exterior burns before the interior cooks.
Step 2: Chicken Frying Technique
- Dredge marinated chicken pieces in batter
- Fry in small batches for 3-4 minutes until golden
- Remove and drain on wire rack
- Second fry for 1-2 minutes for extra crispiness
Step 3: Vegetable Preparation While chicken drains, I quickly stir-fry vegetables in a separate pan. The goal is maintaining crispness while developing flavor through proper heat application.
Step 4: Sauce Assembly
- Heat sauce base in wok over medium-high heat
- Add cornstarch slurry gradually while stirring
- Sauce should coat a spoon but remain pourable
Advanced Techniques
| Technique | Description | Benefit |
|---|---|---|
| Double Frying | Fry chicken twice at different temperatures | Creates maximum crispiness that lasts longer |
| Sauce Timing | Add sauce just before serving | Prevents soggy coating |
| Vegetable Staging | Cook vegetables separately, combine at end | Maintains individual textures |
| Temperature Monitoring | Use thermometer for oil and sauce | Ensures consistent results |
| Batch Control | Fry chicken in small batches | Maintains oil temperature stability |
Nutritional Analysis and Variations
Understanding the nutritional profile helps make informed choices about portion sizes and accompaniments.
Nutritional Breakdown (Per Serving)
| Nutrient | Amount | Daily Value % |
|---|---|---|
| Calories | 485 | 24% |
| Protein | 28g | 56% |
| Carbohydrates | 45g | 15% |
| Fat | 22g | 34% |
| Fiber | 2g | 8% |
| Sugar | 35g | – |
| Sodium | 890mg | 39% |
| Vitamin C | 65mg | 72% |
| Iron | 2.1mg | 12% |
Healthier Variations
Baked Version I’ve developed a baked alternative that reduces oil content by 60% while maintaining satisfying texture. Coat chicken in panko breadcrumbs mixed with cornstarch, spray with oil, and bake at 425°F for 18-20 minutes.
Cauliflower Substitute For lower carbohydrate options, cauliflower florets work beautifully. The key is removing excess moisture by salting and draining for 30 minutes before battering.
Sauce Modifications
- Reduce sugar by substituting with stevia or monk fruit sweetener
- Increase vegetable content with snap peas, carrots, or water chestnuts
- Add heat with fresh chilies or chili garlic sauce
Serving Suggestions and Pairings
The versatility of sweet and sour chicken allows for numerous serving combinations that complement its bold flavors.
Traditional Accompaniments
Rice Varieties
- Jasmine rice provides a fragrant, neutral base
- Brown rice adds nutty flavor and additional fiber
- Fried rice creates a complete one-dish meal
Vegetable Sides
- Steamed broccoli with oyster sauce
- Stir-fried bok choy with garlic
- Chinese-style green beans
Creative Serving Ideas
I’ve experimented with non-traditional presentations that showcase the dish’s adaptability:
Lettuce Wraps Serve chicken mixture in butter lettuce cups for a lighter, interactive meal. The crisp lettuce provides textural contrast while allowing diners to control portion sizes.
Grain Bowl Assembly Layer quinoa or brown rice with the chicken mixture, adding fresh herbs, pickled vegetables, and sesame seeds for contemporary presentation.
Noodle Integration Toss with cooked lo mein noodles or rice noodles for a hearty, satisfying meal that stretches the recipe further.
Troubleshooting Common Issues
Through my cooking journey, I’ve encountered and solved numerous challenges that home cooks frequently face.
Texture Problems
Soggy Coating Solutions
- Ensure oil reaches proper temperature before frying
- Don’t overcrowd the pan during frying
- Use wire rack for draining, not paper towels
- Add sauce just before serving
Tough Chicken Prevention
- Don’t skip the marinating step
- Use chicken thighs instead of breasts
- Avoid overcooking during initial fry
Sauce Difficulties
Consistency Issues
- Always create cornstarch slurry with cold liquid
- Add slurry gradually while stirring constantly
- If sauce becomes too thick, thin with additional pineapple juice
- If too thin, simmer uncovered to reduce
Flavor Balance
- Taste and adjust sweetness with brown sugar
- Increase acidity with additional rice vinegar
- Enhance umami with more soy sauce
- Add salt if flavors seem flat
Storage and Reheating
Proper storage maintains quality and food safety while maximizing the dish’s lifespan.
Storage Guidelines
| Storage Method | Duration | Quality Notes |
|---|---|---|
| Refrigerator | 3-4 days | Store components separately when possible |
| Freezer | 2-3 months | Sauce may separate upon thawing |
| Room Temperature | 2 hours maximum | Follow food safety guidelines |
Reheating Techniques
Oven Method (Preferred) Preheat oven to 375°F. Spread chicken on baking sheet, heat for 8-10 minutes until crispy. Warm sauce separately in saucepan, then combine.
Stovetop Method Heat in large skillet over medium-high heat, stirring frequently. Add small amount of water if mixture becomes too dry.
Microwave Method (Quick but compromises texture) Heat in 30-second intervals, stirring between each interval to prevent hot spots.
Cultural Significance and History
Understanding the cultural context enriches appreciation for this beloved dish. Sweet and sour chicken represents the fascinating evolution of Chinese cuisine as it adapted to American tastes and ingredients.
The dish emerged during the mid-20th century as Chinese immigrants modified traditional recipes to appeal to American palates. The original Chinese sweet and sour preparations typically featured fish or pork, using ingredients like black vinegar and rock sugar. The American version incorporated readily available ingredients like ketchup and white vinegar, creating the familiar bright red sauce.
This adaptation process reflects broader patterns in immigrant cuisine, where traditional techniques meet local ingredients and preferences. The result becomes something new while maintaining connections to its cultural roots.
Advanced Tips for Excellence
After years of refinement, these professional techniques elevate the dish from good to exceptional:
Temperature Control Mastery Maintain oil temperature between 340-360°F throughout frying. Lower temperatures create greasy results, while higher temperatures burn the exterior before cooking the interior.
Sauce Timing Strategy Prepare sauce completely before beginning any cooking. The final assembly happens quickly, leaving no time for sauce preparation.
Vegetable Texture Optimization Cut vegetables uniformly for even cooking. Bell peppers should retain slight crunch, while onions become translucent but not soft.
Flavor Layering Technique Toast garlic and ginger in oil before adding other sauce ingredients. This step develops deeper, more complex flavors that distinguish homemade versions from takeout.
Questions and Answers
Q: Why does my chicken coating always get soggy after adding the sauce?
A: The coating becomes soggy when the sauce is too thin or when it sits too long before serving. Always thicken your sauce properly with cornstarch slurry, and add the sauce just before serving. If making ahead, store the crispy chicken and sauce separately, then combine when ready to eat.
Q: Can I make this dish ahead of time for meal prep?
A: Yes, but with modifications. Cook all components separately and store them individually. The chicken stays crispier when stored without sauce. When ready to eat, quickly reheat the chicken in the oven to restore crispiness, warm the sauce, then combine. This method maintains better texture than storing everything together.
Q: What’s the secret to getting restaurant-style glossy sauce?
A: The glossy finish comes from proper cornstarch slurry technique and adequate stirring. Mix cornstarch with cold water until completely smooth, then add it slowly to the simmering sauce while stirring constantly. The sauce should coat a spoon but remain pourable. Don’t let it boil vigorously after adding the slurry, as this can break the thickening.
Q: Why does my chicken turn out tough instead of tender?
A: Tough chicken results from skipping the marinating step or using breast meat instead of thighs. Always marinate the chicken in egg whites and cornstarch for at least 30 minutes – this velveting technique is crucial for tenderness. Chicken thighs remain more tender than breasts due to higher fat content. Also, avoid overcooking during the initial frying stage.
Q: Can I substitute the pineapple juice in the sauce?
A: While pineapple juice adds authentic sweetness and acidity, you can substitute with orange juice or apple juice if needed. However, you may need to adjust the vinegar amount to maintain proper sourness balance. Pineapple juice contains enzymes that help tenderize the overall dish, so substitutions will change the final result slightly.
Q: How do I prevent the oil from splattering when frying?
A: Oil splattering occurs when moisture meets hot oil. Ensure chicken pieces are well-drained after marinating, and pat them dry before battering. Don’t overcrowd the pan, as this lowers oil temperature and increases moisture. Use a splatter screen or fry with a slightly lower oil level. Maintaining proper temperature (350°F) also reduces excessive bubbling.
Q: What vegetables work best besides the traditional bell peppers and pineapple?
A: Many vegetables complement the sweet and sour profile. Snap peas add crunch and color, while water chestnuts provide textural interest. Carrots cut into matchsticks cook quickly and add sweetness. Baby corn and mushrooms work well too. The key is choosing vegetables that maintain some texture after quick cooking and complement the flavor profile.
Q: How can I make the dish less sweet for adult palates?
A: Reduce the brown sugar by half and increase the rice vinegar slightly to maintain balance. You can also add a small amount of soy sauce for more umami depth. Some people enjoy adding a pinch of white pepper or a few drops of hot sauce to create complexity that balances the sweetness.
Sweet and sour chicken continues to evolve in my kitchen as I discover new techniques and flavor combinations. The fundamental principles of proper preparation, temperature control, and timing remain constant, but the creative possibilities are endless. Whether serving it as a weeknight family dinner or preparing it for special occasions, this dish never fails to satisfy with its perfect balance of flavors and textures.