“As an Amazon Associate, I earn from qualifying purchases.”
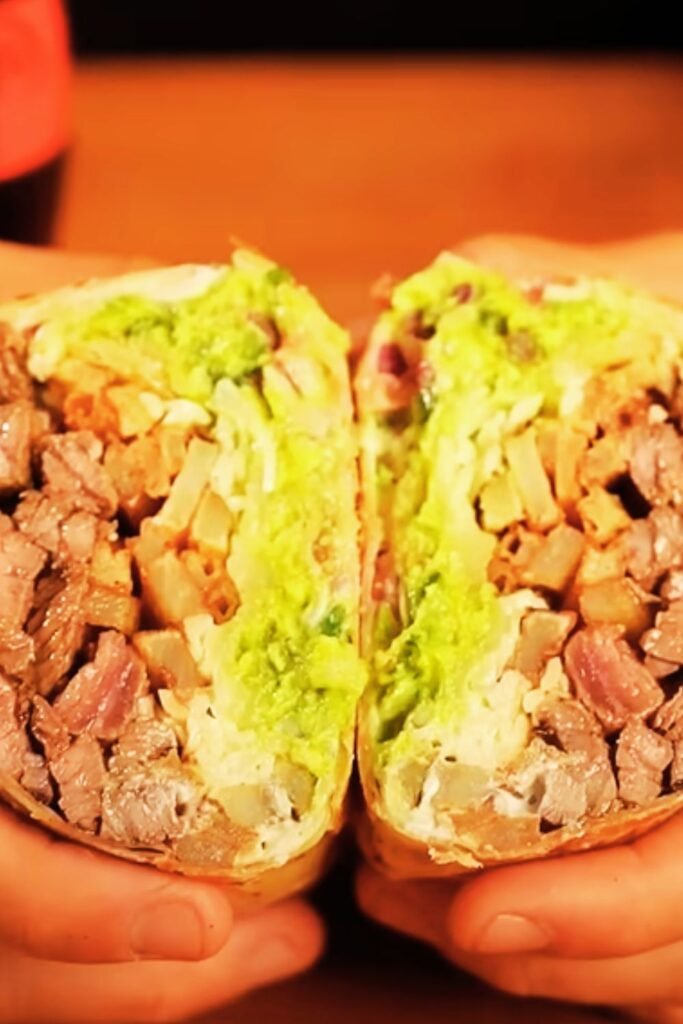
There’s something magical about biting into a warm, hefty California Burrito. That perfect combination of seasoned carne asada, crispy french fries, and melted cheese wrapped in a flour tortilla has captured the hearts (and stomachs) of food lovers across the West Coast and beyond. As someone who’s spent years perfecting my burrito technique, I’m thrilled to share my foolproof recipe that brings authentic San Diego flavors right to your kitchen.
Unlike traditional Mexican burritos, the California Burrito is a distinctive SoCal creation that emerged from the taco shops of San Diego in the 1980s. It’s the perfect fusion food—combining Mexican culinary traditions with a distinctly American addition: french fries. Yes, you read that right. French fries INSIDE the burrito! It’s this unexpected ingredient that gives the California Burrito its unique texture and flavor profile that keeps people coming back for more.
What Makes a California Burrito Special?
Before we dive into the recipe, let’s understand what sets the California Burrito apart from its Tex-Mex cousins:
- The Signature Element: French fries instead of rice and beans
- The Protein: Perfectly seasoned carne asada (grilled steak)
- The Simplicity: Minimal ingredients that create maximum flavor
- The Size: Substantial and satisfying—a complete meal in one hand
Whether you’re a West Coast native missing your favorite taco shop staple or simply curious about this culinary phenomenon, this recipe will guide you through creating an authentic California Burrito experience in your own kitchen. Let’s get cooking!
Ingredients
For the Carne Asada:
| Ingredient | Amount | Notes |
|---|---|---|
| Flank or skirt steak | 1.5 pounds | Thinly sliced against the grain |
| Olive oil | 3 tablespoons | Extra virgin preferred |
| Lime juice | 1/4 cup (about 2 limes) | Freshly squeezed |
| Garlic | 4 cloves, minced | Fresh is best |
| Ground cumin | 1 tablespoon | Toasting before grinding enhances flavor |
| Chili powder | 1 tablespoon | Adjust according to heat preference |
| Dried oregano | 1 teaspoon | Mexican oregano if available |
| Salt | 1 teaspoon | Kosher salt recommended |
| Black pepper | 1/2 teaspoon | Freshly ground |
| Fresh cilantro | 1/4 cup, chopped | Plus extra for garnish |
Missing a few things? You can grab them on Amazon here.
For the French Fries:
| Ingredient | Amount | Notes |
|---|---|---|
| Russet potatoes | 3 large | Approximately 1.5 pounds |
| Vegetable oil | 4 cups | For deep frying |
| Salt | To taste | Sea salt recommended |
For Assembly:
| Ingredient | Amount | Notes |
|---|---|---|
| Large flour tortillas | 4 (12-inch) | Burrito-sized |
| Shredded cheddar cheese | 2 cups | Sharp cheddar or Mexican blend |
| Sour cream | 1/2 cup | Full-fat for best flavor |
| Guacamole | 1 cup | Homemade or store-bought |
| Pico de gallo | 1 cup | Fresh is best |
| Hot sauce | To taste | Optional |
Missing a few things? You can grab them on Amazon here.
Equipment Needed
- Large skillet or grill pan
- Deep fryer or large, heavy-bottomed pot
- Sharp knife and cutting board
- Mixing bowls
- Tongs
- Slotted spoon or spider strainer
- Meat thermometer (optional but helpful)
- Aluminum foil
Missing any kitchen essentials? You can grab them on Amazon here.
Preparation Time
| Task | Time |
|---|---|
| Marinating the meat | 2-24 hours |
| Preparing the fries | 30 minutes |
| Cooking the meat | 10-15 minutes |
| Assembly | 5 minutes per burrito |
| Total active time | About 1 hour |
Instructions
Step 1: Marinate the Carne Asada
- In a large bowl, combine olive oil, lime juice, minced garlic, cumin, chili powder, oregano, salt, pepper, and chopped cilantro.
- Whisk the marinade ingredients together until well blended.
- Add the flank or skirt steak to the bowl and turn several times to coat thoroughly.
- Cover the bowl with plastic wrap and refrigerate for at least 2 hours, preferably overnight. This allows the flavors to penetrate the meat, creating that distinctive carne asada taste.
- For best results, remove the meat from the refrigerator about 30 minutes before cooking to allow it to come to room temperature.
Step 2: Prepare the French Fries
I’ve found that making fresh fries yields the best results, though in a pinch, quality frozen fries baked until extra crispy will work too. Here’s how I make mine from scratch:
- Wash and peel the potatoes (though leaving some skin on adds texture and flavor).
- Cut the potatoes into 1/4-inch thick sticks. Try to keep them uniform for even cooking.
- Place the cut potatoes in a large bowl of cold water and let them soak for at least 30 minutes. This removes excess starch and ensures crispy fries.
- After soaking, drain the potatoes and pat them completely dry with paper towels.
- Heat oil in a deep fryer or heavy pot to 325°F (165°C).
- Working in batches to avoid overcrowding, fry the potatoes for 3-4 minutes until they’re soft but not browned.
- Remove the partially cooked fries with a slotted spoon and drain on paper towels.
- Increase the oil temperature to 375°F (190°C).
- Return the fries to the oil and cook until golden brown and crispy, about 3-4 minutes.
- Transfer to paper towels, season immediately with salt, and keep warm.
Pro Tip: Double-frying is the secret to crispy french fries that will hold up inside the burrito without becoming soggy.
Step 3: Cook the Carne Asada
- Heat a large skillet or grill pan over high heat until it’s smoking hot.
- Remove the steak from the marinade, shaking off excess. Discard the used marinade.
- Place the steak in the hot pan and cook for about 4-5 minutes per side for medium-rare, or until it reaches your desired doneness. For optimal flavor and texture, aim for medium-rare to medium (internal temperature of 130-145°F).
- Transfer the cooked steak to a cutting board and let it rest for 5-10 minutes. This critical step allows the juices to redistribute throughout the meat.
- After resting, slice the steak thinly against the grain. This ensures tender, easy-to-bite pieces.
- Chop the sliced steak into smaller, bite-sized pieces.
Missing a few things? You can grab them on Amazon here.
Missing any kitchen essentials? You can grab them on Amazon here.
Step 4: Warm the Tortillas
- Heat a clean, dry skillet over medium heat.
- Place a tortilla in the skillet and warm for about 15-20 seconds per side until flexible and slightly toasted.
- Transfer to a plate and cover with a clean kitchen towel to keep warm.
- Repeat with the remaining tortillas.
Pro Tip: For extra flavor, lightly brush the tortillas with some of the fat rendered from cooking the steak before warming them.
Step 5: Assemble the Burritos
This is where the magic happens! Here’s how I layer my California Burritos for the perfect bite every time:
- Place a warmed tortilla on a flat surface or large plate.
- Add about 1/2 cup of chopped carne asada slightly below the center of the tortilla.
- Top with a generous layer of french fries (about 1/3 cup).
- Sprinkle about 1/2 cup of shredded cheese over the fries. The residual heat will help melt the cheese.
- Add a dollop of sour cream (2 tablespoons).
- Spoon on guacamole (about 1/4 cup).
- Add pico de gallo (about 1/4 cup).
- Add hot sauce if desired.
Step 6: Roll the Burrito
- Fold the left and right sides of the tortilla inward.
- While holding the sides in, fold the bottom of the tortilla up and over the filling.
- Continue rolling tightly away from you, tucking in the sides as you go, until the burrito is completely wrapped.
- For an extra crispy exterior, you can return the wrapped burrito to a dry skillet and lightly toast each side for about 1 minute.
- Wrap in foil if you’re serving later or want to keep it warm.
Missing a few things? You can grab them on Amazon here.
Missing any kitchen essentials? You can grab them on Amazon here.
Serving Suggestions
A proper California Burrito is hefty enough to be a meal on its own, but here are some complementary sides and accompaniments that I love serving with mine:
- Fresh lime wedges for squeezing over the burrito
- Extra pico de gallo or salsa
- Pickled red onions for a tangy contrast
- Sliced avocado
- Mexican-style street corn (elote)
- Simple green salad with cilantro-lime dressing
- Refreshing agua fresca or horchata
- Fresh lemonade or iced tea
Make-Ahead and Storage Tips
Make-Ahead Options:
- Marinate the steak up to 24 hours in advance
- Prepare the pico de gallo and guacamole up to 4 hours ahead (add lime juice to guacamole and cover with plastic wrap directly on the surface to prevent browning)
- Cook and chop the carne asada up to 2 days ahead, then reheat before assembly
- Prepare fresh fries just before assembly for best results
Storage:
- Wrapped burritos will keep in the refrigerator for up to 2 days
- To store, wrap tightly in aluminum foil, then place in a zip-top bag
- For longer storage, wrap individually in foil, place in freezer bags, and freeze for up to 1 month
Reheating:
- From refrigerated: Unwrap, place on a microwave-safe plate, and heat for 1-2 minutes, turning halfway through
- For a crispier exterior: Unwrap and place in a 350°F oven for 15-20 minutes
- From frozen: Thaw overnight in the refrigerator, then reheat as above, adding a few extra minutes to the cooking time
Variations and Customizations
While the classic California Burrito has a very specific ingredient list, I’ve experimented with several delicious variations over the years:
Protein Options:
- Grilled chicken: Marinate and cook chicken thighs using the same seasonings as the carne asada
- Carnitas: Slow-cooked pulled pork adds rich flavor
- Grilled shrimp: For a seafood twist
- Grilled vegetables: For a vegetarian version, try marinated portobello mushrooms, bell peppers, and zucchini
French Fry Alternatives:
- Seasoned curly fries add extra flavor and texture
- Sweet potato fries bring a subtle sweetness
- Tater tots create a unique texture experience
- Crispy hash browns work well for breakfast versions
Additional Add-ins:
- Scrambled eggs (for a breakfast California Burrito)
- Sliced jalapeños for extra heat
- Black beans for added protein and fiber
- Grilled corn kernels for sweetness and texture
- Pickled red onions for tanginess
Remember, while these variations can be delicious, purists might argue that they no longer constitute a true California Burrito. The beauty of home cooking, however, is making recipes your own—so feel free to experiment!
Missing a few things? You can grab them on Amazon here.
Missing any kitchen essentials? You can grab them on Amazon here.
Troubleshooting Common Issues
| Problem | Cause | Solution |
|---|---|---|
| Tortilla tears when rolling | Overstuffed or dry tortilla | Warm tortilla properly before filling and don’t overfill |
| Soggy fries in burrito | Fries not crispy enough initially | Double-fry potatoes and let them cool slightly before assembly |
| Burrito falls apart when eating | Improper rolling technique | Tuck sides in first, then roll tightly from bottom |
| Meat too tough | Overcooked or incorrectly sliced | Cook to medium-rare and always slice against grain |
| Bland flavor | Insufficient marinating time | Marinate meat at least 2 hours, preferably overnight |
| Burrito too dry | Not enough sauces/condiments | Balance dry ingredients with adequate sour cream, guacamole, salsa |
Nutritional Information
While California Burritos are undeniably a hearty indulgence rather than a health food, here’s an approximate nutritional breakdown per burrito:
| Nutrient | Amount |
|---|---|
| Calories | 850-950 |
| Protein | 45-50g |
| Carbohydrates | 65-75g |
| Fat | 45-55g |
| Fiber | 6-8g |
| Sodium | 1200-1500mg |
Note: Values will vary based on exact portions and ingredients used.
Questions & Answers
Q: Can I use a different cut of beef for the carne asada?
While flank and skirt steak are traditional and ideal for carne asada due to their rich flavor and appropriate texture, you can substitute with sirloin, flat iron, or even ribeye in a pinch. Whatever cut you choose, remember that thin slicing against the grain is crucial for tenderness.
Q: Is there a way to make this recipe healthier?
Absolutely! Try these modifications:
- Use baked or air-fried potatoes instead of deep-fried
- Opt for whole wheat tortillas
- Use lean cuts of beef and trim excess fat
- Substitute Greek yogurt for sour cream
- Increase the vegetable content with extra pico de gallo or add lettuce
- Use reduced-fat cheese or reduce the amount
Q: Can I make California Burritos vegetarian or vegan?
Yes! For a vegetarian version, replace the carne asada with grilled portobello mushrooms, plant-based meat alternatives, or extra-firm tofu marinated in the same spices. For a vegan version, also use plant-based cheese and sour cream alternatives, and ensure your tortillas don’t contain lard.
Q: Why do my homemade burritos never taste as good as restaurant ones?
Restaurant California Burritos benefit from extremely hot grills for proper meat searing and commercial deep fryers for perfect fries. At home, make sure to:
- Get your pan smoking hot before adding the meat
- Don’t overcrowd the pan when cooking
- Double-fry your potatoes for maximum crispness
- Season aggressively at each step
- Use high-quality, fresh ingredients
Q: How spicy is this recipe?
As written, this recipe has a mild to medium heat level, but you can easily adjust to your preference. For milder burritos, reduce or omit the chili powder and skip the hot sauce. For a spicier version, add diced jalapeños or serranos to your pico de gallo, increase the chili powder, or use a spicier hot sauce.
Q: My tortillas keep breaking when I try to roll them. What am I doing wrong?
Cold or dry tortillas are prone to cracking. Make sure to properly warm your tortillas until they’re pliable—they should be warm and steamy but not crisp. If they’re older tortillas, you can lightly dampen them with water before heating to restore moisture. Also, don’t overstuff your burritos, as this puts extra strain on the tortilla.
Q: Can I prepare these in advance for a party?
California Burritos are best assembled fresh, but you can prepare all components ahead of time. Keep the carne asada warm in a slow cooker, fry the potatoes just before serving, and set up a “build your own burrito” station. Alternatively, you can fully assemble them, wrap in foil, and keep in a 200°F oven for up to an hour before serving.
Missing a few things? You can grab them on Amazon here.
Missing any kitchen essentials? You can grab them on Amazon here.
The History Behind the California Burrito
As a San Diego native, I’ve always been fascinated by the origins of this iconic regional dish. The California Burrito emerged from San Diego’s taco shops in the late 1980s, though its exact creator remains disputed. The story goes that it was designed to appeal to hungry surfers looking for a portable, filling meal that combined Mexican flavors with American comfort food.
The addition of french fries was a stroke of genius—replacing the traditional rice and beans with potatoes created a unique texture and flavor profile that perfectly complemented the seasoned meat. The California Burrito quickly became a local staple, particularly popular after late nights out or long days at the beach.
While it started as a San Diego specialty, its popularity has spread throughout California and beyond. Today, you’ll find variations across the Southwest, though purists insist that authentic California Burritos can only be found in San Diego’s numerous taco shops.
By making this recipe at home, you’re participating in a beloved culinary tradition that perfectly represents Southern California’s cross-cultural food innovation. Every bite is a taste of sunny San Diego—where Mexican culinary tradition meets American innovation in the most delicious way possible.
I hope this recipe brings a bit of California sunshine to your kitchen, wherever you might be! Let me know in the comments if you try it and what variations you might have added to make it your own.
Final Tips for California Burrito Success
After years of perfecting my California Burrito technique, here are my top tips for guaranteed success:
- Don’t rush the marinating process—those flavors need time to develop
- Make sure your pan or grill is extremely hot before cooking the steak
- Allow the meat to rest before slicing to retain juices
- Double-frying the potatoes is non-negotiable for proper texture
- Season each component separately rather than just at the end
- Roll tightly but don’t compress the burrito too much
- Serve immediately for the best experience of contrasting temperatures and textures
Remember, cooking is both an art and a science—don’t be afraid to adjust seasonings and proportions to suit your taste. The perfect California Burrito is the one that makes YOU happy!
Happy cooking!
Missing a few things? You can grab them on Amazon here.
Missing any kitchen essentials? You can grab them on Amazon here.