There’s something magical about the first bite of a perfectly crafted quesadilla. The way the crispy tortilla gives way to molten cheese, savory ground beef, and a symphony of flavors that comfort your soul – it’s pure culinary bliss. I’ve been perfecting my cheesy ground beef quesadilla recipe for years, and I’m thrilled to share every secret, tip, and technique that’ll help you create restaurant-quality quesadillas in your own kitchen.
Growing up, quesadillas were my go-to comfort food. My grandmother would whip them up whenever I visited, and the aroma alone could transport me to a place of pure happiness. Today, I’m passing on not just a recipe, but a piece of my heart that’ll bring warmth to your family’s dinner table.
What Makes the Perfect Cheesy Ground Beef Quesadilla?
Before diving into the recipe, let me share what separates an ordinary quesadilla from an extraordinary one. It’s all about understanding the components and how they work together harmoniously.
Key Components Definition:
: Tortilla Foundation – The canvas for your masterpiece, providing structure and that coveted crispy exterior : Cheese Blend – The binding agent that holds everything together while delivering creamy, melted perfection
: Seasoned Ground Beef – The protein powerhouse that adds substance, flavor, and satisfaction : Aromatics and Vegetables – Supporting players that enhance flavor complexity and add nutritional value : Cooking Technique – The method that transforms raw ingredients into a golden, crispy delight
My Foolproof Cheesy Ground Beef Quesadilla Recipe
After countless experiments and family taste tests, I’ve developed this foolproof recipe that delivers consistent, mouthwatering results every single time.
Ingredients You’ll Need
For the Ground Beef Filling:
- 1 pound lean ground beef (80/20 blend works perfectly)
- 1 medium yellow onion, finely diced
- 2 cloves garlic, minced
- 1 bell pepper, diced (I prefer red for sweetness)
- 2 tablespoons olive oil
- 1 packet taco seasoning (or homemade blend)
- 1/4 cup beef broth
- 1 can (4 oz) diced green chiles
- Salt and pepper to taste
For Assembly:
- 8 large flour tortillas (10-inch diameter)
- 3 cups shredded Mexican cheese blend
- 1 cup sharp cheddar cheese, shredded
- 1/2 cup Monterey Jack cheese, shredded
- 2 tablespoons butter for cooking
- Fresh cilantro, chopped (optional)
For Serving:
- Sour cream
- Guacamole or sliced avocado
- Salsa (mild, medium, or hot)
- Pickled jalapeños
- Lime wedges
Step-by-Step Preparation Method
Preparing the Beef Filling:
• Heat olive oil in a large skillet over medium-high heat until it shimmers
• Add diced onions and cook for 3-4 minutes until they become translucent and fragrant
• Incorporate minced garlic and diced bell pepper, cooking for another 2 minutes
• Add ground beef, breaking it apart with a wooden spoon as it browns
• Cook for 6-8 minutes until the beef is completely browned with no pink remaining
• Drain excess fat, leaving about 1 tablespoon in the pan for flavor
• Sprinkle taco seasoning over the meat mixture, stirring to coat evenly
• Pour in beef broth and diced green chiles, mixing thoroughly
• Simmer for 5 minutes until liquid reduces and flavors meld together
• Season with salt and pepper, then remove from heat and let cool slightly
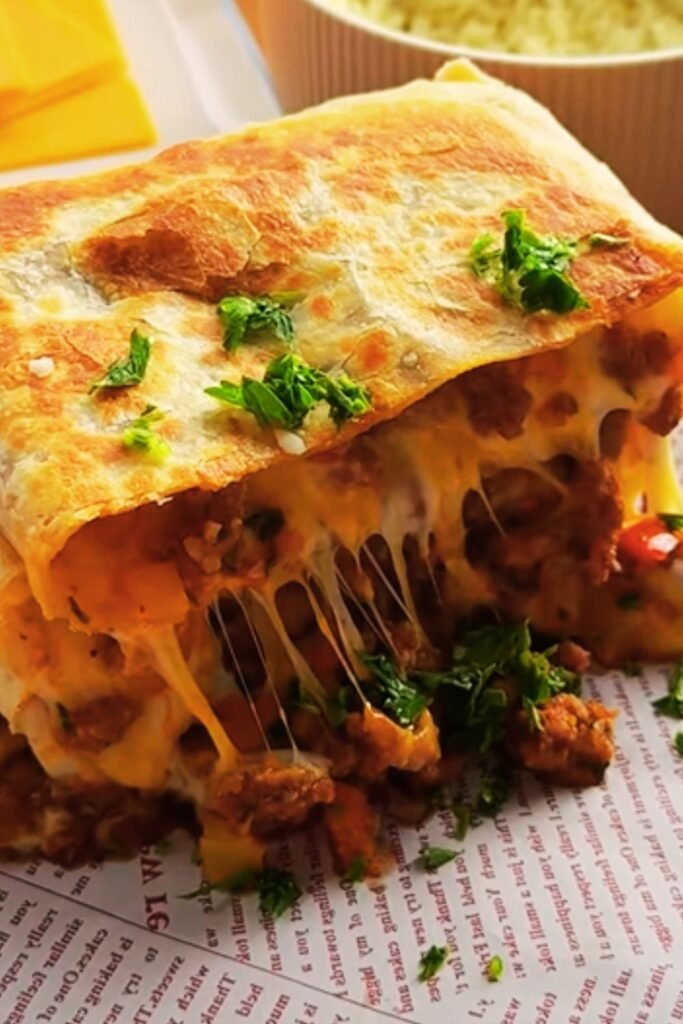
Assembling Your Quesadillas:
• Lay out tortillas on a clean work surface
• Spread 1/2 cup of cheese blend on half of each tortilla
• Distribute beef filling evenly over the cheese (about 1/3 cup per quesadilla)
• Sprinkle additional cheese on top of the beef
• Add a pinch of fresh cilantro if desired
• Fold the tortilla in half, pressing gently to seal
Cooking to Perfection:
• Heat a large skillet or griddle over medium heat
• Add a small amount of butter and let it melt
• Place quesadilla in the skillet and cook for 3-4 minutes until golden brown
• Flip carefully using a wide spatula and cook another 2-3 minutes
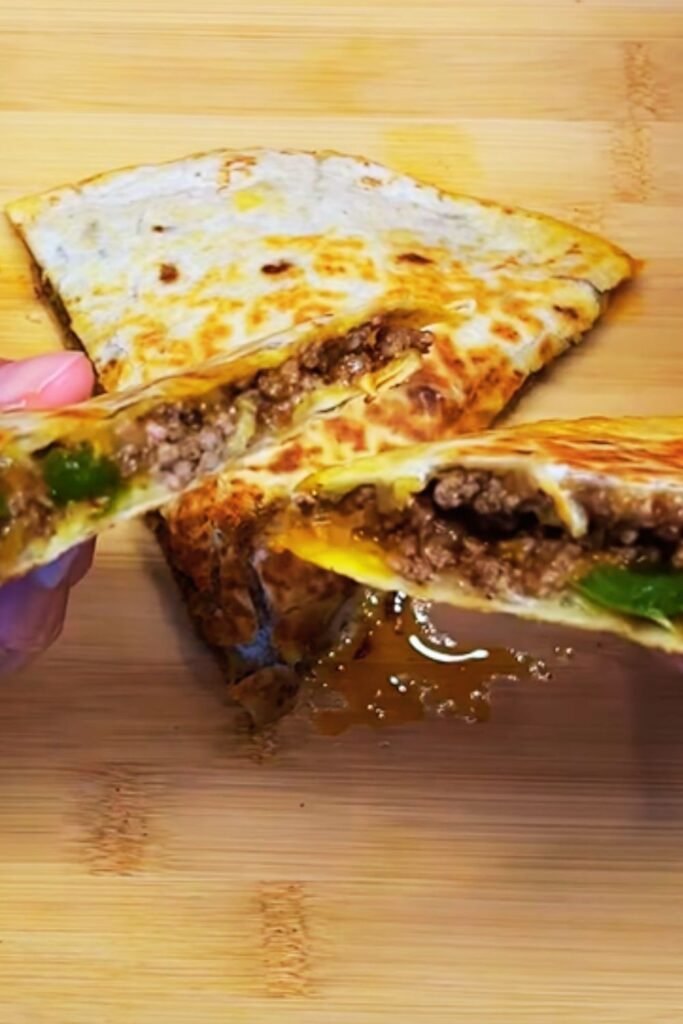
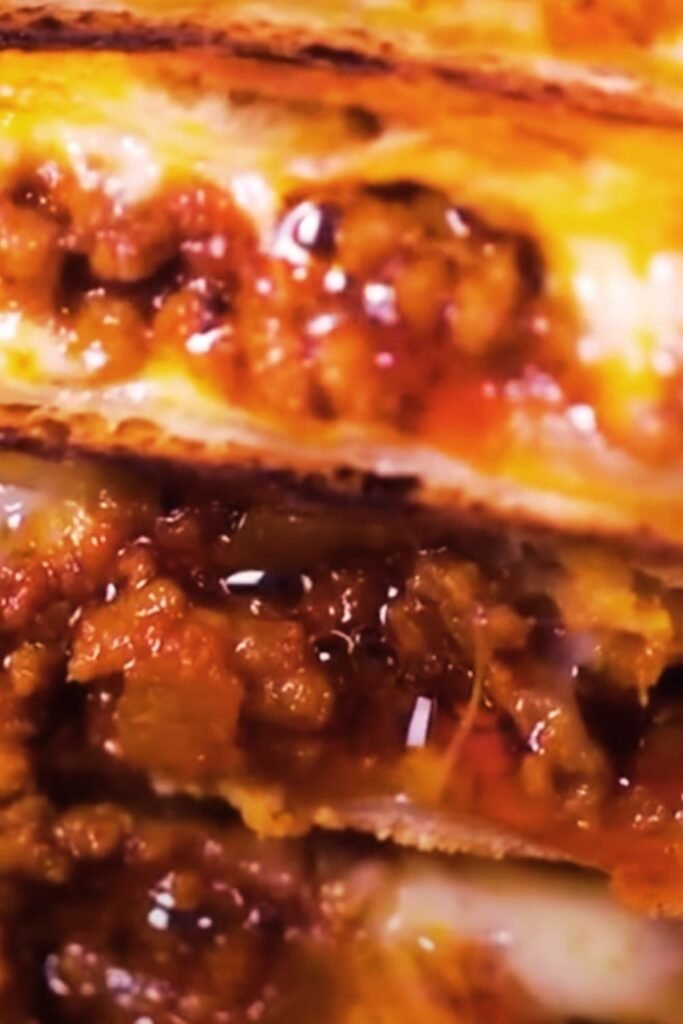
• The cheese should be completely melted and the exterior crispy
• Transfer to a cutting board and let rest for 1 minute before cutting
• Cut into triangular wedges using a sharp knife or pizza cutter
Mastering the Art: Pro Tips and Techniques
Through years of quesadilla making, I’ve discovered several game-changing techniques that’ll elevate your results from good to absolutely phenomenal.
Temperature Control is Everything: Medium heat is your best friend when cooking quesadillas. Too high, and you’ll burn the exterior before the cheese melts. Too low, and you’ll end up with a soggy, unappetizing result.
The Cheese Strategy: I always use a combination of cheeses for maximum flavor and melting properties. Mexican cheese blends provide authenticity, sharp cheddar adds tang, and Monterey Jack contributes creaminess.
Beef Preparation Secrets: Don’t overcook your ground beef during the initial browning. It’ll continue cooking when you assemble and heat the quesadillas, so slightly underdone is better than overdone.
Assembly Line Method: When making multiple quesadillas, set up an assembly line. This keeps the process efficient and ensures consistent results across all your quesadillas.
Nutritional Information and Variations
Understanding the nutritional profile helps you make informed choices about portion sizes and accompaniments.
| Nutritional Component | Per Quesadilla | Daily Value % |
|---|---|---|
| Calories | 485 | 24% |
| Total Fat | 28g | 36% |
| Saturated Fat | 14g | 70% |
| Cholesterol | 85mg | 28% |
| Sodium | 890mg | 39% |
| Carbohydrates | 32g | 12% |
| Dietary Fiber | 3g | 11% |
| Protein | 28g | 56% |
| Calcium | 320mg | 25% |
| Iron | 4.2mg | 23% |
Creative Variations to Try
Spicy Jalapeño Version: Add 2-3 minced jalapeño peppers to your beef mixture for extra heat. Include pepper jack cheese in your blend for additional spiciness.
Vegetable-Enhanced Option: Incorporate diced tomatoes, corn kernels, or black beans into your beef filling for added nutrition and texture variety.
Breakfast Quesadilla Twist: Add scrambled eggs to your beef mixture and serve with breakfast sides for a hearty morning meal.
Mediterranean Fusion: Substitute ground lamb for beef and add sun-dried tomatoes, feta cheese, and fresh basil for an international twist.
Storage and Reheating Guidelines
Proper storage ensures you can enjoy leftover quesadillas while maintaining their quality and safety.
| Storage Method | Duration | Quality Notes |
|---|---|---|
| Room Temperature | 2 hours maximum | Not recommended beyond this |
| Refrigerated | 3-4 days | Wrap in foil or plastic wrap |
| Frozen | 2-3 months | Best quality within first month |
| Cooked Filling Only | 5-7 days refrigerated | Great for meal prep |
Reheating Best Practices:
• Oven Method: Preheat to 350°F, wrap in foil, heat for 10-12 minutes
• Skillet Method: Medium heat for 2-3 minutes per side until heated through
• Microwave: 30-45 seconds, though this compromises crispiness
• Air Fryer: 350°F for 3-4 minutes for optimal crispiness restoration
Serving Suggestions and Pairings
The beauty of cheesy ground beef quesadillas lies in their versatility. They work equally well as appetizers, main courses, or party food.
Classic Accompaniments: Serve with a dollop of cool sour cream, fresh guacamole, and your favorite salsa. The contrast between the warm, crispy quesadilla and cool, creamy sides creates a perfect balance.
Side Dish Pairings:
- Mexican rice with cilantro and lime
- Black bean and corn salad
- Fresh coleslaw with lime dressing
- Roasted sweet potato wedges
- Garden salad with avocado vinaigrette
Beverage Recommendations:
- Fresh limeade or lemonade
- Iced tea with mint
- Sparkling water with lime
- Fresh fruit juices
- Mexican horchata
Troubleshooting Common Issues
Even experienced cooks sometimes encounter challenges. Here are solutions to the most common quesadilla problems I’ve encountered over the years.
Problem: Cheese Won’t Melt Properly Solution: Ensure your skillet is at medium heat and cover with a lid for the first minute of cooking to trap steam and accelerate melting.
Problem: Tortilla Burns Before Cheese Melts Solution: Lower your heat and be patient. Good quesadillas can’t be rushed.
Problem: Filling Falls Out During Flipping Solution: Don’t overfill your quesadillas, and let them cook longer on the first side to help set the cheese.
Problem: Soggy Bottom Tortilla Solution: Make sure your beef filling isn’t too wet, and use enough heat to create a proper crust.
Advanced Techniques for Quesadilla Masters
Once you’ve mastered the basics, these advanced techniques will take your quesadillas to the next level.
The Double-Flip Method: For extra-crispy results, flip your quesadilla twice during cooking. This ensures both sides achieve perfect golden-brown color.
Steam-Finish Technique: Add a tablespoon of water to the pan and immediately cover after placing your quesadilla. This creates steam that helps melt the cheese while the bottom crisps up.
Compound Butter Enhancement: Mix softened butter with minced garlic, herbs, or spices before using it to cook your quesadillas. This adds an extra layer of flavor.
Meal Prep and Batch Cooking Strategies
For busy families, preparing components ahead of time makes weeknight quesadillas a breeze.
| Prep Component | Advance Timeline | Storage Method |
|---|---|---|
| Cooked Ground Beef | Up to 5 days | Refrigerated in airtight container |
| Shredded Cheese | 1 week | Refrigerated, properly sealed |
| Assembled Raw Quesadillas | 24 hours | Refrigerated, wrapped individually |
| Fully Cooked Quesadillas | 3 days | Refrigerated, wrapped in foil |
Batch Cooking Tips:
- Cook large batches of seasoned ground beef and freeze in portions
- Pre-shred cheeses and store in labeled containers
- Keep cooked quesadillas warm in a 200°F oven while finishing the batch
Questions and Answers
Q: Can I use corn tortillas instead of flour tortillas for my quesadillas? A: While you can use corn tortillas, flour tortillas work much better for quesadillas. They’re more pliable, less likely to crack when folded, and create a better seal to keep the filling inside. Corn tortillas tend to break apart when folded and don’t hold up as well during the cooking process.
Q: What’s the best cheese combination for maximum flavor? A: I recommend using a blend of three cheeses: Mexican cheese blend for authenticity, sharp cheddar for tangy flavor, and Monterey Jack for superior melting properties. This combination gives you the perfect balance of flavor and texture.
Q: How do I prevent my ground beef from being too greasy in the quesadillas? A: Choose 80/20 ground beef and drain excess fat after browning, but leave about a tablespoon for flavor. Also, let the cooked beef mixture cool slightly before assembling – this prevents excess grease from making your tortillas soggy.
Q: Can I make these quesadillas ahead of time for a party? A: Absolutely! You can assemble quesadillas up to 24 hours in advance and store them covered in the refrigerator. Cook them just before serving for the best crispy texture. Alternatively, cook them completely and reheat in a 350°F oven for 8-10 minutes.
Q: What’s the secret to getting perfectly crispy exteriors? A: The key is using medium heat and a small amount of butter in your pan. Don’t rush the process – let each side cook for 3-4 minutes to develop a golden-brown crust. Also, make sure your tortillas aren’t too wet from the filling.
Q: How can I make my quesadillas spicier without overwhelming the flavor? A: Add heat gradually by incorporating diced jalapeños into your beef mixture, using pepper jack cheese, or adding a pinch of cayenne pepper to your taco seasoning. You can also serve with spicy salsa on the side so people can control their heat level.
Q: Is it better to use fresh or pre-shredded cheese? A: Fresh cheese that you shred yourself melts better and has superior flavor because it doesn’t contain anti-caking agents. However, pre-shredded cheese is convenient and still produces good results. If using pre-shredded, look for high-quality brands without too many additives.
Q: How do I know when my quesadilla is perfectly cooked? A: Look for a golden-brown exterior that’s crispy to the touch, and you should see melted cheese slightly oozing from the edges. The quesadilla should feel firm when gently pressed with a spatula, indicating the cheese has set properly.
Q: Can I freeze cooked quesadillas for later use? A: Yes, you can freeze fully cooked quesadillas for up to 3 months. Wrap them individually in plastic wrap, then place in freezer bags. Reheat from frozen in a 350°F oven for 15-20 minutes, flipping halfway through.
Q: What’s the best way to cut quesadillas for serving? A: Let the quesadilla rest for about a minute after cooking to allow the cheese to set slightly, then use a sharp knife or pizza cutter to slice into triangular wedges. Clean your cutting tool between quesadillas to ensure clean cuts and prevent cheese from sticking.
Creating the perfect cheesy ground beef quesadilla is an art that combines technique, quality ingredients, and a little bit of love. With these comprehensive guidelines, tips, and techniques, you’re well-equipped to create quesadillas that’ll become a beloved staple in your home. Remember, cooking is about experimentation and finding what works best for your taste preferences, so don’t be afraid to adjust seasonings and add your own creative touches.
The joy I find in making these quesadillas comes not just from the delicious results, but from the smiles they bring to my family’s faces. There’s something deeply satisfying about creating comfort food that brings people together around the dinner table. Every time I make these, I’m reminded of why I fell in love with cooking in the first place – it’s about nourishing the people we care about and creating moments of happiness through food.