There’s something magical about biting into a perfectly cooked chicken tender – that satisfying crunch giving way to juicy, tender meat inside. But when you add the robust flavors of garlic and parmesan to the mix? That’s when a simple comfort food transforms into something truly special.
I’ve been perfecting this recipe for years, tweaking ingredients and methods until I found the perfect balance. These garlic parmesan chicken tenders have become my go-to when I need to please a crowd or just want to treat myself to something delicious without spending hours in the kitchen.
What Makes These Chicken Tenders Special
Before we dive into the recipe, let me explain why these aren’t your average chicken tenders. The secret lies in the three-part coating that creates layers of flavor and texture:
- A seasoned flour mixture that forms the foundation
- A garlic-infused egg wash that adds moisture and flavor
- A crispy parmesan-herb coating that creates that irresistible crunch
The result is chicken tenders that are bursting with garlic and cheese flavor in every bite, perfectly moist inside, and delightfully crispy outside. Best of all, they can be baked or air-fried instead of deep-fried, making them a healthier alternative without sacrificing taste.
Ingredients You’ll Need
For the Chicken:
- 2 pounds chicken tenderloins (about 10-12 pieces)
- 1 teaspoon salt, divided
- ½ teaspoon black pepper, divided
For the Flour Mixture:
- 1 cup all-purpose flour
- 1 teaspoon garlic powder
- 1 teaspoon onion powder
- ½ teaspoon dried oregano
- ½ teaspoon paprika
- ¼ teaspoon cayenne pepper (optional, for heat)
For the Egg Wash:
- 3 large eggs
- 3 cloves garlic, minced
- 2 tablespoons fresh parsley, finely chopped
- 1 tablespoon Dijon mustard
- 2 tablespoons water
For the Parmesan Coating:
- 2 cups panko breadcrumbs
- 1 cup freshly grated Parmesan cheese
- 2 teaspoons Italian seasoning
- 1 teaspoon garlic powder
- ½ teaspoon salt
- 2 tablespoons olive oil
For Serving (Optional):
- Fresh lemon wedges
- Chopped fresh parsley
- Your favorite dipping sauces
Equipment Needed
Before we get started, make sure you have these tools ready:
- 3 shallow dishes for the dredging stations
- Baking sheet with wire rack (for baked version)
- Parchment paper or cooking spray
- Tongs for handling the chicken
- Instant-read thermometer (optional but recommended)
- Air fryer (if using that method)
Step-by-Step Instructions
Preparing the Chicken
- Pat the chicken tenderloins dry with paper towels. This helps the coating stick better.
- Season the chicken on both sides with half of the salt and pepper.
- If the tenderloins are very large or uneven in thickness, gently pound them to an even thickness of about ½ inch. This ensures they’ll cook evenly.
Setting Up Your Breading Station
- For the flour mixture: In the first shallow dish, combine the flour, garlic powder, onion powder, dried oregano, paprika, cayenne pepper (if using), and the remaining salt and pepper. Mix well.
- For the egg wash: In the second shallow dish, whisk together the eggs, minced garlic, chopped parsley, Dijon mustard, and water until well combined.
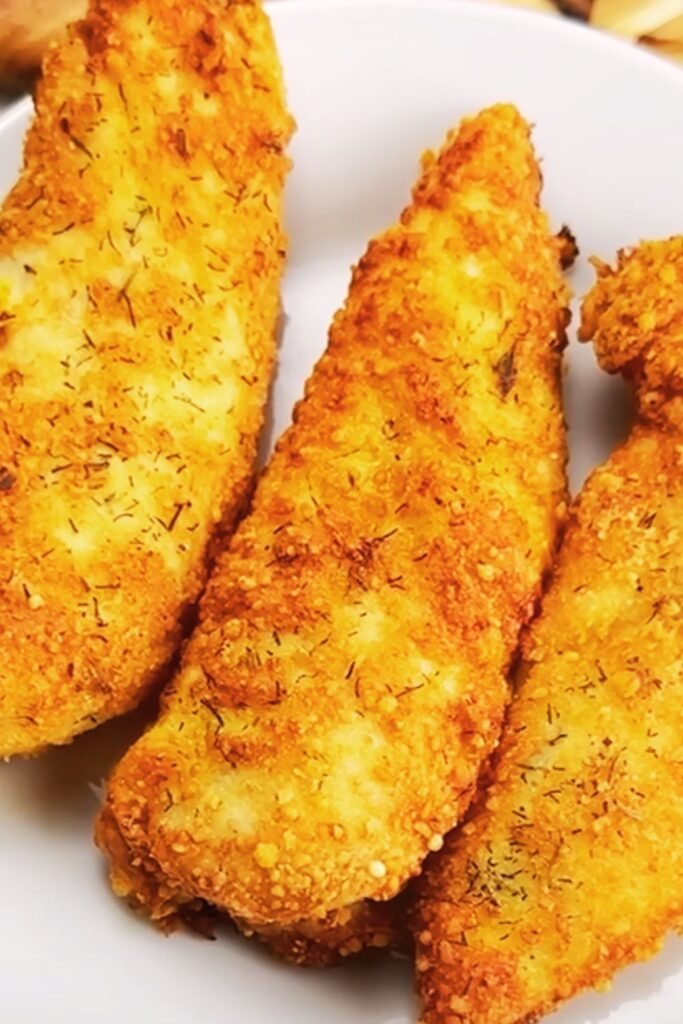
- For the parmesan coating: In the third shallow dish, mix the panko breadcrumbs, grated Parmesan cheese, Italian seasoning, garlic powder, and salt. Drizzle the olive oil over the mixture and use your fingers to rub it in. This helps the breadcrumbs get golden and crispy when cooking.
Breading the Chicken
- Working with one piece of chicken at a time, dredge it in the flour mixture, shaking off any excess.
- Next, dip it into the egg wash, allowing any excess to drip off.
- Finally, press it into the parmesan coating, making sure it’s evenly coated on all sides.
- Place the breaded chicken on a clean plate or tray and repeat with the remaining pieces.
- For extra crispiness, let the breaded chicken rest in the refrigerator for 15-30 minutes. This helps the coating set and adhere better during cooking.
Cooking Methods
I love how versatile this recipe is – you can choose the cooking method that works best for you!
Baking Method (Healthiest Option)
- Preheat your oven to 425°F (220°C).
- Line a baking sheet with parchment paper or aluminum foil and place a wire rack on top. Spray the rack with cooking spray.
- Arrange the breaded chicken tenders on the rack, leaving some space between each piece.
- Bake for 15-18 minutes, flipping halfway through, until golden brown and crispy. The internal temperature should reach 165°F (74°C).
Air Fryer Method (Quickest Option)
- Preheat your air fryer to 400°F (200°C).
- Lightly spray the air fryer basket with cooking spray.
- Place the chicken tenders in a single layer in the basket, making sure they don’t touch. You may need to cook them in batches.
- Air fry for 10-12 minutes, flipping halfway through, until golden brown and crispy with an internal temperature of 165°F (74°C).
Pan-Frying Method (Most Traditional)
- Heat ¼ cup of vegetable oil or olive oil in a large skillet over medium-high heat.
- Once the oil is hot (about 350°F or 175°C), add the chicken tenders in a single layer, being careful not to overcrowd the pan.
- Cook for 3-4 minutes per side until golden brown and the internal temperature reaches 165°F (74°C).
- Transfer to a paper-towel-lined plate to drain any excess oil.
Detailed Nutrition Information
I’ve put together this comprehensive nutrition table so you can see exactly what you’re getting in each serving. This information is based on using the baking method and assumes a serving size of 2-3 tenders (about 4 oz of cooked chicken).
| Nutrient | Amount per Serving | % Daily Value* |
|---|---|---|
| Calories | 320 | – |
| Total Fat | 12g | 15% |
| – Saturated Fat | 4g | 20% |
| – Trans Fat | 0g | – |
| Cholesterol | 125mg | 42% |
| Sodium | 650mg | 28% |
| Total Carbohydrates | 22g | 8% |
| – Dietary Fiber | 1g | 4% |
| – Sugars | 1g | – |
| Protein | 32g | 64% |
| Vitamin D | 0.2mcg | 1% |
| Calcium | 180mg | 14% |
| Iron | 2mg | 11% |
| Potassium | 350mg | 7% |
*Percent Daily Values are based on a 2,000 calorie diet.
Storage and Make-Ahead Tips
These chicken tenders are at their absolute best when freshly made, but I know life gets busy and meal prep is important. Here’s how to store them:
Refrigerating:
- Store cooled chicken tenders in an airtight container for up to 3 days.
- To reheat, place them on a baking sheet in a 350°F (175°C) oven for 10 minutes, or in the air fryer at 350°F for 3-4 minutes.
Freezing:
- For make-ahead convenience, freeze the breaded (but uncooked) chicken tenders on a baking sheet until solid, then transfer to a freezer bag.
- They’ll keep for up to 3 months.
- Cook directly from frozen, adding 5-7 minutes to the cooking time.
Freezing Cooked Tenders:
- You can also freeze fully cooked and cooled tenders for up to 2 months.
- Reheat from frozen in a 375°F (190°C) oven for 15-20 minutes until heated through and crispy.
Serving Suggestions

I love to serve these garlic parmesan chicken tenders with a variety of dipping sauces. Here are some of my favorites:
Homemade Dipping Sauces:
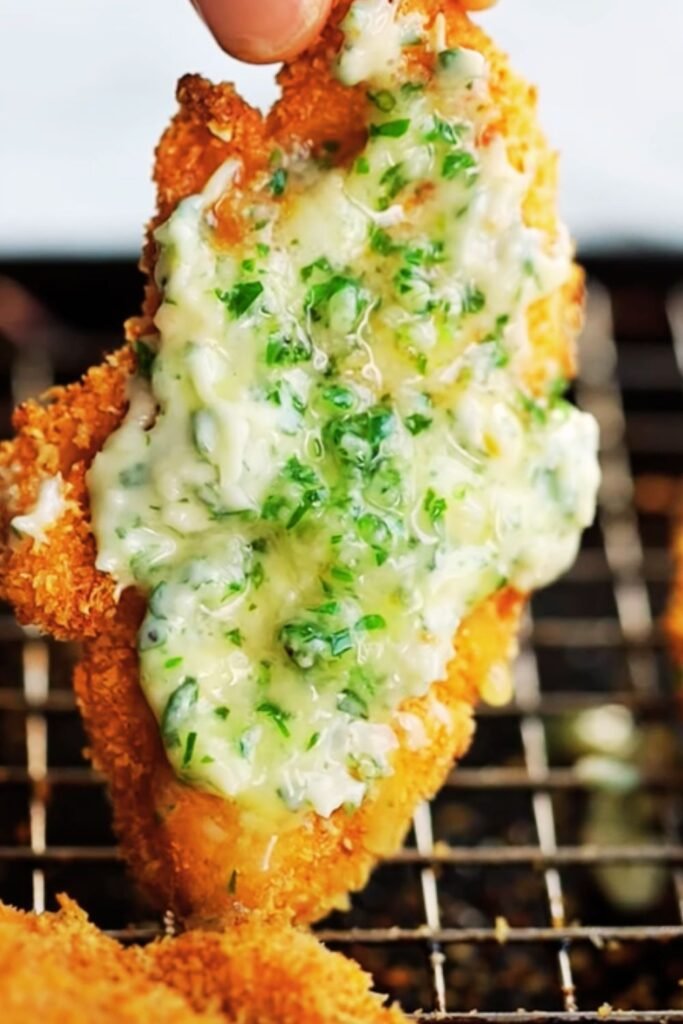
Creamy Garlic Parmesan Sauce
- ½ cup mayonnaise
- ¼ cup sour cream
- 2 tablespoons grated Parmesan cheese
- 1 clove garlic, minced
- 1 tablespoon lemon juice
- Salt and pepper to taste
Honey Mustard Sauce
- ¼ cup Dijon mustard
- ¼ cup honey
- 2 tablespoons mayonnaise
- 1 teaspoon apple cider vinegar
- Pinch of cayenne pepper (optional)
Marinara Dipping Sauce
- 1 cup marinara sauce
- 1 teaspoon Italian seasoning
- 1 tablespoon grated Parmesan cheese
- ½ teaspoon red pepper flakes (optional)
Side Dish Pairings:
- Fresh green salad with lemon vinaigrette
- Roasted garlic broccoli
- Sweet potato fries
- Garlic mashed potatoes
- Coleslaw
Variation Ideas
While I love the classic garlic parmesan flavor, here are some delicious variations to try:
Spicy Buffalo Parmesan
Add 2 tablespoons of buffalo sauce to the egg wash and mix hot sauce with melted butter for drizzling after cooking.
Lemon Herb Parmesan
Add 1 tablespoon of lemon zest to the parmesan coating and serve with extra lemon wedges.
Italian Seasoned
Double the Italian seasoning in the parmesan coating and add 2 tablespoons of sun-dried tomato bits.
Ranch Flavored
Add 2 tablespoons of dry ranch seasoning mix to the parmesan coating for a tangy twist.
Troubleshooting Tips
I’ve made these chicken tenders countless times, and I’ve faced a few challenges along the way. Here’s how to avoid common issues:
Problem: Coating Falls Off During Cooking
Solution: Make sure to:
- Pat the chicken completely dry before starting
- Let the excess egg drip off completely
- Press the breadcrumb mixture firmly onto the chicken
- Let the breaded chicken rest in the refrigerator for 15-30 minutes before cooking
Problem: Tenders Are Browning Too Quickly But Not Cooking Through
Solution:
- Lower the cooking temperature slightly
- Cover loosely with foil for part of the baking time
- Make sure the chicken pieces are even in thickness
Problem: Not Crispy Enough
Solution:
- Make sure your oven or air fryer is fully preheated
- Don’t overcrowd the pan or air fryer basket
- The olive oil in the breadcrumb mixture is crucial for crispiness
- Use the wire rack when baking to allow air to circulate around the tenders
Why This Recipe Works
After much experimentation, I’ve found that the key factors that make these chicken tenders superior are:
- The three-step breading process: This creates multiple layers of flavor and ensures a coating that sticks.
- Adding oil directly to the breadcrumbs: This technique helps achieve a fried-like crispiness even when baking or air frying.
- Freshly grated Parmesan: Pre-grated cheese often contains anti-caking agents that don’t melt as well. Freshly grated parmesan provides better flavor and texture.
- Flavor in every layer: By adding seasonings to the flour, egg wash, AND breading mixture, you get depth of flavor in every bite.
FAQs About Garlic Parmesan Chicken Tenders
Q: Can I use chicken breasts instead of tenderloins? Yes! You can slice boneless, skinless chicken breasts into strips about ½-inch thick. They’ll cook in about the same amount of time as tenderloins.
Q: Is there a way to make these gluten-free? Absolutely. Substitute the all-purpose flour with gluten-free flour and use gluten-free panko breadcrumbs. The recipe works just as well.
Q: Can I make these ahead for a party? Yes! You can bread the chicken up to 24 hours in advance and keep it covered in the refrigerator. You can also fully cook them and reheat in a 350°F oven for 10 minutes before serving.
Q: How do I know when the chicken is done cooking? The safest way is to use an instant-read thermometer – the internal temperature should reach 165°F (74°C). If you don’t have a thermometer, cut into a thicker piece – the meat should be white throughout with no pink remaining.
Q: Can I use pre-grated Parmesan cheese? While fresh is best for flavor and melting quality, you can use pre-grated in a pinch. Try to find one without too many additives.
Q: How do I keep the breading from falling off? Make sure to follow the three-step breading process, pat the chicken dry first, and if possible, let the breaded chicken rest in the refrigerator for 15-30 minutes before cooking to help the coating adhere.
Q: What oil is best for pan frying these tenders? I recommend vegetable oil, canola oil, or a light olive oil. You want something with a high smoke point.
Q: My family doesn’t like spicy food. Can I omit the cayenne pepper? Absolutely! The cayenne adds a very mild heat, but you can leave it out completely and the chicken tenders will still be delicious.
My Final Thoughts
I’ve been making these garlic parmesan chicken tenders for years, and they never fail to impress. What started as a simple weeknight dinner recipe has become a staple at family gatherings, game days, and even dinner parties.
What I love most about this recipe is its versatility. You can adjust the seasonings to suit your taste, choose your preferred cooking method based on time and health preferences, and pair them with countless sides and sauces.
Whether you’re feeding picky children or sophisticated adults, these chicken tenders bridge the gap between comfort food and elevated cuisine. They’re crispy, juicy, and packed with flavor – everything a chicken tender should be, and so much more.
Give them a try, and I’m confident they’ll earn a permanent spot in your recipe collection too!
Remember, the key is in the details – freshly grated cheese, properly seasoned layers, and careful cooking for that perfect crisp exterior and juicy interior. Enjoy!