Have you ever bitten into a chocolate cup and experienced that magical moment when multiple flavors cascade across your taste buds? That’s exactly what happens with these Raspberry Caramel Chocolate Cups. They’re a triple-threat dessert combining rich dark chocolate shells filled with homemade caramel and topped with a vibrant raspberry ganache that’s simply irresistible.
When I first created these treats for a family gathering, my kitchen transformed into a mini chocolate factory. The air filled with the intoxicating scent of melted chocolate and bubbling caramel, and I remember feeling like a professional chocolatier (albeit a slightly messier one). The best part? The stunned silence followed by exclamations of delight when everyone took their first bite.
These chocolate cups may look intimidating, but I promise they’re absolutely achievable for home bakers. With some patience and a bit of technique, you’ll create a dessert that rivals anything from a fancy chocolate shop—at a fraction of the cost.
What Makes These Chocolate Cups Special
What sets these cups apart from store-bought chocolates is the careful layering of complementary flavors. The dark chocolate provides a slightly bitter foundation that balances the sweet, buttery caramel middle. The raspberry ganache adds a fresh, tart finish that cuts through the richness and leaves you craving another bite.
The beauty of making these at home is that you control the quality of ingredients and the sweetness level. I’ve tested this recipe numerous times to achieve the perfect balance, but feel free to adjust the sweetness to suit your palate.
Ingredients You’ll Need
For the Chocolate Cups:
- 12 oz high-quality dark chocolate (60-70% cacao)
- 2 tablespoons coconut oil
For the Caramel Layer:
- 1 cup granulated sugar
- ¼ cup water
- ⅓ cup heavy cream, at room temperature
- 4 tablespoons unsalted butter, cut into pieces
- ½ teaspoon fine sea salt
- 1 teaspoon vanilla extract
For the Raspberry Ganache:
- 6 oz white chocolate, finely chopped
- ¼ cup heavy cream
- ⅓ cup fresh raspberries (or ¼ cup raspberry purée)
- 1 tablespoon unsalted butter, at room temperature
- 2-3 drops of natural red food coloring (optional)
To Garnish:
- 12 fresh raspberries
- Edible gold dust or flakes (optional)
- Finely chopped pistachios (optional)
Essential Equipment
Before diving into the recipe, gather these tools to ensure smooth sailing:
- Standard muffin tin
- 12 cupcake liners (preferably non-stick)
- Small paintbrush or pastry brush (used only for food)
- Several microwave-safe bowls
- Heavy-bottomed saucepan
- Candy thermometer
- Fine mesh strainer
- Offset spatula
- Piping bag with small round tip (optional)
Step-by-Step Instructions
Preparing the Chocolate Cups
- Place cupcake liners in a standard muffin tin.
- In a microwave-safe bowl, combine the dark chocolate and coconut oil.
- Microwave in 30-second intervals, stirring between each interval until completely melted and smooth.
- Allow the chocolate to cool slightly until it thickens but remains pourable (about 85°F/29°C).
- Spoon about 1 tablespoon of melted chocolate into each liner.
- Using the back of a small spoon or a clean paintbrush, push the chocolate up the sides of the liner, creating an even coating approximately ⅛ inch thick.
- Ensure there are no thin spots or holes in your chocolate cup.
- Place in the refrigerator for 15-20 minutes until completely set.
- Apply a second coat of chocolate using the same technique to reinforce the cups.
- Return to the refrigerator for another 15-20 minutes to set completely.
I find it helpful to reserve about ¼ of the melted chocolate for the second coat. If it hardens while you’re waiting, just gently reheat it.
Making the Caramel Layer
- In a heavy-bottomed, light-colored saucepan, combine sugar and water. Stir gently just until the sugar is moistened.
- Place over medium heat and let the mixture come to a boil without stirring.
- Once boiling, occasionally swirl the pan gently (don’t stir!) to ensure even cooking.
- Watch carefully as the sugar turns from clear to golden amber (approximately 8-10 minutes). A candy thermometer should read around 350°F (175°C).
- Remove from heat immediately once the desired amber color is reached.
- Very carefully and slowly add the room temperature heavy cream while whisking constantly (caution: it will bubble vigorously).
- Once the bubbling subsides, add the butter pieces and salt, whisking until smooth.
- Stir in vanilla extract.
- Allow the caramel to cool for about 15-20 minutes, stirring occasionally, until it thickens but remains pourable.
- Pour approximately 1-2 teaspoons of caramel into each chocolate cup, filling them about ⅓ of the way.
- Refrigerate for 20-30 minutes until the caramel firms up.
The caramel may seem too liquid at first, but trust me, it will set to the perfect consistency when chilled.
Creating the Raspberry Ganache
- Place fresh raspberries in a small saucepan over low heat, mashing them with a fork as they warm.
- Cook for 2-3 minutes until the berries break down into a sauce.
- Press the raspberry sauce through a fine mesh strainer to remove seeds, preserving the smooth purée.
- Place white chocolate in a heat-proof bowl.
- Heat heavy cream just until it begins to simmer around the edges.
- Pour hot cream over white chocolate and let stand for 1 minute.
- Gently stir until the chocolate is completely melted and smooth.
- Add 2 tablespoons of the raspberry purée and butter to the white chocolate mixture, stirring until fully incorporated.
- If desired, add a few drops of natural red food coloring for a more vibrant pink color.
- Allow the ganache to cool and thicken slightly (about 10-15 minutes).
- Carefully spoon or pipe the raspberry ganache on top of the caramel layer in each cup, filling almost to the top edge.
- Return to the refrigerator for at least 1 hour to set completely.
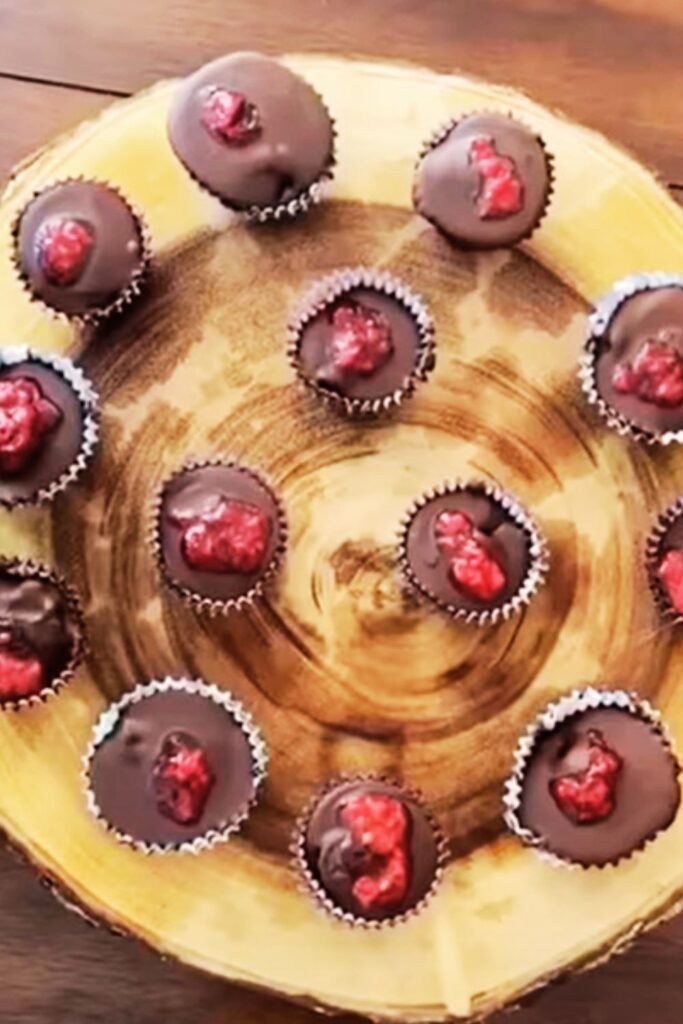
Assembly and Garnishing
Once your chocolate cups have fully set, it’s time for the finishing touches:
- Carefully peel away the cupcake liners from each chocolate cup.
- Place each cup on a serving platter.
- Top each cup with a fresh raspberry.
- If using, lightly dust with edible gold for an elegant touch.
- Alternatively, sprinkle with finely chopped pistachios for color contrast and a hint of nuttiness.
| Layer | Setting Time | Temperature | Visual Cue |
|---|---|---|---|
| Chocolate Shell | 15-20 minutes per coat | Refrigerator | Matte finish, solid to touch |
| Caramel | 20-30 minutes | Refrigerator | Slightly firm, not liquid |
| Raspberry Ganache | 1+ hour | Refrigerator | Set but with slight give |
| Final Assembly | 30 minutes | Refrigerator | Cups hold shape at room temp |
Troubleshooting Common Issues
Chocolate Problems
- Chocolate won’t set properly: The ambient temperature might be too warm. Place in the freezer for 5 minutes, then return to the refrigerator.
- Chocolate looks dull or streaky: This indicates the chocolate has bloomed due to improper tempering. While still edible, for a glossier finish, consider using tempered chocolate (see advanced tips below).
- Chocolate cups break when removing liners: The shell is too thin. Next time, apply a third layer of chocolate or ensure your existing layers are thicker.
Caramel Problems
- Caramel crystallizes: Sugar crystals formed during cooking. Next time, avoid stirring once the mixture begins boiling and brush down the sides of the pan with a wet pastry brush.
- Caramel is too hard: It was cooked at too high a temperature. Warm the cups slightly before serving.
- Caramel is too runny: It wasn’t cooked long enough. Return the caramel to the heat and cook until it reaches a slightly darker amber color.
Ganache Problems
- Ganache separates or looks oily: The mixture was overheated. Whisk in 1-2 teaspoons of warm heavy cream to re-emulsify.
- Ganache is too firm: It contains too much chocolate. Warm very gently and whisk in a small amount of heavy cream.
- Ganache is too soft: It has too much liquid. Add more melted white chocolate and chill longer.
Advanced Tips for Chocolate Artisans
If you’re feeling adventurous and want to elevate your chocolate cups even further, here are some professional techniques:
Properly Tempering Chocolate
For a professional-quality chocolate cup with a glossy finish and satisfying snap, tempering is the way to go:
- Finely chop chocolate and place ⅔ of it in a heat-safe bowl.
- Heat over a double boiler until it reaches 115°F (46°C) for dark chocolate.
- Remove from heat and add the remaining ⅓ chocolate, stirring constantly.
- Stir until temperature drops to 82°F (28°C).
- Return to heat briefly to raise temperature to 88-90°F (31-32°C).
- Use immediately to form chocolate cups.
Creating Decorative Patterns
- Before creating the chocolate cups, drizzle a small amount of contrasting chocolate (white, milk, or colored) inside the cupcake liners.
- Allow to set for 5 minutes in the refrigerator.
- Proceed with the dark chocolate cup recipe as directed.
- When you remove the liner, beautiful patterns will be revealed on the outside of your cups.
Flavor Variations
- Spiced Chocolate: Add a pinch of cayenne pepper or cinnamon to the melted chocolate for the cups.
- Orange Caramel: Add 1 teaspoon of orange zest to the caramel as it cools.
- Blackberry Ganache: Substitute blackberries for raspberries in the ganache.
- Salted Dark Chocolate: Sprinkle a few flakes of fleur de sel on the chocolate while it’s still wet.
Storage and Shelf Life
These chocolate cups are best enjoyed within 3-5 days of making them. Store them in the refrigerator in an airtight container, separated by parchment paper to prevent sticking.
| Storage Method | Temperature | Shelf Life | Notes |
|---|---|---|---|
| Refrigerator | 35-40°F (2-4°C) | 3-5 days | Best flavor and texture |
| Freezer | 0°F (-18°C) | Up to 1 month | Thaw in refrigerator overnight |
| Room temperature | Below 70°F (21°C) | 1 day maximum | May soften significantly |
You can also freeze the assembled cups for up to 1 month. Thaw overnight in the refrigerator before serving.
Serving Suggestions
For the ultimate indulgent dessert experience, try these serving ideas:
- Place on a dessert platter with fresh berries scattered around.
- Serve with a small espresso for an elegant after-dinner treat.
- Pair with a glass of sparkling water with a twist of lemon to cleanse the palate.
- Create a dessert board with these cups as the centerpiece, surrounded by fresh fruit, candied nuts, and small cookies.
- Serve slightly chilled but not ice-cold (remove from refrigerator 10-15 minutes before serving) to allow the flavors to fully bloom.
Nutritional Information
While these treats are definitely an indulgence, it can be helpful to know what you’re enjoying. Each chocolate cup contains approximately:
| Nutrient | Amount per Cup |
|---|---|
| Calories | 320 |
| Total Fat | 22g |
| Saturated Fat | 14g |
| Cholesterol | 45mg |
| Sodium | 75mg |
| Total Carbohydrates | 32g |
| Dietary Fiber | 2g |
| Sugars | 28g |
| Protein | 3g |
Frequently Asked Questions
Can I make these chocolate cups dairy-free? Yes! You can substitute the heavy cream with full-fat coconut cream and use dairy-free butter alternatives. Choose dairy-free chocolate chips or bars for the shells and ganache. The texture may vary slightly, but the results will still be delicious.
Is it necessary to use a candy thermometer for the caramel? While not absolutely essential, a candy thermometer significantly increases your chances of success. Without one, you’ll need to rely on color alone, which can be tricky for beginners. If you don’t have a thermometer, aim for a medium amber color—similar to maple syrup.
Can I use frozen raspberries for the ganache? Absolutely! Thaw them first and follow the same process. Frozen berries may release more liquid, so you might need to cook them a bit longer to achieve the right consistency.
Why did my chocolate cups crack when I was removing the liners? This typically happens when the chocolate layer is too thin or when the cups are removed from the refrigerator and experience a sudden temperature change. Try making thicker shells and letting the cups sit at room temperature for 2-3 minutes before carefully peeling away the liners.
How far in advance can I make these for a party? These cups can be made 2-3 days in advance of your event. Keep them refrigerated and bring them to room temperature about 15 minutes before serving.
Can children help make these? Children can definitely help with certain aspects, like painting the chocolate into the liners and garnishing. However, the caramel-making process involves very hot sugar and should be handled by adults only.
Is there a way to make these less sweet? Yes! Use darker chocolate with 70-85% cacao content for the shells, reduce the sugar in the caramel by 2-3 tablespoons, and use less raspberry purée in the ganache.
Can I use silicone molds instead of paper liners? Absolutely! Silicone molds work wonderfully and often provide a glossier finish. Just be sure to freeze the cups briefly before attempting to remove them from the molds.
A Final Sweet Note
Creating these Raspberry Caramel Chocolate Cups has been one of my most satisfying kitchen adventures. There’s something magical about transforming simple ingredients into a multi-layered confection that looks like it came from a high-end patisserie.
I often make these treats when I want to show someone I really care – they require time and attention, which makes them a labor of love. The combination of rich chocolate, buttery caramel, and tangy raspberry creates a flavor profile that’s sophisticated yet universally appealing.
Remember that chocolate work gets easier with practice. If your first batch isn’t perfect, celebrate the learning experience and try again. Even imperfect chocolate cups will still taste amazing!
I hope these decadent treats bring as much joy to your table as they have to mine. Happy chocolate-making!