There’s something magical about the moment when I slice into a perfectly set blueberry cheesecake. The creamy, velvety texture gives way to reveal swirls of vibrant purple-blue throughout, and that first bite delivers an explosion of tangy sweetness that never fails to make me smile. After years of perfecting this recipe, I can confidently say that making an extraordinary blueberry cheesecake at home is not only possible but surprisingly straightforward.
When I first attempted cheesecake baking fifteen years ago, I was intimidated by the horror stories of cracked surfaces, soggy bottoms, and dense, heavy textures. However, through countless experiments and a few spectacular failures, I’ve discovered that the secret to exceptional blueberry cheesecake lies not in complex techniques but in understanding a few fundamental principles and following them consistently.
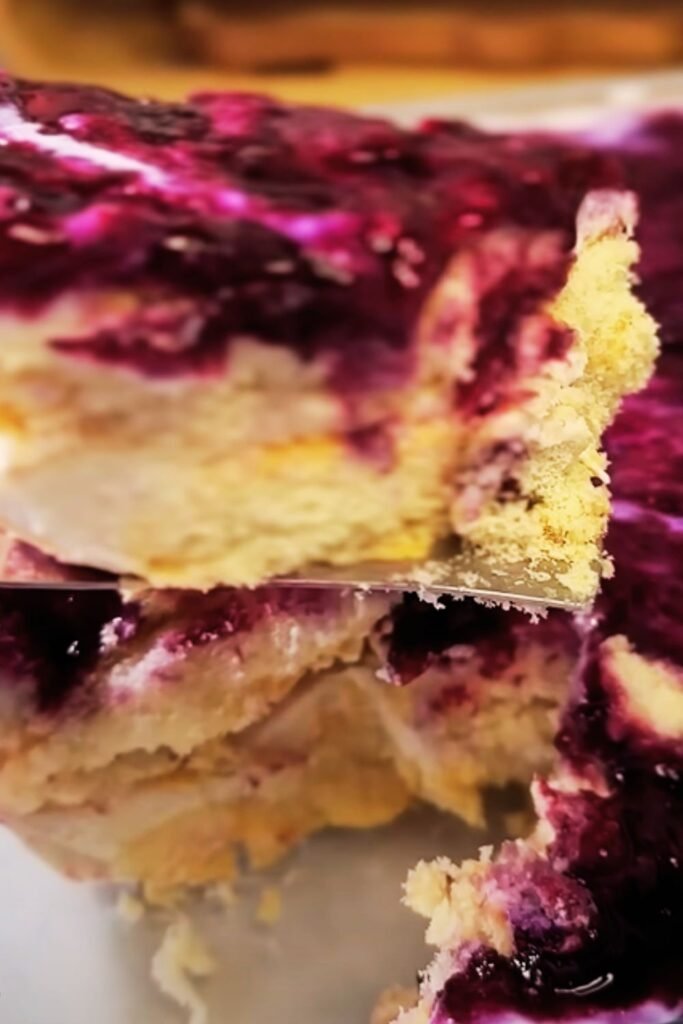
My easy blueberry cheesecake recipe combines the richness of cream cheese with the bright, tart flavor of fresh blueberries, creating a dessert that’s both elegant enough for special occasions and simple enough for weekend baking adventures. What sets this recipe apart is my three-layer approach: a buttery graham cracker crust, a smooth cream cheese filling studded with fresh berries, and a gorgeous blueberry compote topping that adds both visual appeal and an extra burst of fruit flavor.
Understanding Blueberry Cheesecake Fundamentals
Cheesecake Base: The foundation of any exceptional cheesecake begins with high-quality cream cheese that’s been brought to room temperature. Cold cream cheese creates lumps that are nearly impossible to eliminate, resulting in a grainy texture that compromises the entire dessert.
Blueberry Integration: Fresh blueberries release moisture during baking, which can create pockets of liquid within the cheesecake. My technique involves lightly coating the berries in flour before folding them into the batter, which helps absorb excess moisture and prevents the berries from sinking to the bottom.
Water Bath Method: Also known as a bain-marie, this technique involves placing the cheesecake pan inside a larger pan filled with hot water. The steam created provides gentle, even heat that prevents cracking and ensures a silky-smooth texture.
Gradual Cooling: Sudden temperature changes cause cheesecakes to crack. My method involves turning off the oven and allowing the cheesecake to cool gradually with the door slightly ajar before moving it to room temperature, then finally to the refrigerator.
Essential Ingredients and Their Roles
| Ingredient | Quantity | Purpose | Quality Tips |
|---|---|---|---|
| Cream Cheese | 32 oz (4 packages) | Primary base, provides richness and tang | Must be full-fat, room temperature |
| Fresh Blueberries | 2 cups | Flavor and texture contrast | Choose firm, plump berries without wrinkles |
| Granulated Sugar | 1 cup | Sweetness balance, texture | Regular white sugar works best |
| Large Eggs | 4 whole | Structure and binding | Room temperature, grade A |
| Sour Cream | 1 cup | Tangy flavor, smooth texture | Full-fat variety only |
| Vanilla Extract | 2 teaspoons | Flavor enhancement | Pure vanilla, not imitation |
| Graham Crackers | 1½ sleeves | Crust foundation | Honey graham crackers preferred |
| Unsalted Butter | 6 tablespoons | Crust binding | European-style for richer flavor |
| All-Purpose Flour | 3 tablespoons | Blueberry coating, structure | Unbleached preferred |
| Lemon Zest | 1 tablespoon | Brightness and complexity | Fresh lemons only |
Equipment You’ll Need
Springform Pan: A 9-inch springform pan is absolutely essential for this recipe. The removable bottom and expandable sides make unmolding effortless and help maintain the cheesecake’s shape. I always wrap the bottom and sides with heavy-duty aluminum foil to prevent water from seeping in during the water bath.
Stand Mixer or Hand Mixer: While you can make cheesecake by hand, an electric mixer ensures the cream cheese becomes perfectly smooth and incorporates air for a lighter texture. I prefer using the paddle attachment on my stand mixer at medium-low speed to avoid overbeating.
Food Processor: For creating uniform graham cracker crumbs, nothing beats a food processor. It pulverizes the crackers into fine, even pieces that compact beautifully into a crust.
Large Roasting Pan: This serves as the water bath vessel. It needs to be large enough to accommodate your springform pan with room to spare and deep enough to hold at least two inches of water.
Step-by-Step Instructions
Preparing the Graham Cracker Crust
I begin by preheating my oven to 350°F (175°C). Creating the perfect crust starts with crushing about 12 full graham crackers in my food processor until they form fine, uniform crumbs. The texture should resemble coarse sand with no large pieces remaining.
In a medium bowl, I combine the graham cracker crumbs with 6 tablespoons of melted unsalted butter and 2 tablespoons of granulated sugar. The mixture should hold together when squeezed but not be overly wet. I press this mixture firmly into the bottom of my prepared springform pan, using the bottom of a measuring cup to create an even layer that extends slightly up the sides.
The crust needs to bake for 10 minutes until it’s lightly golden and set. While it’s baking, I prepare the filling, allowing the crust to cool completely before adding the cream cheese mixture.
Creating the Perfect Filling
Room temperature ingredients are crucial for achieving the smooth, lump-free texture that defines exceptional cheesecake. I remove my cream cheese, eggs, and sour cream from the refrigerator at least two hours before beginning, sometimes placing them in a warm (not hot) water bath to speed the process.
In my stand mixer bowl, I beat the cream cheese on medium-low speed until it’s completely smooth and fluffy, about 3-4 minutes. Scraping down the sides frequently ensures no lumps remain hidden. Gradually, I add the sugar, beating until the mixture is light and well combined.
Next come the eggs, which I add one at a time, beating just until each is incorporated. Overbeating at this stage can incorporate too much air, leading to cracks during baking. I follow with the sour cream, vanilla extract, and freshly grated lemon zest, mixing until just combined.
Incorporating the Blueberries
Fresh blueberries can be tricky in cheesecake because they release moisture and can sink to the bottom. My solution involves tossing the berries with 2 tablespoons of flour before gently folding them into the batter. This coating helps absorb excess moisture and provides enough structure to keep the berries evenly distributed throughout the cheesecake.
I reserve about ½ cup of the prettiest berries for the top, gently pressing them into the surface of the batter in an attractive pattern. This creates beautiful pockets of color that make each slice visually stunning.
The Water Bath Technique
Wrapping my springform pan thoroughly with heavy-duty aluminum foil is essential to prevent water from seeping into the crust. I use at least two layers, ensuring the foil comes up the sides of the pan.
I place the wrapped pan in a large roasting pan and carefully pour hot water around it until the water reaches about halfway up the sides of the springform pan. This gentle, moist heat environment prevents the top from cracking and ensures even cooking throughout.
The cheesecake bakes at 325°F (163°C) for 55-65 minutes, until the edges are set but the center still has a slight jiggle when gently shaken. The surface should look matte rather than shiny, and a toothpick inserted near the center should come out with just a few moist crumbs.
Cooling and Setting Process
Proper cooling is where many home bakers go wrong, but it’s actually quite simple when you understand the science. Sudden temperature changes cause the proteins in the cheesecake to contract rapidly, creating cracks on the surface.
When the baking time is complete, I turn off the oven and crack the door open slightly, allowing the cheesecake to cool gradually for one hour. This prevents thermal shock while the internal temperature slowly decreases.
After the oven cooling period, I remove the cheesecake and let it cool completely at room temperature for another 2-3 hours. Only then do I cover it and refrigerate for at least 8 hours, though overnight is preferred. This extended chilling period allows the flavors to meld and the texture to achieve that perfect, sliceable consistency.
Creating the Blueberry Compote Topping
While the cheesecake chills, I prepare a gorgeous blueberry compote that serves as both decoration and flavor enhancement. In a medium saucepan, I combine 2 cups of fresh blueberries with ⅓ cup of sugar, 2 tablespoons of water, and 1 tablespoon of fresh lemon juice.
Over medium heat, I cook the mixture, stirring gently, until the berries begin to burst and release their juices, about 5-7 minutes. Some berries should remain whole for texture contrast. I dissolve 1 tablespoon of cornstarch in 2 tablespoons of cold water and stir this slurry into the bubbling berries.
The compote is ready when it coats the back of a spoon and has a glossy, jam-like consistency. I let it cool completely before spooning it over the chilled cheesecake just before serving.
Nutritional Information and Serving Details
| Nutritional Component | Per Slice (12 servings) | Daily Value % |
|---|---|---|
| Calories | 485 | 24% |
| Total Fat | 32g | 49% |
| Saturated Fat | 19g | 95% |
| Cholesterol | 145mg | 48% |
| Sodium | 385mg | 17% |
| Total Carbohydrates | 42g | 15% |
| Dietary Fiber | 2g | 7% |
| Sugars | 35g | – |
| Protein | 9g | 18% |
| Vitamin C | 15mg | 17% |
| Calcium | 125mg | 10% |
Troubleshooting Common Issues
Cracked Surface: Usually caused by overbaking, sudden temperature changes, or overmixing. The water bath method and gradual cooling process I’ve outlined virtually eliminates this problem.
Soggy Crust: Results from not pre-baking the crust long enough or water seeping through inadequate foil wrapping. Ensure your foil seal is watertight and the crust is golden before adding the filling.
Dense Texture: Typically happens when ingredients aren’t at room temperature or when the mixture is overbeaten after adding eggs. Patience with ingredient temperature and gentle mixing are key.
Sunken Center: Usually indicates underbaking. The center should still jiggle slightly when done, but if it’s very liquidy, it needs more time in the oven.
Storage and Make-Ahead Tips
This blueberry cheesecake actually improves with time, making it an excellent make-ahead dessert. I can prepare it up to three days in advance, storing it covered in the refrigerator. The flavors deepen and meld beautifully during this time.
For longer storage, the cheesecake freezes exceptionally well for up to three months. I wrap it tightly in plastic wrap, then aluminum foil, and freeze it whole or in individual slices. When ready to serve, I thaw it in the refrigerator overnight.
The blueberry compote should be added just before serving to maintain its fresh texture and prevent the cheesecake surface from becoming soggy.
Seasonal Variations and Adaptations
Summer Berry Medley: I often substitute mixed berries (strawberries, raspberries, blackberries) for a colorful variation that showcases seasonal fruit.
Lemon-Blueberry Version: Adding extra lemon zest and a tablespoon of fresh lemon juice to the filling creates a bright, citrusy twist that complements the blueberries beautifully.
Mini Individual Cheesecakes: Using a muffin tin lined with paper cups, I can create individual portions that bake in just 18-20 minutes and are perfect for parties.
Gluten-Free Option: Replacing graham crackers with gluten-free cookies or almond flour creates an equally delicious crust for those with dietary restrictions.
Serving Suggestions and Presentation
I prefer to serve my blueberry cheesecake slightly chilled but not ice-cold, which allows the flavors to be more pronounced. Using a sharp knife dipped in warm water and wiped clean between cuts ensures neat, professional-looking slices.
For elegant presentation, I garnish each slice with a few fresh blueberries, a sprig of mint, and a light dusting of powdered sugar. A small dollop of freshly whipped cream on the side adds richness without overwhelming the delicate cheesecake flavor.
The cheesecake pairs beautifully with hot coffee, particularly a medium roast that won’t compete with the dessert’s subtle flavors. For tea lovers, Earl Grey or a light chamomile creates lovely flavor harmony.
Questions and Answers
Q: Can I use frozen blueberries instead of fresh ones? While fresh blueberries provide the best texture and flavor, frozen berries can work in a pinch. I thaw them completely and pat them dry with paper towels to remove excess moisture. I also increase the flour coating to 3 tablespoons to compensate for the additional liquid. Keep in mind that frozen berries may break down more during baking, creating a more marbled appearance.
Q: Why does my cheesecake crack even when I follow the recipe exactly? Cracking typically results from rapid temperature changes or overbaking. Even with the water bath method, oven temperatures can vary significantly. I recommend using an oven thermometer to verify accuracy. Also, resist the urge to open the oven door during baking, as this causes temperature fluctuations that can lead to cracking.
Q: How do I know when the cheesecake is perfectly done? The edges should be set and slightly puffed, while the center should still have a gentle jiggle when the pan is lightly shaken. The surface should appear matte rather than shiny. An instant-read thermometer inserted in the center should read 150°F (65°C). Remember that the cheesecake continues cooking from residual heat during the cooling process.
Q: Can I make this cheesecake without a springform pan? While a springform pan makes removal much easier, you can use a regular 9-inch cake pan lined with parchment paper, leaving overhang for easy lifting. The presentation won’t be as neat, but the taste will be identical. Alternatively, you can make individual cheesecakes in ramekins or a muffin tin.
Q: What’s the best way to cut clean slices? Use a sharp, thin-bladed knife dipped in warm water and wiped clean between each cut. This prevents the creamy filling from sticking to the blade and creates clean, professional-looking slices. Some bakers prefer using unflavored dental floss, which cuts through the cheesecake without dragging.
Q: How long can I store leftover cheesecake? Properly stored in the refrigerator, the cheesecake maintains its quality for up to five days. I cover it tightly with plastic wrap or store it in an airtight container. For optimal flavor and texture, I recommend consuming it within three days of making it.
Q: Can I substitute the sour cream with something else? Greek yogurt makes an excellent substitute for sour cream, providing similar tang and creaminess. Use the same amount and ensure it’s full-fat for best results. Heavy cream or crème fraîche also work well, though they’ll create a slightly different flavor profile.
Q: Why is my crust soggy? A soggy crust usually results from inadequate pre-baking or moisture seeping in during the water bath. Ensure your crust is golden brown before adding the filling, and double-check that your foil wrapping is completely watertight. Sometimes adding a thin layer of melted chocolate to the baked crust before adding the filling creates an additional moisture barrier.
Q: Can I reduce the sugar in this recipe? While you can reduce the sugar slightly, remember that it serves multiple purposes beyond sweetness – it affects texture, moisture retention, and the overall structure of the cheesecake. I wouldn’t recommend reducing it by more than ¼ cup, as this could significantly impact the final result.
Q: What causes the filling to be grainy? Graininess typically results from cold cream cheese that hasn’t been properly beaten smooth. Always ensure your cream cheese is at room temperature and beat it thoroughly before adding other ingredients. If you end up with lumps, you can press the mixture through a fine-mesh sieve before baking, though this is time-consuming.
My easy blueberry cheesecake has become the dessert I’m most requested to bring to gatherings, and for good reason. The combination of creamy, tangy filling studded with sweet-tart blueberries creates a perfect balance that appeals to virtually every palate. The techniques I’ve shared eliminate the guesswork and common pitfalls that intimidate many home bakers.
What I love most about this recipe is its reliability – when you follow the steps carefully, you’ll achieve consistent, professional-quality results every time. The make-ahead nature makes it perfect for entertaining, while the elegant presentation ensures it’s always a showstopper on any dessert table.
Whether you’re celebrating a special occasion or simply treating yourself to something extraordinary, this blueberry cheesecake delivers the kind of satisfaction that comes from creating something truly beautiful and delicious from scratch. The process itself is meditative and rewarding, and the end result never fails to impress both the baker and those lucky enough to enjoy a slice.