Let me share something magical that happened in my kitchen last winter. I was craving the deep, chocolatey warmth of red velvet cake but wanted something I could grab with my hands – no forks, no plates, just pure indulgence. That’s when I stumbled upon the perfect marriage of two beloved desserts: the rich, velvety texture of red velvet paired with the chewy, fudgy satisfaction of a blondie. The result? These incredibly decadent Fudgy Red Velvet Cookies that taste like browned butter blondies had a passionate affair with classic red velvet cake.
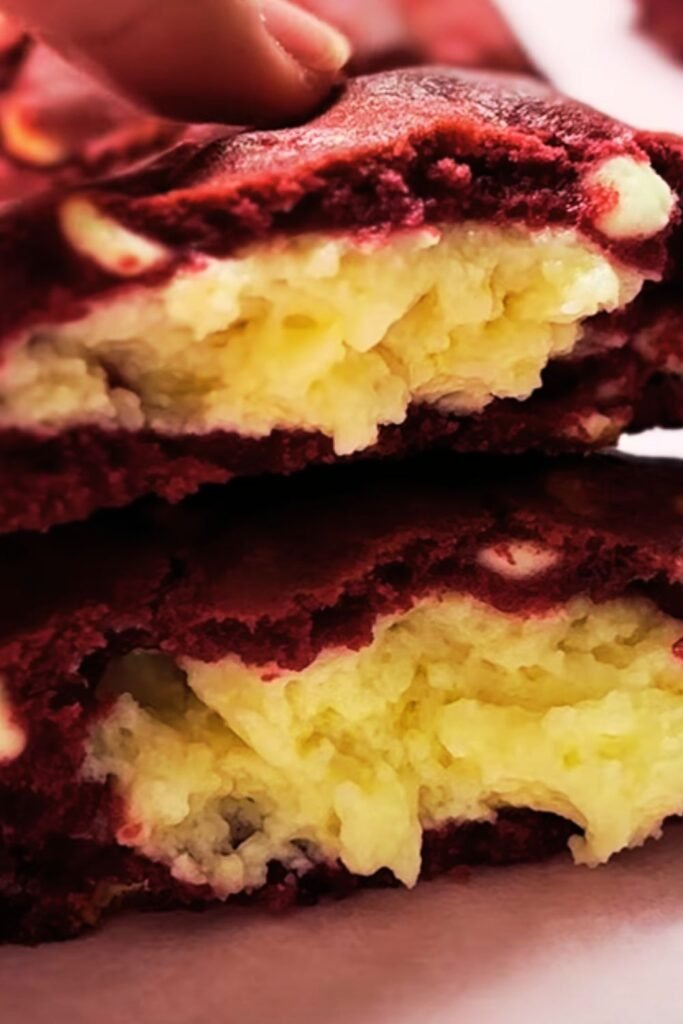
These aren’t your typical cookies. They’re thick, chewy, and impossibly fudgy with that signature red velvet tang that comes from the perfect balance of cocoa and buttermilk. The browned butter adds a nutty depth that elevates every bite, while the cream cheese ensures they stay soft and tender for days. I’ve made these for countless gatherings, and they disappear faster than I can replenish the plate.
Understanding the Magic Behind Red Velvet
Red Velvet: A classic American cake flavor characterized by its distinctive red color, subtle chocolate taste, and tangy flavor profile achieved through the reaction between cocoa powder and acidic ingredients like buttermilk and vinegar.
Browned Butter: Butter that’s been heated until the milk solids caramelize, creating a nutty, complex flavor with notes of hazelnut and vanilla that adds incredible depth to baked goods.
Blondie Texture: A dense, chewy bar cookie that’s similar to a brownie but without chocolate as the primary flavor, typically featuring a fudgy interior and slightly crisp edges.
The science behind these cookies fascinates me. When you brown butter, you’re creating hundreds of new flavor compounds through the Maillard reaction. The milk proteins and sugars caramelize, developing that distinctive nutty aroma that transforms ordinary cookies into something extraordinary. Combined with the acidity from buttermilk and the richness of cream cheese, you get a cookie that’s both familiar and surprising.
Essential Ingredients Breakdown
| Ingredient | Purpose | Substitution Options | Notes |
|---|---|---|---|
| Unsalted Butter | Flavor base, texture | Salted butter (reduce salt) | Must be browned for optimal flavor |
| Cream Cheese | Tanginess, moisture | Greek yogurt (reduce by half) | Room temperature essential |
| Light Brown Sugar | Moisture, chewiness | Dark brown sugar | Creates tender texture |
| Granulated Sugar | Structure, sweetness | Coconut sugar | Balances brown sugar |
| Eggs | Binding, richness | Flax eggs (vegan option) | Large eggs preferred |
| All-Purpose Flour | Structure | Gluten-free blend | Don’t overmix |
| Cocoa Powder | Chocolate flavor | Dutch-processed cocoa | Unsweetened only |
| Buttermilk | Tanginess, tenderness | Milk + vinegar | Creates classic red velvet flavor |
| Red Food Coloring | Signature color | Beet juice powder | Gel coloring works best |
| Vanilla Extract | Flavor enhancement | Vanilla paste | Pure extract preferred |
| White Chocolate Chips | Contrast, sweetness | Cream cheese chips | Optional but recommended |
The ingredient ratios here are crucial. I’ve tested this recipe dozens of times, adjusting the butter-to-flour ratio to achieve that perfect fudgy texture that’s not too cakey but not underbaked either. The cream cheese isn’t just for flavor – it’s what keeps these cookies incredibly soft even after they’ve cooled completely.
Step-by-Step Method
Preparing Your Kitchen
Before diving into the actual baking process, I always recommend getting everything ready. This recipe moves quickly once you start, especially with the browned butter component.
- Set your oven to 350°F (175°C) and position the rack in the center
- Line two large baking sheets with parchment paper
- Bring cream cheese and eggs to room temperature (about 30 minutes)
- Measure all dry ingredients into separate bowls
- Set up your cooling rack near the stove
The Browned Butter Process
This step is absolutely critical and where many people stumble. I’ve learned through experience that patience here pays dividends in flavor.
- Cut 1 cup of unsalted butter into small, even pieces – this ensures even melting
- Place butter in a light-colored saucepan – you need to see the color changes
- Cook over medium heat, stirring constantly – don’t walk away from this
- Watch for the foaming stage – the butter will bubble vigorously
- Listen for the crackling sound – this indicates water evaporation
- Look for golden brown color and nutty aroma – usually 5-7 minutes
- Remove from heat immediately – residual heat continues cooking
- Transfer to a bowl and cool for 10 minutes – too hot will scramble eggs

The transformation during browning is remarkable. You’ll notice the butter goes through distinct stages: first melting, then foaming as water evaporates, then the magical moment when the milk solids turn golden and release that incredible nutty fragrance. Don’t rush this process – the difference between perfectly browned butter and burnt butter is mere seconds.
Mixing the Dough
Once your browned butter has cooled slightly, the assembly becomes straightforward but order matters enormously.
- Whisk together the cooled browned butter with both sugars – this creates the base
- Beat in room temperature cream cheese until completely smooth – no lumps allowed
- Add eggs one at a time, beating well after each addition – ensures proper emulsification
- Mix in vanilla extract and red food coloring – start with less coloring, add more as needed
- In a separate bowl, whisk together flour, cocoa powder, baking powder, and salt
- Gradually add dry ingredients to wet ingredients – mix just until combined
- Stir in buttermilk until the dough comes together – don’t overmix
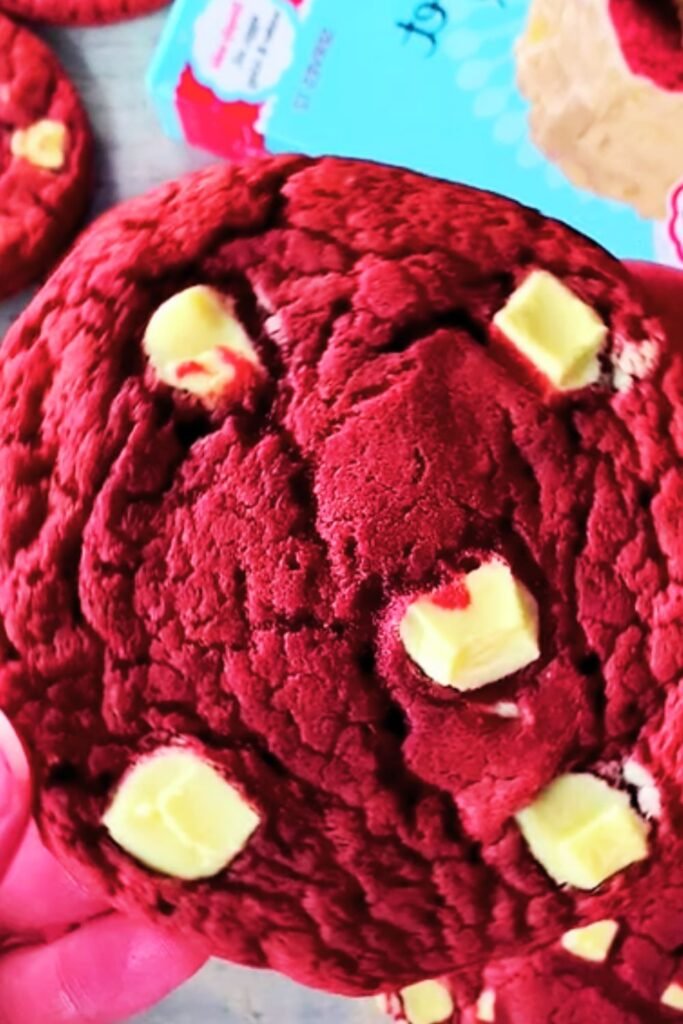
- Fold in white chocolate chips – if using
The dough should be thick but not stiff, with a beautiful deep red color. If it seems too soft, don’t panic – chilling for 30 minutes will firm it up perfectly.
Baking to Perfection
The baking process requires attention to detail, but the results are worth every minute of careful monitoring.
- Scoop dough into 2-tablespoon portions – I use a large cookie scoop for consistency
- Space cookies 2 inches apart – they spread during baking
- Bake for 11-13 minutes – centers should look slightly underbaked
- Don’t overbake – cookies continue cooking on the hot pan
- Cool on baking sheet for 5 minutes – prevents breaking
- Transfer to wire rack – complete cooling takes about 20 minutes
The cookies are done when the edges are set but the centers still look soft and slightly shiny. They’ll appear underbaked, but trust the process – they’ll firm up as they cool while maintaining that perfect fudgy texture.
Troubleshooting Common Issues
| Problem | Likely Cause | Solution |
|---|---|---|
| Cookies spread too much | Butter too warm, dough too soft | Chill dough 30 minutes before baking |
| Dry, crumbly texture | Overbaked, too much flour | Reduce baking time, measure flour carefully |
| Pale color | Insufficient food coloring | Add more gel coloring gradually |
| Bitter aftertaste | Burnt butter | Start over with butter – can’t fix burnt flavor |
| Cookies too cake-like | Overmixed, too much leavening | Mix just until combined |
| Uneven browning | Oven hot spots | Rotate pans halfway through baking |
Storage and Serving Suggestions
These cookies are incredibly versatile and actually improve in flavor over the first day as the ingredients meld together.
Storage Options:
- Room temperature in airtight container: 5-7 days
- Refrigerated in sealed container: 2 weeks
- Frozen in freezer bags: 3 months
- Freeze dough balls: 2 months (bake directly from frozen, add 1-2 minutes)
Serving Ideas:
- Warm with a glass of cold milk
- Crumbled over vanilla ice cream
- Sandwiched with cream cheese frosting
- Paired with hot coffee or tea
- Gift boxes for special occasions
- Potluck dessert contributions
The texture of these cookies is best at room temperature, where the fudgy interior really shines. If you’ve stored them in the refrigerator, let them sit out for 15-20 minutes before serving.
Nutritional Information and Variations
| Nutrient | Per Cookie (Makes 24) | Daily Value % |
|---|---|---|
| Calories | 185 | 9% |
| Total Fat | 8g | 12% |
| Saturated Fat | 5g | 25% |
| Cholesterol | 35mg | 12% |
| Sodium | 95mg | 4% |
| Total Carbs | 28g | 10% |
| Dietary Fiber | 1g | 4% |
| Sugars | 20g | – |
| Protein | 3g | 6% |
Variation Ideas:
- Gluten-Free Version: Substitute cup-for-cup gluten-free flour blend
- Vegan Adaptation: Use vegan butter, cream cheese, and flax eggs
- Chocolate Chip Addition: Fold in dark chocolate chips with white chocolate
- Cream Cheese Frosting: Top cooled cookies with piped frosting
- Mini Version: Make bite-sized cookies for parties
- Bar Cookie Style: Press dough into 9×13 pan, bake 25-30 minutes
The Science of Perfect Texture
Understanding why these cookies work so well helps you replicate success every time. The combination of browned butter and cream cheese creates a unique fat profile that contributes to both flavor and texture. The browned butter adds those complex nutty notes while the cream cheese provides tanginess and keeps the cookies tender.
The ratio of brown sugar to granulated sugar is carefully calculated too. Brown sugar contains molasses, which adds moisture and creates that chewy texture we’re after. The granulated sugar helps with structure and provides the slight crispness around the edges.
Temperature control throughout the process is crucial. The browned butter needs to cool enough not to cook the eggs when mixed, but shouldn’t be so cool that it solidifies. Room temperature cream cheese blends smoothly without lumps, creating that uniform texture that makes these cookies so appealing.
Frequently Asked Questions
Q: Can I make these cookies without browning the butter? Regular melted butter will work, but you’ll miss out on the incredible nutty flavor that makes these cookies special. The browning process only takes about 5-7 minutes and transforms the entire cookie experience.
Q: Why do my cookies turn out more pink than red? The amount of red food coloring needed varies by brand. Gel food coloring tends to be more concentrated and effective than liquid. Start with less and gradually add more until you achieve your desired color intensity.
Q: Can I substitute the buttermilk with regular milk? You can make a buttermilk substitute by adding 1 tablespoon of white vinegar or lemon juice to 1 cup of regular milk. Let it sit for 5 minutes before using. However, real buttermilk provides better flavor and texture.
Q: How do I know when the butter is properly browned? Look for three signs: golden brown color, nutty aroma, and small brown bits at the bottom of the pan. The process usually takes 5-7 minutes over medium heat. The butter will foam initially, then the foam will subside as it browns.
Q: My cookies came out too cake-like. What went wrong? This usually happens from overmixing the dough after adding the flour. Mix just until the ingredients are combined. Overmixing develops the gluten in the flour, creating a more cake-like texture.
Q: Can I double this recipe? Absolutely! This recipe doubles beautifully. Just make sure you have enough baking sheets and oven space. You might need to bake in batches, which actually works well since the dough holds up perfectly while waiting.
Q: What’s the best way to measure flour for this recipe? I recommend the spoon-and-level method: spoon flour into your measuring cup, then level with a straight edge. Too much flour will make the cookies dry and crumbly.
Q: How long should I cool the browned butter before adding other ingredients? About 10 minutes is perfect. You want it cool enough that it won’t scramble the eggs, but still warm enough to cream well with the sugars.
Q: Can I freeze the baked cookies? Yes! These cookies freeze beautifully for up to 3 months. Layer them between parchment paper in an airtight container. Thaw at room temperature for best texture.
Q: Why do you recommend gel food coloring over liquid? Gel food coloring is more concentrated, so you need less to achieve vibrant color. Liquid food coloring can add too much moisture to the dough and may not provide the deep red color you’re looking for.
These Fudgy Red Velvet Cookies with their browned butter blondie character have become my go-to treat for everything from casual family dinners to special celebrations. The combination of familiar red velvet flavors with the sophisticated nuttiness of browned butter creates something truly special. Each bite delivers that perfect balance of fudgy texture, tangy flavor, and rich butteriness that keeps people coming back for more.
The beauty of this recipe lies not just in its incredible taste, but in its reliability. Once you master the browned butter technique, these cookies come together easily and consistently. They’re forgiving enough for beginner bakers but sophisticated enough to impress experienced dessert lovers. Whether you’re baking for a crowd or just treating yourself, these cookies deliver that perfect combination of comfort and indulgence that makes every occasion a little more special.