When I first discovered the magic of no-bake cheesecakes, my life changed forever. Gone were the days of wrestling with water baths, worrying about cracks, and dealing with temperamental ovens. The no-bake chocolate raspberry cheesecake has become my go-to dessert for every occasion, from casual family dinners to elegant dinner parties.
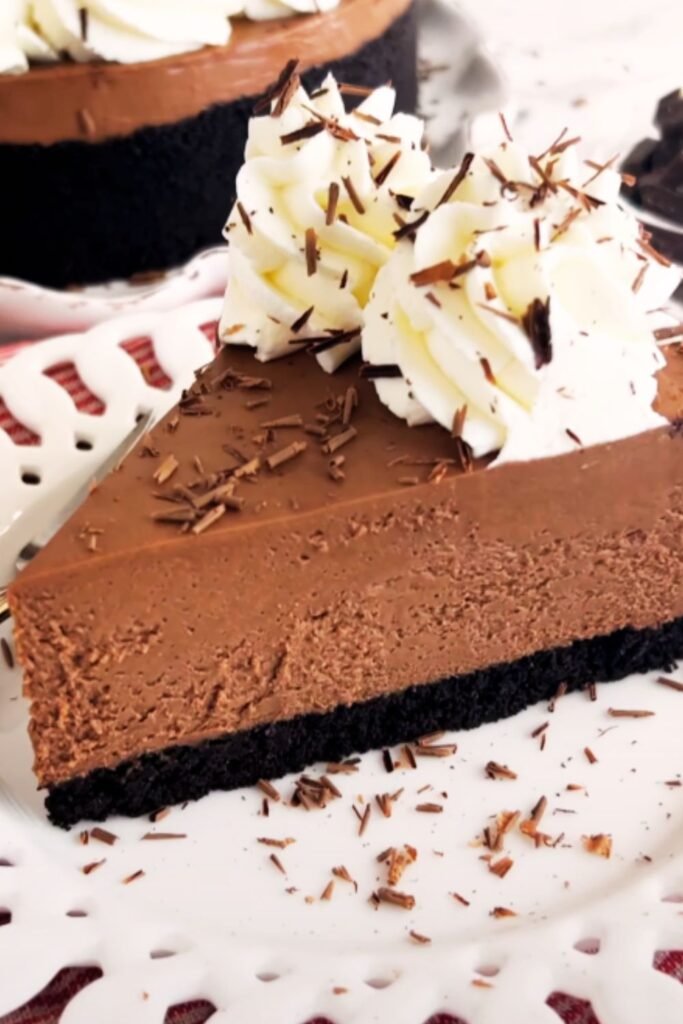
This dessert combines the rich, velvety smoothness of chocolate cheesecake with the bright, tangy burst of fresh raspberries. The beauty lies not just in its stunning appearance but in its remarkable simplicity. I’ve served this to countless guests who assume I spent hours in the kitchen, when in reality, most of the work happens in the refrigerator while I relax.
What makes this recipe particularly special is its foolproof nature. Unlike traditional baked cheesecakes that can crack, sink, or overcook, this no-bake version delivers consistent results every single time. The chocolate layer provides a decadent foundation, while the raspberry swirls create beautiful marbled patterns that never fail to impress.
Understanding No-Bake Cheesecakes
Gelatin: A protein derived from collagen that acts as the primary setting agent in no-bake cheesecakes, replacing the eggs and heat used in traditional versions.
Stabilization: The process by which cream cheese, gelatin, and whipped cream work together to create a firm yet creamy texture without baking.
Bloom: The technique of dissolving gelatin in cold liquid first, then heating it to activate its setting properties.
Temper: The method of gradually combining warm gelatin mixture with cold ingredients to prevent lumps and ensure smooth incorporation.
The science behind no-bake cheesecakes fascinated me when I first started experimenting with them. Unlike baked versions that rely on eggs and heat to set, no-bake cheesecakes depend on gelatin and refrigeration. This fundamental difference creates a lighter, more mousse-like texture that many people actually prefer to traditional cheesecake.
Essential Ingredients Breakdown
For the Chocolate Crust
| Ingredient | Quantity | Purpose | Substitutions |
|---|---|---|---|
| Chocolate sandwich cookies | 24 cookies (240g) | Base structure and chocolate flavor | Graham crackers + 2 tbsp cocoa powder |
| Unsalted butter | 6 tablespoons (85g) | Binding agent | Coconut oil (melted) |
| Granulated sugar | 2 tablespoons | Additional sweetness | Brown sugar, honey |
| Salt | 1/4 teaspoon | Flavor enhancement | Sea salt, kosher salt |
For the Chocolate Cheesecake Layer
| Ingredient | Quantity | Purpose | Substitutions |
|---|---|---|---|
| Cream cheese | 24 oz (680g), room temperature | Primary base | Neufchatel cheese |
| Dark chocolate | 8 oz (225g), melted | Chocolate flavor and color | Semi-sweet chocolate |
| Powdered sugar | 1 cup (120g) | Sweetness and smooth texture | Regular sugar (processed) |
| Heavy cream | 1 1/2 cups (360ml) | Lightness and volume | Whipping cream |
| Unflavored gelatin | 2 packets (14g) | Setting agent | Agar powder (1 1/2 tsp) |
| Vanilla extract | 2 teaspoons | Flavor enhancement | Vanilla paste |
| Cold water | 1/2 cup (120ml) | Gelatin activation | None |
For the Raspberry Swirl
| Ingredient | Quantity | Purpose | Substitutions |
|---|---|---|---|
| Fresh raspberries | 2 cups (250g) | Primary flavor and color | Frozen raspberries (thawed) |
| Granulated sugar | 1/2 cup (100g) | Sweetness balance | Maple syrup, honey |
| Lemon juice | 2 tablespoons | Acidity and preservation | Lime juice |
| Cornstarch | 1 tablespoon | Thickening agent | Arrowroot powder |
| Water | 2 tablespoons | Cornstarch slurry | None |
I’ve learned through countless trials that ingredient quality makes an enormous difference in the final product. I always use full-fat cream cheese at room temperature – this ensures smooth mixing without lumps. The chocolate should be high quality, as its flavor will shine through prominently in the finished dessert.
Step-by-Step Preparation Process
Preparing the Chocolate Crust
I start every no-bake cheesecake with the crust because it needs time to firm up. The process begins with crushing the chocolate sandwich cookies into fine crumbs. I prefer using a food processor for this task, as it creates more uniform crumbs than crushing by hand.
• Remove and discard the cream filling from 24 chocolate sandwich cookies • Process the cookies in a food processor until they form fine, even crumbs • Add melted butter, sugar, and salt to the crumbs • Pulse until the mixture resembles wet sand and holds together when squeezed • Press firmly into the bottom of a 9-inch springform pan • Use the bottom of a measuring cup to create an even, compact layer • Refrigerate for at least 30 minutes while preparing the filling
The key to a perfect crust lies in achieving the right moisture level. The mixture should hold together when pressed but not be soggy. I always press it firmly and evenly, paying special attention to the edges where the crust meets the pan sides.
Creating the Raspberry Swirl
Making the raspberry swirl ahead of time allows it to cool completely, which is crucial for creating those beautiful marbled patterns without melting the cheesecake layer.
• Combine fresh raspberries, sugar, and lemon juice in a medium saucepan • Cook over medium heat for 5-7 minutes, stirring frequently, until raspberries break down • Mix cornstarch and water in a small bowl to create a slurry • Add the cornstarch slurry to the raspberry mixture • Continue cooking for 2-3 minutes until thickened • Strain through a fine-mesh sieve to remove seeds (optional, but I prefer it) • Cool completely to room temperature, then refrigerate
The raspberry mixture will continue to thicken as it cools. I often make this component a day ahead, which actually improves the flavor as the ingredients meld together.
Preparing the Chocolate Cheesecake Base
This is where the magic happens, and timing becomes crucial. I always ensure my cream cheese is perfectly softened – it should give slightly when pressed but not be melty or warm.
• Sprinkle gelatin over cold water in a small bowl and let bloom for 5 minutes • Heat the bloomed gelatin in the microwave for 30-45 seconds until dissolved, stirring until smooth • Let cool for 2-3 minutes (but don’t let it set) • Beat cream cheese in a large bowl with an electric mixer until completely smooth and fluffy • Gradually add powdered sugar, beating until well combined • Mix in melted chocolate, vanilla extract, and the cooled gelatin mixture • Beat until everything is thoroughly incorporated and smooth
The gelatin step requires attention and patience. If the gelatin is too hot when added to the cream cheese, it can cause the mixture to curdle. If it’s too cool, it might start setting before it’s fully incorporated, creating lumps.
Incorporating the Whipped Cream
Whipped cream provides the light, airy texture that makes no-bake cheesecakes so appealing. I always whip it separately to ensure maximum volume and proper incorporation.
• Whip heavy cream in a clean bowl with clean beaters until soft peaks form • Don’t overwhip – the cream should be fluffy but not stiff • Gently fold one-third of the whipped cream into the chocolate mixture to lighten it • Fold in the remaining whipped cream in two additions, being careful not to deflate • The mixture should be smooth, light, and evenly colored
The folding technique makes all the difference here. I use a large rubber spatula and fold from the bottom up, turning the bowl as I work. This preserves the airiness that makes the cheesecake light and creamy.
Assembly and Setting Process
Layer Construction
Assembly requires a gentle touch and strategic planning. I work quickly but carefully during this phase, as the gelatin-stabilized mixture will begin to set once it reaches the proper temperature.
• Pour half of the chocolate cheesecake mixture over the prepared crust • Spread evenly with an offset spatula • Dot spoonfuls of the raspberry swirl across the surface • Pour the remaining cheesecake mixture over the raspberry layer • Add more raspberry swirl on top • Use a knife or skewer to create swirl patterns, dragging through both layers • Tap the pan gently on the counter to settle the mixture and remove air bubbles • Cover with plastic wrap, ensuring it doesn’t touch the surface • Refrigerate for at least 6 hours, preferably overnight
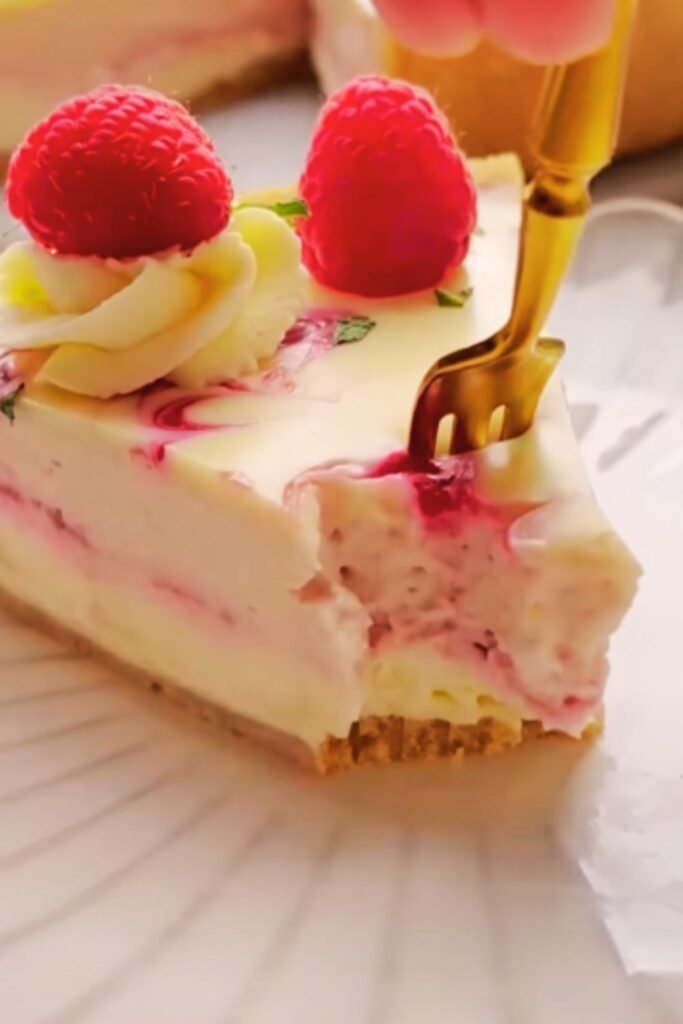
The swirling technique creates the signature marbled appearance that makes this dessert so visually stunning. I draw the knife in both circular and linear motions, creating an organic, artistic pattern that’s different every time.
Setting and Storage Requirements
| Time Period | Temperature | Purpose | Notes |
|---|---|---|---|
| First 2 hours | 35-38°F (2-3°C) | Initial firming | Don’t disturb or move |
| 2-6 hours | 35-38°F (2-3°C) | Partial setting | Can check progress gently |
| 6+ hours | 35-38°F (2-3°C) | Complete setting | Ready to serve |
| Storage (up to 5 days) | 35-38°F (2-3°C) | Maintained freshness | Cover tightly |
Patience during the setting phase rewards you with perfect texture. I’ve learned that rushing this process always leads to disappointing results. The cheesecake needs those hours to fully firm up and develop its characteristic creamy-yet-stable consistency.
Serving and Presentation Tips
Proper Slicing Technique
Achieving clean, professional-looking slices requires the right tools and technique. I always keep a tall glass of warm water nearby for cleaning the knife between cuts.
• Remove the cheesecake from the refrigerator 10 minutes before serving • Run a thin knife around the edges to loosen from the pan • Release the springform pan sides carefully • Use a sharp, thin-bladed knife warmed in hot water • Clean the blade between each cut for pristine slices • Wipe the knife completely dry before each cut
The slightly softened exterior makes slicing easier while maintaining the firm interior structure. I find that a heated knife glides through the layers without dragging or creating ragged edges.
Garnish and Decoration Ideas
Presentation elevates this dessert from homemade to restaurant-quality. I vary my garnishes based on the occasion and season.
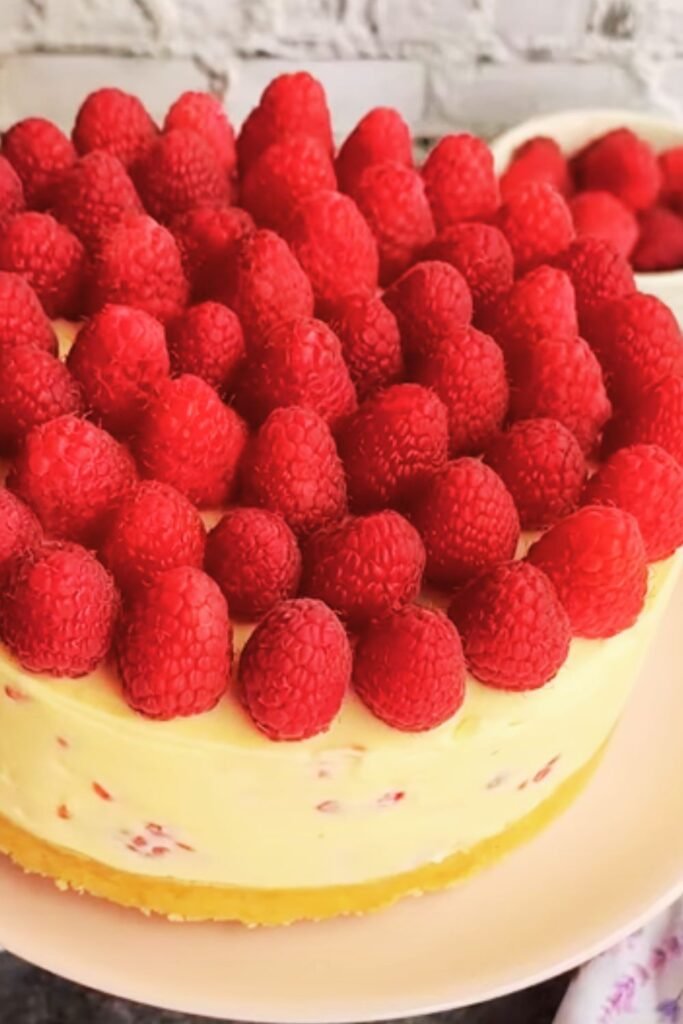
• Fresh raspberries arranged in patterns or clusters • Chocolate shavings or curls made with a vegetable peeler • Mint leaves for color contrast and fresh aroma • Powdered sugar dusted lightly over the surface • Raspberry coulis drizzled artistically around the plate • White chocolate drizzle for elegant contrast • Toasted coconut flakes for texture variation
Each serving becomes a small work of art with thoughtful garnishing. I particularly love the contrast between the deep chocolate color and bright red raspberries – it’s visually striking and hints at the flavor combination within.
Troubleshooting Common Issues
Texture Problems and Solutions
| Issue | Cause | Prevention | Fix |
|---|---|---|---|
| Lumpy texture | Cold cream cheese, hot gelatin | Room temperature ingredients | Strain mixture, re-whip |
| Too soft/won’t set | Insufficient gelatin, warm fridge | Proper measurements, cold fridge | Add dissolved gelatin |
| Too firm/rubbery | Too much gelatin | Accurate measuring | Serve at room temp longer |
| Grainy texture | Overwhipped cream | Soft peaks only | Fold in fresh whipped cream |
| Separated layers | Temperature differences | Room temp assembly | Gently re-fold together |
Through years of making this recipe, I’ve encountered most of these issues and learned how to prevent them. The most common problem I see with first-time makers is using cold cream cheese, which creates lumps that are nearly impossible to eliminate once they form.
Flavor Adjustments
The beauty of this recipe lies in its adaptability. I frequently modify the flavors based on preferences and seasonal availability.
• For more intense chocolate flavor: Add 1 tablespoon of cocoa powder • For sweeter results: Increase powdered sugar by 1/4 cup • For tangier profile: Add 1 tablespoon of lemon juice to the base • For adult version: Add 2 tablespoons of chocolate liqueur • For coffee notes: Dissolve 1 teaspoon instant espresso in the warm gelatin
I keep detailed notes about modifications so I can replicate successful variations. Some of my most beloved versions came from happy accidents or spontaneous adjustments.
Nutritional Information and Dietary Modifications
Standard Recipe Nutritional Breakdown
| Component | Per Slice (12 servings) | Daily Value % |
|---|---|---|
| Calories | 485 | 24% |
| Total Fat | 32g | 41% |
| Saturated Fat | 19g | 95% |
| Cholesterol | 95mg | 32% |
| Sodium | 285mg | 12% |
| Carbohydrates | 45g | 15% |
| Fiber | 3g | 11% |
| Sugars | 38g | – |
| Protein | 8g | 16% |
Dietary Adaptation Options
Gluten-Free Modification: Replace chocolate sandwich cookies with gluten-free chocolate cookies or create a crust using almond flour, cocoa powder, and coconut oil.
Reduced Sugar Version: Substitute half the sugar with stevia or erythritol, adjusting to taste. The raspberry layer adapts particularly well to sugar alternatives.
Dairy-Free Alternative: Use vegan cream cheese and coconut cream in place of dairy products. The texture will be slightly different but equally delicious.
Lower Fat Option: Substitute part of the cream cheese with Greek yogurt and use light whipped topping instead of heavy cream.
I’ve successfully made all these variations for friends and family with dietary restrictions. While the texture and flavor may vary slightly, each version maintains the essence of this beloved dessert.
Storage and Make-Ahead Guidelines
Optimal Storage Conditions
This cheesecake actually improves with time, making it perfect for entertaining and meal prep. The flavors meld and develop complexity over the first 24 hours.
• Store covered in the refrigerator for up to 5 days • Wrap individual slices in plastic wrap for grab-and-go portions • Freeze whole cheesecake for up to 3 months (wrap tightly) • Thaw frozen cheesecake overnight in refrigerator • Bring to room temperature 15 minutes before serving for best texture
Make-Ahead Timeline
| Task | When to Complete | Storage Method |
|---|---|---|
| Raspberry swirl | Up to 3 days ahead | Covered in refrigerator |
| Crust preparation | 1 day ahead | Covered at room temperature |
| Complete assembly | 1-2 days ahead | Covered in refrigerator |
| Garnish preparation | Day of serving | Separate containers |
Planning ahead reduces stress and often improves the final result. I typically make this cheesecake the day before I need it, allowing ample time for setting and flavor development.
Serving Suggestions and Pairings
Beverage Combinations
The rich chocolate and tart raspberry flavors pair beautifully with various beverages that complement rather than compete with the dessert.
• Freshly brewed coffee or espresso cuts through the richness • Black tea or Earl Grey provides subtle flavor enhancement • Sparkling water with lemon cleanses the palate between bites • Cold milk offers a classic, comforting combination • Hot chocolate creates an indulgent chocolate lover’s experience • Fresh fruit juices like apple or grape provide natural sweetness balance
Occasion-Specific Presentations
Romantic Dinner: Serve individual portions with candlelight, garnished with chocolate-covered strawberries and a dusting of edible gold powder.
Family Gathering: Present the whole cheesecake as a centerpiece with casual garnishes and let everyone serve themselves.
Holiday Entertaining: Adapt colors to match the season – use white chocolate for winter holidays or add orange zest for autumn celebrations.
Casual Dinner Party: Pre-slice and plate with artistic raspberry coulis drizzles and mint sprigs for an elegant but approachable presentation.
Each presentation style creates a different atmosphere while showcasing the same delicious dessert. I choose my approach based on the formality of the occasion and the preferences of my guests.
Seasonal Variations and Creative Adaptations
Fruit Substitutions
While raspberries are my favorite, this recipe framework accommodates numerous fruit variations that I’ve explored throughout the years.
• Strawberry swirl using fresh or frozen strawberries • Mixed berry combination with blueberries, blackberries, and raspberries • Cherry version using sweet or tart cherries • Mango swirl for tropical flavor profiles • Peach adaptation using ripe, sweet peaches
Each fruit brings its unique character to the dessert while maintaining the fundamental chocolate base that makes this recipe so versatile.
Seasonal Ingredient Integration
Spring: Fresh strawberries and rhubarb combination with a graham cracker crust Summer: Mixed berries with a hint of lemon zest and basil Fall: Pumpkin spice swirl with gingersnap crust Winter: Peppermint extract and crushed candy canes for holiday appeal
These seasonal adaptations keep the recipe exciting throughout the year and allow me to take advantage of the best ingredients each season offers.
Professional Tips and Advanced Techniques
Temperature Control Mastery
Understanding temperature control elevates this recipe from good to extraordinary. I’ve learned that every ingredient has an optimal temperature for incorporation.
• Cream cheese should be 65-68°F (18-20°C) for smooth mixing • Melted chocolate should cool to 85-90°F (29-32°C) before adding • Gelatin mixture should be 100-110°F (38-43°C) when dissolved, then cooled to 85°F (29°C) • Whipped cream should be incorporated at 35-40°F (2-4°C) • Assembly should happen when all components are within 10°F of each other
This temperature awareness prevents the common issues that plague many home bakers and ensures consistent results every time.
Equipment Recommendations
| Tool | Purpose | Quality Impact | Alternatives |
|---|---|---|---|
| Stand mixer | Smooth cream cheese base | High | Hand mixer (longer mixing) |
| Food processor | Even crust crumbs | Medium | Rolling pin and bag |
| Springform pan | Easy removal | High | Regular cake pan (harder removal) |
| Fine-mesh sieve | Smooth raspberry swirl | Medium | Fork mashing |
| Offset spatula | Even spreading | Medium | Regular spatula |
| Sharp thin knife | Clean slicing | High | Regular knife (messier cuts) |
Quality equipment makes the process more enjoyable and produces better results. However, I’ve made excellent versions of this cheesecake with basic tools when necessary.
Questions and Answers
Q: Can I make this cheesecake without gelatin? Yes, but the texture will be much softer and more mousse-like. The cheesecake may not hold its shape as well when sliced, but it will still taste delicious. Some bakers use agar as a vegetarian alternative to gelatin.
Q: Why did my cheesecake turn out lumpy? Lumps typically result from cold cream cheese or adding hot gelatin directly to the mixture. Always ensure your cream cheese is at room temperature and let the dissolved gelatin cool before incorporating it slowly into the base.
Q: How long does this cheesecake need to set? For best results, allow at least 6 hours, but overnight (8-12 hours) produces the ideal texture. The cheesecake will continue to firm up during the first 24 hours.
Q: Can I freeze individual slices? Absolutely! Wrap each slice tightly in plastic wrap, then place in freezer bags. They’ll keep for up to 3 months and thaw beautifully in the refrigerator overnight.
Q: What’s the best way to prevent cracks in the crust? Since this is a no-bake recipe, cracks usually occur from pressing too hard or using too little butter. The mixture should hold together when pressed but not be dry or crumbly.
Q: Can I substitute the raspberry swirl with store-bought jam? While possible, I don’t recommend it. Store-bought jams are typically too thick and sweet, and they lack the fresh, bright flavor that makes this dessert special. If you must use jam, thin it with a little lemon juice and water.
Q: Why is my cheesecake too soft even after overnight chilling? This usually indicates either insufficient gelatin, a warm refrigerator, or ingredients that were too warm during assembly. Check that your refrigerator is below 40°F and ensure you used the full amount of gelatin called for in the recipe.
Q: Can I make this recipe in individual portions? Yes! Use 6-8 individual ramekins or glasses. Reduce the setting time to 3-4 hours since the smaller portions will firm up more quickly.
Q: What should I do if my raspberry swirl is too thick? Thin it with a small amount of water or lemon juice, one teaspoon at a time, until it reaches a consistency that swirls easily through the cheesecake mixture.
Q: Is it normal for the cheesecake to have a slightly different texture than baked versions? Yes, no-bake cheesecakes have a lighter, more mousse-like texture compared to the denser, more custard-like texture of baked cheesecakes. This is completely normal and many people prefer it.
This no-bake chocolate raspberry cheesecake has become more than just a recipe in my kitchen – it’s become a reliable friend that never lets me down. Whether I’m celebrating a special occasion or simply craving something indulgent, this dessert delivers elegance and satisfaction in equal measure. The combination of rich chocolate and bright raspberries creates a harmony that pleases every palate, while the foolproof no-bake method ensures success for bakers of all skill levels.
The versatility of this recipe means it can adapt to your preferences, dietary needs, and seasonal ingredient availability. I encourage you to start with this base recipe and then experiment with your own variations as you become comfortable with the technique. Each time you make it, you’ll discover new nuances and perhaps create your own signature version that becomes a treasured family recipe.